
premo! Textured Tapestry Mirrored Compact
premo! Textured Tapestry Mirrored Compact
Read More
Your friends will be dying to borrow this stylish compact!
Read Less
ADDITIONAL SUPPLIES
Micro pearl powder
Paint brush
2 1/4" circle cutter
Three glass crystals
2 3/4" metal compact mirror
E6000 silicone glue|Micro pearl powder
Paint brush
2 1/4" circle cutter
Three glass crystals
2 3/4" metal compact mirror
E6000 silicone glue
Project Instructions
Do not use unbaked clay on unprotected furniture or finished surfaces. Start with clean hands and work surface area. Good work surfaces include wax paper, metal baking sheet, or disposable foil. Knead clay until soft and smooth. For best results, clean your hands in between colors. Shape clay, pressing pieces together firmly. Bake on oven-proof glass or metal surface at 275 °F (130 °C) for 30 minutes per 1/4” (6 mm) thickness. For best baking results, use an oven thermometer. DO NOT USE MICROWAVE OVEN. DO NOT EXCEED THE ABOVE TEMPERATURE OR RECOMMENDED BAKING TIME. Wash hands after use. Baking should be completed by an adult. Begin by preheating oven to 275 °F (130 °C). Test temperature with oven thermometer for perfectly cured clay. For best results, condition all clay by running it through the clay dedicated clay conditioning machine several passes on the widest setting. Fold the clay in half after each pass and insert the fold side into the rollers first.

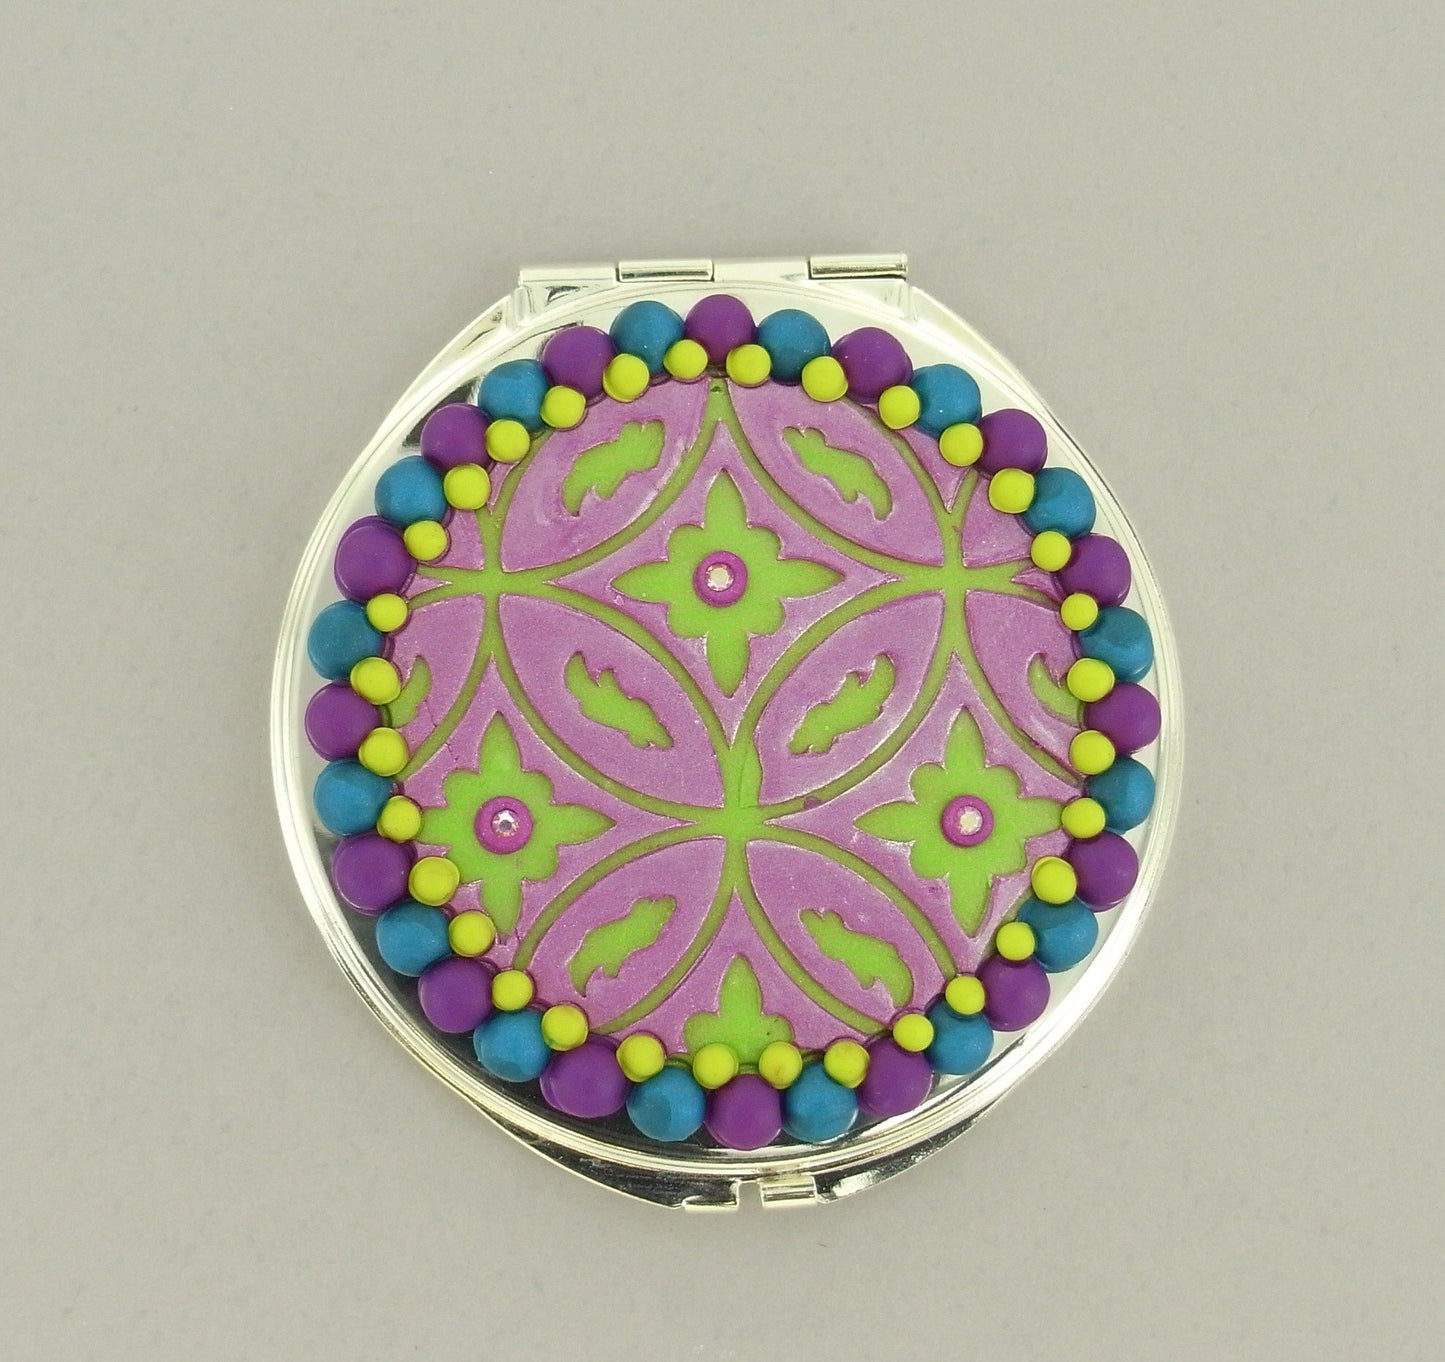
- I used the mica powder as a release. Very lightly spread tiny amounts of the mica powder into the crevices of the texture sheet with a paint brush. Remove as much excess powder as you can from the texture sheet with the paint brush. - With the Copper Ceiling texture laying texture side up, press small amounts of Purple Pearl into all the cavities.- Gently remove all of the extra clay away from the texture sheet with the flexible blade leaving clay only in the crevices. This will be easiest if you bend the blade slightly and work in small areas. Make sure you fill an area large enough to accommodate your design.

- Press Bright Green Pearl through the clay conditioning machine on the 3rd thickest setting. Lay the texture sheet texture side down on the sheet of green clay. Press the texture sheet onto the green clay sheet and roll over it with the roller. - Starting at one corner of the texture sheet, very gently peel the texture sheet back curling it back on itself so that the clay in the crevices stays on the sheeted clay.

Cut a 2-1/4" circle from the textured clay.

- Decorate the outside edge with pearls made by the Etch n Pearl tools and the Purple clay. - Start by placing a large Purple pearl at the N, S, E, and W positions around the circle. Make sure your pearls sit on the edge of the circle and make good contact with it. Next, place three more large Purple pearls evenly spaced between each of the first four pearls. There will be 16 Purple pearls total. - Put a large Turquoise pearl between every one of the Purple pearls. There will be 16 Turquoise pearls total. - Put a small Wasabi pearl between each Purple and Turquoise pearl. There will be 32 small Wasabi pearls.

Place a small Purple Pearl pearl in the center of each of the diamond shaped designs in the background. Press a small crystal into the center of each of these pearls.
Bake on a flat surface according to the directions above. Remove from the oven and place the hot clay piece immediately on a flat work surface to cool. Glue to the front of your compact mirror using E6000 silicone glue when completely cool.