
premo Sculpey Santa Glass Ornament
premo Sculpey Santa Glass Ornament
Read More
Turn a basic glass ornament into an adorable keepsake!
By: Helen Dorn
Read Less
ADDITIONAL SUPPLIES
3" Clear Glass Ornament Acrylic Paint- White
Black Permanent Marker
Project Instructions
Your workspace:Please make sure your work area is covered and you are not working on an unprotected surface. We recommend working on the Sculpey® Work ‘n Bake Clay Mat, wax paper, metal baking sheet, or disposable foil. Uncured clay may damage unprotected furniture or finished surfaces. Be sure to cover your crafting area appropriately. Getting Started:Start with clean hands, unwrap and knead clay until soft and smooth, or condition by running clay though a Pasta Machine. We recommend using a designated machine for clay purposes only. When working with multiple colors, clean hands with soap and water or baby wipe before switching colors.Shape clay, pressing pieces firmly together. Wash hands after use. Baking:Begin by preheating oven to 275 °F (130 °C). After you are done creating; for best results bake clay on an oven-proof surface such metal, aluminum foil, an index card or the Sculpey® Clay Mat at 275°F (130 °C) for 30 minutes per ¼" (6 mm) thickness according to package directions. Oven safe glass or ceramic surfaces are also acceptable for baking; however please note that the baking times may take longer as the glass or ceramic surfaces take longer to heat up. For best baking results, use an oven thermometer. DO NOT USE MICROWAVE OVEN. DO NOT EXCEED THE ABOVE TEMPERATURE OR RECOMMENDED BAKING TIME
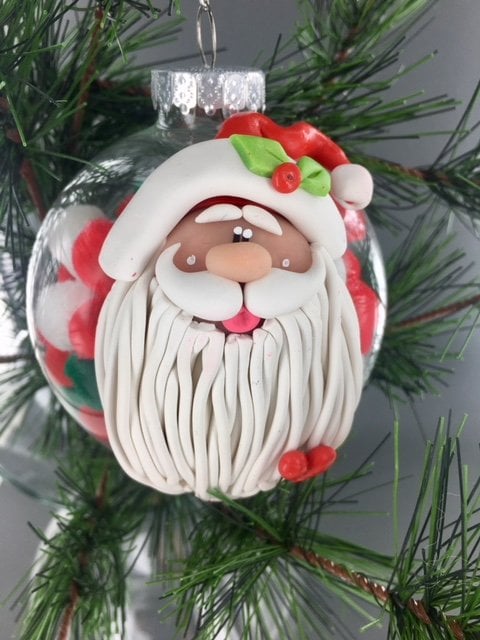
Begin by placing glass ball on a base of raw clay to hold it stable while you work.
Face: Shape a .75” ball of Super Sculpey into a flat round disc and add Bake & Bond to the back and center it towards the upper portion of the ball.

Mouth: Roll a tiny ball of pink – indent with the end of a paint brush and set in place.

Beard: Press out enough white strands from the clay extruder (if you do not have one you can use a garlic press) and attach them to the bottom portion of the face/disc – use Bake and Bond behind these and press to secure.

Mustache: Make two 3/16” balls – shape into teardrops and bend the ends up a slight amount – place above mouth.
Nose: Make a 1/4” of Super Sculpey and shape into a ball/oblong as desired and place above mustache.
Make two eyebrows by forming two tiny comma shapes of white clay – 3/32” balls and set in place.
Nose: Make a 1/4” of Super Sculpey and shape into a ball/oblong as desired and place above mustache.
Make two eyebrows by forming two tiny comma shapes of white clay – 3/32” balls and set in place.


Santa Cap: Shape a .75” Red Hot Red ball of clay into a long triangle – use your creativity and make it as long and as twisty as desired (use Bake & Bond).
Next flatten a .5” white ball and place it over the tip of the hat to make the hat end (pom pom).
Next flatten a .5” white ball and place it over the tip of the hat to make the hat end (pom pom).


Add two leaves by shaping two 1/4” Pearl Green leaves, indent with needle tool or toothpick. Make one holly berry by rolling a tiny, tiny ball of Red Hot Red clay and inserting a hole in the middle. Add a heart by joining two teardrops into a heart shape – use two 3/16” red balls.


BAKE AS DIRECTED – When cooled, add eyes and cheek highlights as desired with a permanent maker for the black of the eyes and white acrylic paint for the eye highlights. You may also use tiny black seed beads for the eyes – use your own imagination and enjoy!!

Fill with pom- poms or beads and enjoy!
