
premo! Mossy Faux Stone Necklace
premo! Mossy Faux Stone Necklace
Read More
Love a big bead necklace? Make a big bead necklace that isn’t big on weight using Sculpey® Ultra Light clay as the “core” of the bead. In this project we cover the “core” with Premo! Sculpey® Accents Grey Granite and complete the natural look with some mokume gane moss.
Design by syndee holt
Read Less
ADDITIONAL SUPPLIES
Dark Brown craft paint
Paint brush
Electric bead drill such as a Dremel or a hand bead drill
Small spray bottle of water
Necklace Finding
Cutters (optional for perfect size balls)|Dark Brown craft paint
Paint brush
Electric bead drill such as a Dremel or a hand bead drill
Small spray bottle of water
Necklace Finding
Cutters (optional for perfect size balls)
Project Instructions
Do not use unbaked clay on unprotected furniture or finished surfaces. Start with clean hands and work surface area. Good work surfaces include wax paper, metal baking sheet, or disposable foil. Knead clay until soft and smooth. For best results, clean your hands in between colors. Shape clay, pressing pieces together firmly. Bake on oven-proof glass or metal surface at 275 °F (130 °C) for 30 minutes per 1/4” (6 mm) thickness. For best baking results, use an oven thermometer. DO NOT USE MICROWAVE OVEN. DO NOT EXCEED THE ABOVE TEMPERATURE OR RECOMMENDED BAKING TIME. Wash hands after use. Baking should be completed by an adult. Begin by preheating oven to 275 °F (130 °C). Test temperature with oven thermometer for perfectly cured clay. For best results, condition all clay by running it through the clay dedicated pasta machine several passes on the widest setting. Fold the clay in half after each pass and insert the fold side into the rollers first.
Pinch off a piece of the Ultra Light and gently knead it in your hands. Flatten the clay into a patty with your hands and roll it through the Clay Conditioning Machine on the #1 setting. Create at least 6 balls about 1” diameter. NOTE: The easiest way to create balls of a consistent size is to use a small cutter (any shape). Bake the balls in a preheated oven according to the Ultra Light package directions.

While the beads are baking, start on the mokume gane. Roll out small pieces of each color (Burnt Sienna, Jungle, and Spanish Olive) on the #1 setting on the Clay Conditioning Machine. Roll the Wasabi out on a thinner layer, such as #4. The pieces should be about 2 inches by 2 inches. NOTE: the size of the layers depends on how much mokume gane you want to create. This project doesn’t require a lot. Stack the layers as shown on the photo: Jungle, Spanish Olive, the thinner Wasabi, and Burnt Sienna. Press the layers together and use the acrylic roller to further flatten the layers together. (NOTE: Notice the rough edges? Random mokume gane work fine).

Roll the flattened layers through the Clay Conditioning Machine on the #2 setting and fold the longer, thinner sheet of clay into thirds (Fold so that there is a Burnt Sienna side and a Jungle side).

Flatten this stack with the acrylic roller and run through the Clay Conditioning Machine again on the #2 setting. Fold into thirds once more. Now the stack will have very thin layers of color. Use the Sculpey Ball Stylus to press into the stacks on both sides. The object is to distress the layers and push them around a little.

Lightly spray the top surface of the clay with water and press the Bristle Block firmly into the surface. Repeat on the other side.

Using the Super Slicer, cut off a slice of the Premo! Accent Grey Granite and run it through the Clay Conditioning Machine on the #1 setting. Set the machine to #5 and run through again to get a very thin sheet of clay. Place one of the baked Ultra Light balls in the center and wrap the clay around the ball. Tear off the excess clay and roll the ball in the palms of your hand to seal and smooth the Grey Granite exterior.

Position your mokume gane stack firmly on your work surface (a non-porous surface like glass or ceramic tile works really well to hold it in place) and make very thin slices from the top of the clay stack with your Super Slicer blade.

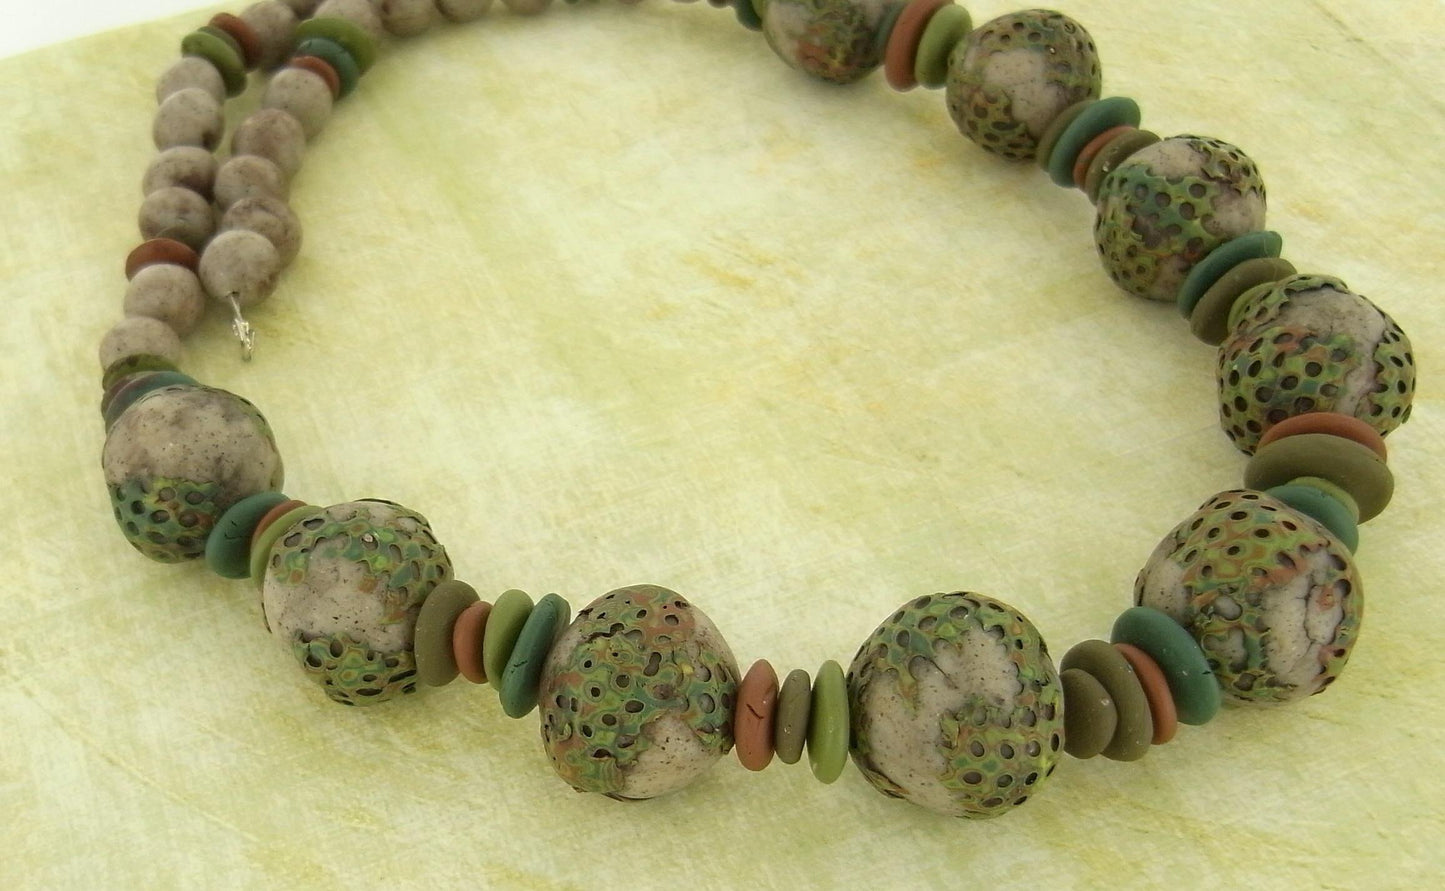
Lay these slices around the Grey Granite wrapped ball, but don’t cover the entire ball, allow the Grey Granite to show through in some areas. Repeat these steps for the amount of balls you want your necklace to have. The necklace shown has 9 balls.

Once the balls are complete, bake the balls in a preheated oven according to the directions above. Allow the balls to cool thoroughly and then drill the bead holes in the balls. If you are drilling by hand, you will love how easy the Ultra Light is to drill through!
Roll small balls of the remaining Premo! Clays and flatten them to irregular sized disks to use between the balls. Also roll some small round balls of Grey Granite for the top of the necklace (again use a cutter to help give you the same amount of clay for each ball to ensure even sized balls.) NOTE: These smaller pieces can be drilled before baking or after baking. In the necklace shown there are 22 Gray Granite balls, 12 Wasabi disks, 12 Burnt Sienna disks, 11 Jungle disks and 11 Spanish Olive disks.

Once the big beads are baked and cooled, paint the surface with the dark brown craft paint and quickly wipe the surface with a damp paper towel to remove most of the paint. This will add an organic effect to the bead.

Assemble your necklace using the flattened discs between the big beads and the smaller round beads for the top portion of the necklace.