
Sculpey Premo™ Lace Earrings
Sculpey Premo™ Lace Earrings
Read More
Read Less
These gorgeous earrings are super easy to make. Make a pair for all of your friends!
ADDITIONAL SUPPLIES
- Spray bottle with water
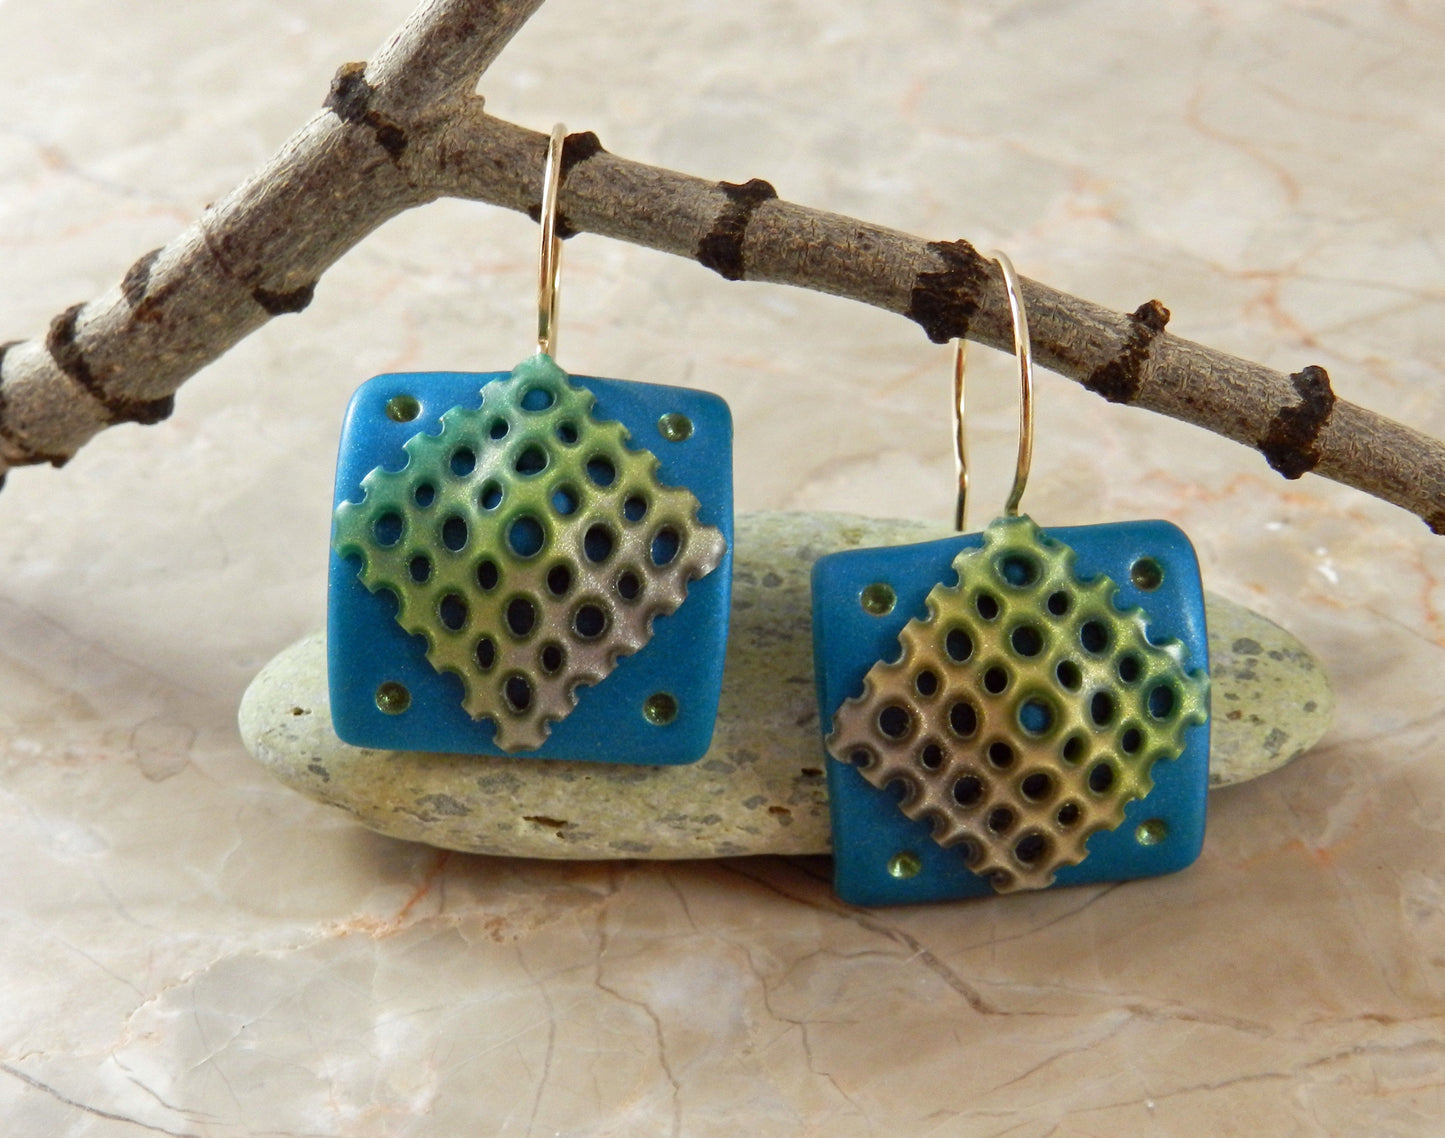
- 3/4" Metal Square cutter
- 2 gold loop ear wires
- Silver Metallic Powder
- Hammer
- Optional Soft cotton cloth
- Optional Glass bowl
- Bristle Block
Project Instructions
- Getting Started:
Start with clean hands, unwrap and knead clay until soft and smooth, or condition by running clay though a Pasta Machine. We recommend using a designated machine for clay purposes only. When working with multiple colors, clean hands with soap and water or baby wipes (we have found that baby wipes work best) before switching colors. Shape clay, pressing pieces firmly together. Wash hands after use.
- Baking:
A quick and easy method to create a small scale Skinner blend is to start with 1 inch square blocks of each color cut on a slight angle. Align the angled edges of the blocks together and compress with your fingers until you have a strip about 1/4 inch wide. Run this through the clay conditioning machine on the #1 setting, constantly folding in the same direction so the colors remain aligned, until the colors blend in the center.

Fold or cut the blend into a double thickness, again keeping the colors aligned. Roll the clay onto the work surface so it adheres tightly. Spray the Dot Design Block with water and press into the clay as far as possible. Carefully lift the tool out of the clay, wiggling gently as needed.

Use the Super Slicer to slice across the patterned clay, removing at least two layers. If the holes close up, re-imprint with the tool between slices. Remember to spray the tool with water again so that it releases from the clay easier.

Roll Peacock Pearl clay through the clay conditioning machine on the #1 setting and cut out two squares using the metal cutter. These will form the back portion of the earrings. Cut the same sized squares from the patterned slices and trim them using the super slicer until they are evenly sized and at least 1/8 inch smaller that the Peacock squares. Make sure to cut right through the circles, as that will leave an interesting, ragged texture along the edges.

Use pre-made round loop ear wires. Hammer the hook so it is flat, then roll a tiny ball of Peacock Pearl clay and press it around the hook. Set the ear wire so the covered hook lands in the center of the Peacock backing, and add another small ball of Peacock Pearl clay on top. Press down gently and repeat with the second earring.

Center the trimmed patterned square on top, orienting in a diamond shape. Gently press down in the center and along all edges, forming a secure seal. If desired, use the tip of the Etch n Pearl dipped in metallic powder to accent the four corners of the earrings. The earrings can be placed of a curved glass for a rounded look or left flat as they go in the oven and bake as directed above.
This step is optional. Once cooled, sand with 400/600/800 wet-dry sandpaper. Start with the lowest grit until the piece feels smooth. Then follow with the other grits very gently and quickly to even out any lines left by the rougher grit. Then polish with a soft cotton cloth.