
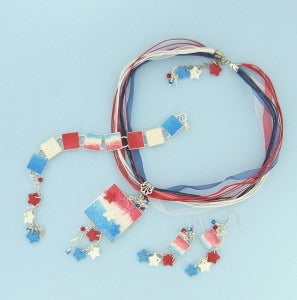
premo! July 4th Jewelry Set
premo! July 4th Jewelry Set
Read More
What a beautiful way to show your love of the USA! Great to wear all summer long.
Read Less
ADDITIONAL SUPPLIES
Crystals, chain and ribbon
Jewelry bezels and findings kit|Crystals, chain and ribbon
Jewelry bezels and findings kit
Project Instructions
Getting StartedDo not use unbaked clay on unprotected furniture or finished surfaces. Start with clean hands and work surface area. Good work surfaces include wax paper, metal baking sheet, or disposable foil. Knead clay until soft and smooth. For best results, clean your hands in between colors. Shape clay, pressing pieces together firmly. Bake on oven-proof glass or metal surface at 275°F (130°C) for 30 minutes per ¼" (6 mm) thickness. For best baking results, use an oven thermometer. DO NOT USE MICROWAVE OVEN. DO NOT EXCEED THE ABOVE TEMPERATURE OR RECOMMENDED BAKING TIME. Wash hands after use. Baking should be completed by an adult. Begin by preheating oven to 275°F (130 °C). Test temperature with oven thermometer for perfectly cured clay. For best results, condition all clay by running it through the Clay Conditioning Machine machine several passes on the widest setting. Fold the clay in half after each pass and insert the fold side into the rollers first.

Condition 1/4 of a package of Red Glitter, 1/4 of Frost Glitter White and 1/4 of Blue Glitter. Make a Skinner Blend of the three colors together, Red on left, White in the center, Blue on the right. Don’t blend the colors too much, just enough to get a nice blend.

Using your the needle tool from the 5 in 1 Tool Set lightly drag across the blended sheet Red to Blue, then repeat from Blue to Red. This creates scratches in the sheet.

Using the largest ball stylist from the 5-in-1 Tool Set, go over each scratch flattening it and softening the marks. Roll over the entire sheet with the acrylic roller.

Press your jewelry finding blanks (the pendant, the earrings and 2 of the bracelet squares) into the blended sheet along the center. Do this with the findings face down.

Fill the remainder of the bracelet squares with solid colors from the sheet. If desired create a separate sheet of Frost White Glitter for a couple of squares. Trim all of the pieces you created and place them in the jewelry blanks. Check the edges and trim any clay on the edges.
Using the smallest Etch N Pearl to add dots around each square.
Using the premo! Star mini cutter cut out 5 stars from the Red section of the blended sheet. Use the pointy end of the Etch and Pearl tool and add dot indentation around each star. Repeat the procedure with the Red and White clay, creating 15 stars in total. Put aside one of each colored star and place a hole for hanging in the top
Add a Red star overlapping the Red/White area, add another star overlapping the White/Blue area and add a Blue Star in the blue area.
Bake the pendant, earrings and the bracelet along with the 12 remaining stars according to the instructions above. After baking allow to thoroughly cool. Pop the clay pieces out of the findings and add a drop of clear, fast drying glue to the bottom of each piece of baked clay and place back in the finding.
If desired embellish the jewelry pieces with wire wrapped crystal, the pre-baked stars you created and chain. Wear, Enjoy and Happy Fourth of July