
Original Sculpey® Terra Cotta Ornamental Blue Bird
Original Sculpey® Terra Cotta Ornamental Blue Bird
Designed by Amy Koranek
Read More
Read Less
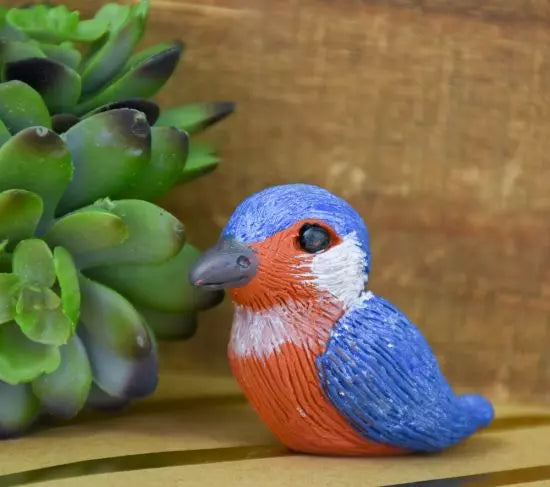
This clever little bird can keep your favorite houseplant company, or display on a shelf or table in your home. You can follow these directions for painting or personalize your bird by electing to keep it in the original terra cotta or even just a light whitewash.COMPLETION TIME: 60 Minutes to make and bake
ADDITIONAL SUPPLIES
- Acrylic paint in blue, white, dark gray, and black
- Paintbrush
Project Instructions
Step 1
- Getting Started:
Start with clean hands, unwrap and knead clay until soft and smooth, or condition by running clay though a Pasta Machine. We recommend using a designated machine for clay purposes only. When working with multiple colors, clean hands with soap and water or baby wipes (we have found that baby wipes work best) before switching colors. Shape clay, pressing pieces firmly together. Wash hands after use.
- Baking (also called Curing):
Step 2
Start with 1/8 bar of Original Terra Cotta Sculpey®. You can make the size of your bird as large or as small as you like using more or less clay. Just be sure to make the shapes proportionate to each other.Make a long-tapered piece that is thick on one end. This will be the body of the bird.

Step 3
Make a shallow groove with the small Etch ‘n Pearl or other long thin tool. This groove will serve as a marker between the head and the body. Birds don’t really have a neck, so keep this groove shallow and smooth.
Step 4
Use your fingertips to smooth out the groove creating a gentle taper between the head and the body.
Step 5
Pinch a beak out from the front of the face. Use your fingertips to make the beak smooth and even.
Step 6
Gently bend the body to put the little bird into a sitting position. Push the tail area down flat to the work surface so that the bird can sit up on its own.
Step 7
Make two teardrop shapes that are domed on top and flat on the back to be placed as wings. As you can see the wing pieces are about the same length as the bird from neck to tail tip.
Step 8
Position the wings on each side lining them up from the neck to the tail.
Step 9
Pinch the tail out longer as needed to help it extend past the wing tips.Make sure the wings are securely attached to the body. Wrap the sides of the wings around the sides of the body so that they conform to the curve of the body.

Step 10
Flatten the entire bird to the work surface again to make sure it can sit on its own.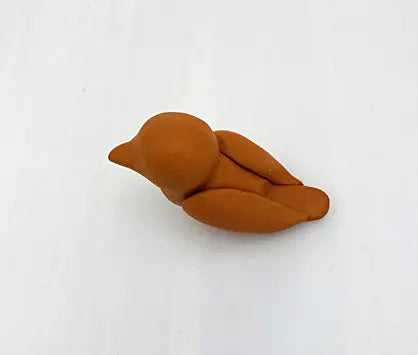
Step 11
Now for the details. Use the medium (6mm) Ball Tool to impress eye sockets.
Step 12
Insert a little ball of clay into the eye socket.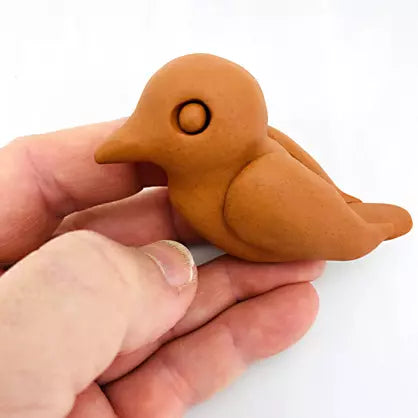
Step 13
Use your fingers to pinch the eye socket around each eyeball. You can use the small (2mm)Ball Tool to make little tear ducts making the eyes more oval in shape.
Use the small Ball Tool to gently impress nostrils at the base of the beak.
Use the flat Chisel Point to score a little line dividing the beak.

Step 14
Keep making sure the little bird can sit on his own.
Step 15
Use the tip of the small Etch ‘n Pearl to drag texture lines in the wings, head, and body.
Step 16
Here’s a close up of the direction the lines should run to create realistic texture.Bake following the baking instructions. If you need to prop the bird up for baking, you can use a folded dish towel or aluminum foil.
Allow to cool completely before handling.

Step 17
You can paint the bird as shown.Blue paint for the body and the wings.
Paint the eyes black and the beak dark gray.
Water down the white paint to make little accent feathers around the eyes and across the neck. Allow the paint to dry completely.
