
premo! Neon Brights Necklace
premo! Neon Brights Necklace
Read More
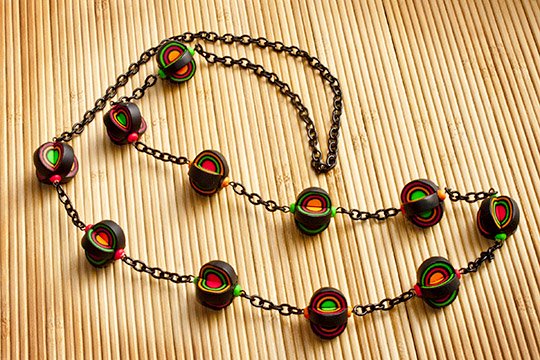
Since so much of the Spring/Summer fashion is featuring the British Mod styles and colors from the 60s, I thought it was time to bring back a clay classic to go with the bold colors and black and white themes. The bullseye cane sliced and styled into a “lantern bead”. (I believe this was originated by Pier Volkos and first shown at Ravensdale) The necklaces from the 60s were long and swingy – maybe as a counterbalance to the short skirts!
Read Less
ADDITIONAL SUPPLIES
Black chain - about 16 inches
Eye pins - Black
Wire cutters and small round nosed pliers
White craft glue|Black chain - about 16 inches
Eye pins - Black
Wire cutters and small round nosed pliers
White craft glue
Project Instructions
Do not use unbaked clay on unprotected furniture or finished surfaces. Start with clean hands and work surface area. Good work surfaces include wax paper, metal baking sheet, or disposable foil. Knead clay until soft and smooth. For best results, clean your hands in between colors. Shape clay, pressing pieces together firmly. Bake on oven-proof glass or metal surface at 275°F (130°C) for 30 minutes per ¼" (6 mm) thickness. For best baking results, use an oven thermometer. DO NOT USE MICROWAVE OVEN. DO NOT EXCEED THE ABOVE TEMPERATURE OR RECOMMENDED BAKING TIME. Wash hands after use. Baking should be completed by an adult.Begin by preheating oven to 275°F (130 °C). Test temperature with oven thermometer for perfectly cured clay. For best results, condition all clay by running it through the clay dedicated pasta machine several passes on the widest setting. Fold the clay in half after each pass and insert the fold side into the rollers first.

Create a simple cylinder of each color to create the center of each roll or “cane”. These are about 7/8 inch in diameter by 2-1/4 inches long.

With the Clay conditioning Machine on the #1 setting roll a sheet from 1/3 of a package of Black.

Set one of the cores on this sheet of clay and trim the front edge, then use the length of the blade to trim down each side.

Wrap the core in the Black clay by rolling it. Roll the leading edge over so that it touches the remaining sheet of clay. Gently roll it back and there will be a dent in the clay from the leading edge. Cut the sheet of Black clay just on the inside of this mark. Complete the wrap and the edges should just meet. (No overlapping! This will cause a bump in the smooth line of the pattern.)

Repeat step 4 with the two remaining colors, using a wrap of black in between the color wraps. Finish with a final wrap of black. Repeat for each cylinder of color. Obviously, the cane is too large to slice into beads so we need to make it smaller or reduce it. I use the Marie Segal “choke method”.

Put the completed cane in your hand fitting the center of the cane snuggly between your thumb and forefinger. Now squeeze to “choke” the cane. (NOTE: I often use my other hand to push against my index finger to increase the pressure.) This will cause an hourglass shape to the cane.

Continue to choke the cane from the center to the end, turning the cane frequently. Repeat on the other side. Now it really looks like a lump mess! This really helps to get the clays on the inside of the cane to move at the same time as the clays on the outside of the cane (where the pressure is greater).

Now place both hands on the cane and roll it back and forth from the tip of your fingers to the heals of your hands, spreading your hands apart slightly to length and smooth the cane. STOP when you have the cane smoothed and at the largest diameter you may wish to cut. (I stopped mine at it was 1 inch in diameter). Slice the cane in half with a firm smooth push of the Super Slicer and admire your handywork. Set one of the halves aside and continue to reduce the size/diameter of the remaining half to about ½ inch diameter. Again, I slice the cane in the middle and admire it!

At this point allow the cane to rest while you reduce the other two canes. For a nice round slice, I often allow the canes to rest overnight on a sheet of waxed paper.

Cut two slices of the cane about 3/16 inch wide and cut each slice in half down the center. (You can cut these wider, but not much thinner!) Roll a small cylinder of remaining Black clay to the same diameter and place a half on each side of the cylinder. Position the 3rd half slice in the center top, making sure to align the patterns on each side so that they meet. Pick up the assembly and add the 4th half slice on the opposite side. There should be almost none of the black center core showing between the slices. Pinch the excess black clay from the center and press it gently against the lantern bead to flatten it. (This also helps to hold the bead slices in place. Double check that all the patterns match again too!

Create two “pearls” with the medium sized Etch N’ Pearl tool from the remaining excess clay colors. (NOTE: I got in trouble by using colors from the wrap colors. I recommend using the same color as the core). Place the “pearls” at the top and bottom center. Create 4 lantern beads from each cane for a total of 12 beads.
Cut an eye pin to about ¼ inch and press into the top of the bead. Gently remove it and put a small dot of white glue on the tip and replace it in the bead. Repeat on the other side.
Bake the completed lantern beads as directed above.
Attach the baked beads to short lengths of chain to create the necklace – no closure needed, since it’s long enough to go over the wearer’s head.
NOTE: I have no problem mixing the two clays together as long as they are all about the same softness- in fact, even if you use all Premo! Sculpey or all Sculpey III for a cane, the colors should all be about the same softness.