
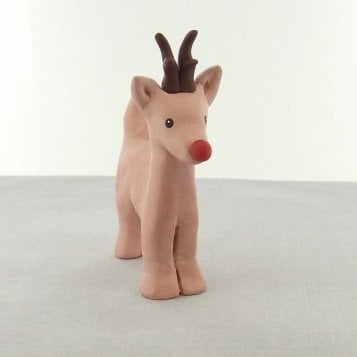
Model Air® Reindeer
Model Air® Reindeer
Read More
Rudolph will certainly be jealous if he sees this cute little guy on your mantle!
Read Less
ADDITIONAL SUPPLIES
Acrylic Paint: Black, White
Paintbrush (fine)
Bowl of water
Clear Fast Dry Glue
400 grit wet/dry sandpaper|Acrylic Paint: Black, White
Paintbrush (fine)
Bowl of water
Clear Fast Dry Glue
400 grit wet/dry sandpaper
Project Instructions
Start with clean hands and work surface area. Good work surfaces include wax paper or disposable foil. Wash hands between each color.
Start with a ball of clay about 2 ½†round. Roll this into a thick log. Begin shaping the head and neck by gently pulling the clay up and outward from the log. This will require some bending and shaping until you get a head shape.Once the head is shaped, pinch out an ear from both sides of the head.To form the front and back legs, gently pull the clay downward. Create the belly by pushing the clay upward between the legs and smoothing. Pinch a small amount of clay at the back end of the body to form the tail.Once you form basic shape, you can continue to perfect the overall look of the body. Use a little water on your fingers to smooth cracks or areas of imperfections.Using your fingers, form the ears into teardrop shapes, use the end of your paintbrush to make small indents in the center. Do the same for the tail.Stand the reindeer on your work surface; this will require you to push the bottom of the feel flat against the surface so it will stand. Make sure it is able to stand before adding the details to the legs. Using the Needle Tool, make a deep indentation in the front and back legs to create the illusion of four legs instead of two.Allow the reindeer to dry according to the manufactures instructions.

Condition the Red glitter clay. Pinch off a small amount and make a small ball that will fit nicely on the tip of the nose. Gently flatter a small spot of the ball so once it's baked it will glue on to the nose.Condition the Burnt Umber clay. Pinch off ½†ball to form the antlers. Roll the clay into 1/8†thick snake. Cut two pieces about 1†and two pieces about ½†each. Round one end of each piece. Now press the smaller piece and the larger piece together to form one antler, do the same with the other two pieces. Slightly curve the antlers to give them a natural shape. Push the two antlers. Before baking make sure these fit on top of of the reindeers head. Bake nose and antlers according to the manufacturer’s instructions. Let cool.

Once the reindeer is completely dry you can sand it with the 400 grit wet/dry sandpaper. Because of this is air dry clay you will want to use the sandpaper dry. Gently sand any areas that need to be smoothed. Once satisfied, wipe your deer off with a cloth. Now glue the nose and antlers on with clear fast dry glue. To finish the reindeer paint on Black eyes. Use the White paint to add the highlight to the eye. Using the White paint again to paint the back of the tail.