
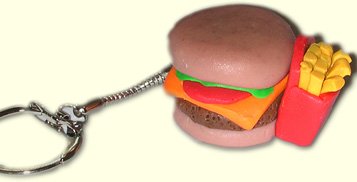
Sculpey® III Hamburger and Fries Key Chain
Sculpey® III Hamburger and Fries Key Chain
Read More
Make this mouthwatering key chain that looks just like real hamburger and fries.
Read Less
ADDITIONAL SUPPLIES
- 1 ½” of 20 gauge wire
- Key chain
- Toothpicks
Project Instructions
- Getting Started:
Start with clean hands, unwrap and knead clay until soft and smooth, or condition by running clay though a Pasta Machine. We recommend using a designated machine for clay purposes only. When working with multiple colors, clean hands with soap and water or baby wipes (we have found that baby wipes work best) before switching colors. Shape clay, pressing pieces firmly together. Wash hands after use.
- Baking:
Take a ball (about 1/2”) of Beige clay and form it into the top bun. Do this by flattening the bottom on your work surface and then smoothing the top.
For the bottom of the bun, take a smaller ball of Beige clay and flatten into a disc.

Mix small balls of Red, Orange and Black together to create the “hamburger” color. Take a small ball of the “hamburger” color and flatten into a thin disc. Place it on the bottom portion of the bun.

Use a roller to make a flat sheet of Orange clay. Cut a square of “cheese” using a clay knife. Place the cheese on top of the burger patty.

Now, for the ketchup. Flatten a ball of Red clay and place on top of the cheese.

Flatten a ball of Green clay to make the lettuce, make the edges a little wavy. Place the lettuce on top of the ketchup and then add the top portion of the bun. Press down slightly so everything sticks together.

Make the fries and fry box separately and then attach to the burger. To make the fry box: roll out a sheet of Red clay and cut out the shapes as shown in the below photo. The piece that is rounded at the bottom is the back of the box. The rounded end should be at the top and this piece needs to be a little taller than the assembled hamburger. Set the fry box pieces aside.

Mix a ball of Orange and a ball of Yellow clay together to form the “fry” color. Roll a thick sheet of this color and cut out the fries. Stack 2 rows of fries on the back of the fry box and then assemble the box. (Look at the completed project as a reference). Gently push the filled fry box onto the hamburger.

Take a 1 ½” inch piece of 20 gauge wire. Put the wire through the small ring at the end of the keychain, fold it in half. Twist the wire 3 or 4 times and then with the ends together push it into the hamburger.
Bake the key chain as directed above in Step 1. Cool completely before touching.
- Choosing a selection results in a full page refresh.
- Opens in a new window.