
Fall Harvest Cake Tutorial by Mo Tipton, The Mouse Market
Fall Harvest Cake Tutorial by Mo Tipton, The Mouse Market
Read More
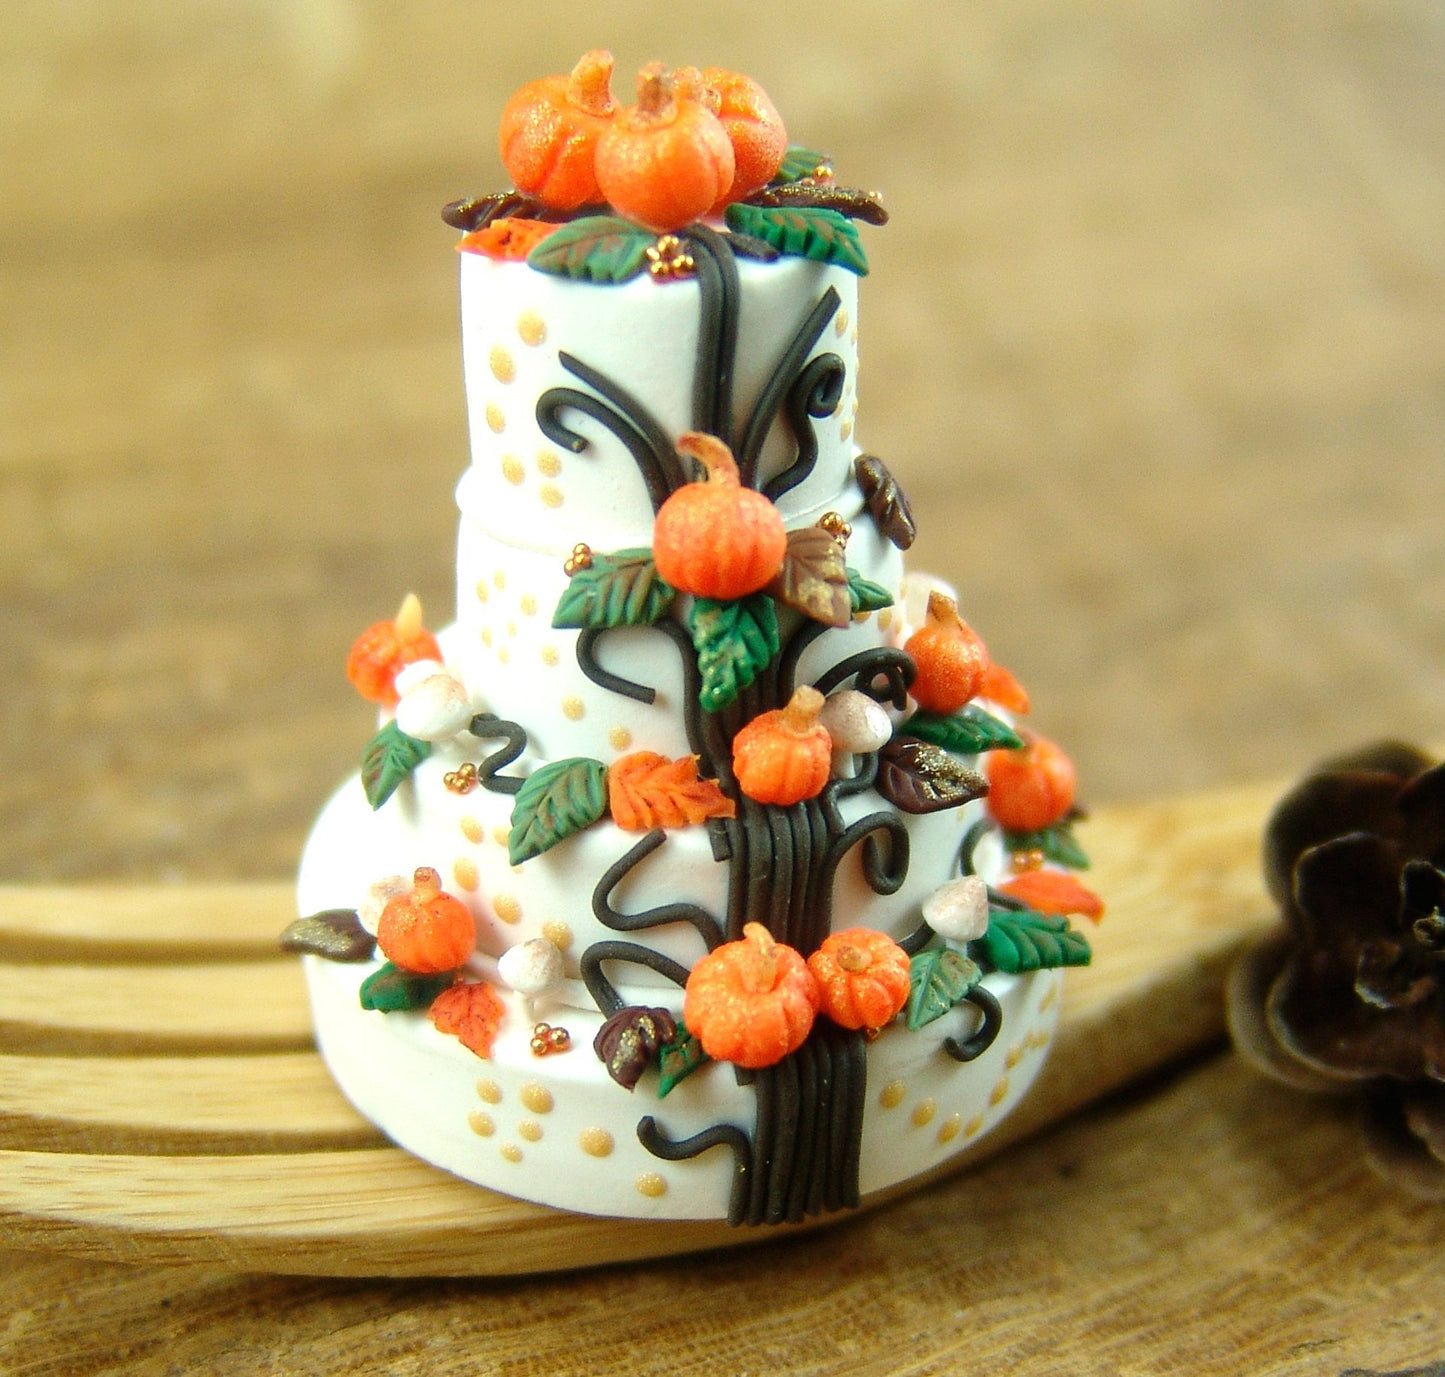
Mo Tipton from The Mouse Market shares with us how to create this beautiful mini Fall Harvest Cake!
Read Less
ADDITIONAL SUPPLIES
Paint Brush
Toothpicks
Chalk Pastels (Optional)
Corn Starch (Optional)
Metal Pastry Tip (Optional)
Orange Mircobeads (Optional)|Paint Brush
Toothpicks
Chalk Pastels (Optional)
Corn Starch (Optional)
Metal Pastry Tip (Optional)
Orange Mircobeads (Optional)
Project Instructions
Prepare the clay mix for the cake layers by combining one part Sculpey III Jewelry Gold with five parts White and three parts Translucent. Knead thoroughly to combine.

Roll the clay out to ¼” thickness, and use a 1.25” circle cutter to create the bottom layer of the cake. If the cutter sticks to the clay, dust the surface of the clay and the cutter with corn starch first. Cut a 1” circle from the same ¼” thick sheet for the second layer. Roll the clay out again, this time slightly thinner (⅜” thick), and cut out a smaller circle. You can use a circle stencil or use the wide end of a metal pastry tip as a circle cutter. You can also cut the circle freehand.


To make the top layer, roll out the cake layer clay into a log ½” in diameter. Place the log in the freezer for ten minutes to firm up, then slice off a ½-inch length of the log. The top layer is taller than the bottom layers.

Once you have cut all of the layers, smooth them with your finger. It helps to dust your finger and the clay with corn starch, and use smooth, circular strokes as you buff out any imperfections. Use a clean, dry paint brush to dust off any excess starch when done.
Spread Translucent Liquid Sculpey to the underside of the second through top layers, using it as a glue to adhere the layers together. Once the cake stack is assembled, bake in a preheated oven for fifteen minutes and let cool.


Take some of the leftover cake layer clay and roll it out into a very thin snake. Spread a thin line of Translucent Liquid Sculpey along the base of each layer with toothpick, and wrap the snake around the bases. This decorative touch conceals any gaps that might be present between the layers. Trim the ends of each snake to create a nice, even seam.

For the brown vines, roll Sculpey III Suede Brown into a thin snake. Draw lines of Translucent Liquid Sculpey on the cake with a toothpick to act as glue, then lay down strips of the vine using your finger and/or a Blunt End Tool to smooth the vines against the clay. Continue adding vines, some running from top to bottom, some running on only one or two layers, until you are satisfied with the arrangement. You can curl or coil the vines before adding them to the clay, creating intricate designs.


Use a toothpick to add dots of Gold Liquid Sculpey to the cake, creating little patterns.

Bake the cake in a preheated oven for seven minutes and let cool completely.
For the mushrooms, use a clay mix of equal parts White and Translucent clay. Create the stems by rolling the clay into a thin snake and slicing off shorter lengths. The caps are made by rolling small balls of clay and shaping them into a cap shape with your fingers. Attach the stem with a needle tool, and if you wish use a dry paint brush to add brown pigment to the caps. The pigment is made by grating loose chalk from a stick of chalk pastel with a razor blade. Add the mushrooms to the cake, using a tiny dot of Translucent Liquid Sculpey as glue.


Create leaves using any combination of Sculpey III Leaf Green, String Bean, and Just Orange and Premo Spanish Olive, Raw Sienna, and Burnt Umber. To make the leaves, roll the desired clay color into a thin sheet, roughly 1/16” thick. You can cut the leaf design by hand with a sharp blade, or make strips of clay using the Rick Rack Blade. The strip will have plump sections and narrow sections created by the two wavy lines. The plump sections, when separated from the rest of the strip, form a nice leaf shape. Cut along the dotted lines as shown. Use your finger to pinch the pointy end into a more defined leaf shape. Use a needle tool to etch veins onto the leaves and arrange them on the cake using a tiny dot of translucent liquid sculpey as glue. You can also use a dry, stiff paint brush to swipe a bit of Gold Liquid Sculpey onto the leaves as accent before adding them to the cake. You can also add accents of reddish-brown chalk pastel to the leaves for additional color variation. See step 10 for pigment instructions.


If you wish, add dabs of translucent liquid sculpey to the cake and use a toothpick to deposit little bunches of orange microbeads.

To make the pumpkins, roll Sculpey III Just Orange into little balls, slightly varied in size, and use a 2 mm Ball End Stylus tool to make a small depression in the top of each. Use a needle tool to press lines from the top to bottom, all the way around the pumpkin. Optional: Brush chalk pastel in reddish orange on part of the pumpkin to add realistic color variation. See step 10 for pigment instructions. For the stem of the pumpkins, use leftover cake layer clay rolled into a skinny snake and cut into short lengths. Use a needle tool or Flat End Tool to attach the stem to the pumpkin. If you wish, use a small, moistened paint brush to add hints of reddish brown chalk pastel pigment to the stem. Bake the pumpkins in a preheated oven for five minutes and let cool. (Baking them before the next step makes them easier to handle, but if you are able to coat them with gold when they’re raw, feel free to skip the baking.)


Use a stiff, dry paint brush to swipe a thin coat of gold liquid clay on each pumpkin and arrange them on the cake as desired, using a dot of Translucent Liquid Sculpey as glue.
Once you are happy with the arrangement of the cake decorations, bake the cake for a final ten minutes and let cool. Enjoy!

Prepare the clay mix for the cake layers by combining one part Sculpey III Jewelry Gold with five parts White and three parts Translucent. Knead thoroughly to combine.
Roll the clay out to ¼” thickness, and use a 1.25” circle cutter to create the bottom layer of the cake. If the cutter sticks to the clay, dust the surface of the clay and the cutter with corn starch first. Cut a 1” circle from the same ¼” thick sheet for the second layer. Roll the clay out again, this time slightly thinner (⅜” thick), and cut out a smaller circle. You can use a circle stencil or use the wide end of a metal pastry tip as a circle cutter. You can also cut the circle freehand.
To make the top layer, roll out the cake layer clay into a log ½” in diameter. Place the log in the freezer for ten minutes to firm up, then slice off a ½-inch length of the log. The top layer is taller than the bottom layers.
Once you have cut all of the layers, smooth them with your finger. It helps to dust your finger and the clay with corn starch, and use smooth, circular strokes as you buff out any imperfections. Use a clean, dry paint brush to dust off any excess starch when done.
Spread Translucent Liquid Sculpey to the underside of the second through top layers, using it as a glue to adhere the layers together. Once the cake stack is assembled, bake in a preheated oven for fifteen minutes and let cool.
Take some of the leftover cake layer clay and roll it out into a very thin snake. Spread a thin line of Translucent Liquid Sculpey along the base of each layer with toothpick, and wrap the snake around the bases. This decorative touch conceals any gaps that might be present between the layers. Trim the ends of each snake to create a nice, even seam.
For the brown vines, roll Sculpey III Suede Brown into a thin snake. Draw lines of Translucent Liquid Sculpey on the cake with a toothpick to act as glue, then lay down strips of the vine using your finger and/or a Blunt End Tool to smooth the vines against the clay. Continue adding vines, some running from top to bottom, some running on only one or two layers, until you are satisfied with the arrangement. You can curl or coil the vines before adding them to the clay, creating intricate designs.
Use a toothpick to add dots of Gold Liquid Sculpey to the cake, creating little patterns.
Bake the cake in a preheated oven for seven minutes and let cool completely.
For the mushrooms, use a clay mix of equal parts White and Translucent clay. Create the stems by rolling the clay into a thin snake and slicing off shorter lengths. The caps are made by rolling small balls of clay and shaping them into a cap shape with your fingers. Attach the stem with a needle tool, and if you wish use a dry paint brush to add brown pigment to the caps. The pigment is made by grating loose chalk from a stick of chalk pastel with a razor blade. Add the mushrooms to the cake, using a tiny dot of Translucent Liquid Sculpey as glue.
Create leaves using any combination of Sculpey III Leaf Green, String Bean, and Just Orange and Premo Spanish Olive, Raw Sienna, and Burnt Umber. To make the leaves, roll the desired clay color into a thin sheet, roughly 1/16” thick. You can cut the leaf design by hand with a sharp blade, or make strips of clay using the Rick Rack Blade. The strip will have plump sections and narrow sections created by the two wavy lines. The plump sections, when separated from the rest of the strip, form a nice leaf shape. Cut along the dotted lines as shown. Use your finger to pinch the pointy end into a more defined leaf shape. Use a needle tool to etch veins onto the leaves and arrange them on the cake using a tiny dot of translucent liquid sculpey as glue. You can also use a dry, stiff paint brush to swipe a bit of Gold Liquid Sculpey onto the leaves as accent before adding them to the cake. You can also add accents of reddish-brown chalk pastel to the leaves for additional color variation. See step 10 for pigment instructions.
If you wish, add dabs of translucent liquid sculpey to the cake and use a toothpick to deposit little bunches of orange microbeads.
To make the pumpkins, roll Sculpey III Just Orange into little balls, slightly varied in size, and use a 2 mm Ball End Stylus tool to make a small depression in the top of each. Use a needle tool to press lines from the top to bottom, all the way around the pumpkin. Optional: Brush chalk pastel in reddish orange on part of the pumpkin to add realistic color variation. See step 10 for pigment instructions. For the stem of the pumpkins, use leftover cake layer clay rolled into a skinny snake and cut into short lengths. Use a needle tool or Flat End Tool to attach the stem to the pumpkin. If you wish, use a small, moistened paint brush to add hints of reddish brown chalk pastel pigment to the stem. Bake the pumpkins in a preheated oven for five minutes and let cool. (Baking them before the next step makes them easier to handle, but if you are able to coat them with gold when they’re raw, feel free to skip the baking.)
Use a stiff, dry paint brush to swipe a thin coat of gold liquid clay on each pumpkin and arrange them on the cake as desired, using a dot of Translucent Liquid Sculpey as glue.
Once you are happy with the arrangement of the cake decorations, bake the cake for a final ten minutes and let cool. Enjoy!