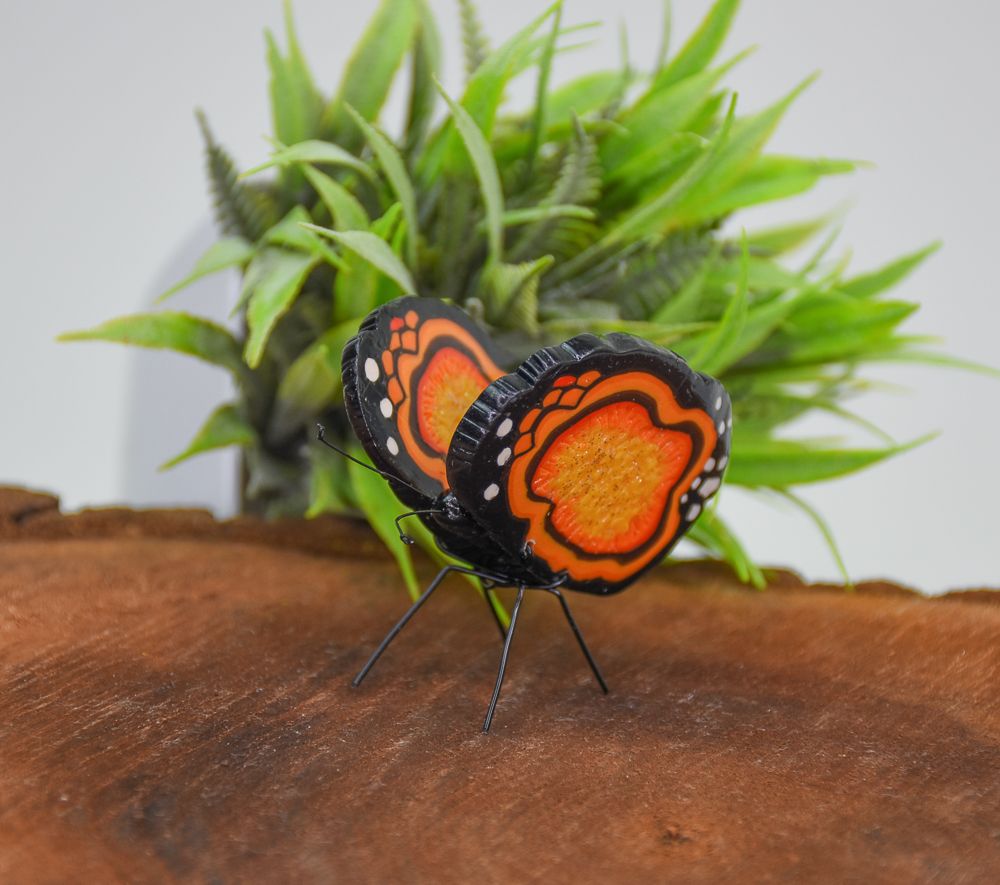
Agate Monarch Butterfly Figurine Featuring Sculpey Soufflé™ Koi
Agate Monarch Butterfly Figurine Featuring Sculpey Soufflé™ Koi
Designed by Lauren Medina
Read More
Read Less
Soufflé Koi takes center stage in this gorgeous little butterfly that will have so many uses from package decorations to guest gifts to keeping your favorite houseplant company! TIME TO COMPLETION: 112 mins to create (excluding gloss glaze drying time)
45 mins to bake
45 mins to bake
ADDITIONAL SUPPLIES
- Hand drill, 1/16 inch drill bit
- 38 mm bead string wire, black
- 20 gauge wire, black
- Rounded, flat and needle sculpting tools
- Long nose pliers (2)

Project Instructions
Step 1
- Getting Started:
Start with clean hands, unwrap and knead clay until soft and smooth, or condition by running clay though a Pasta Machine. We recommend using a designated machine for clay purposes only. When working with multiple colors, clean hands with soap and water or baby wipes (we have found that baby wipes work best) before switching colors. Shape clay, pressing pieces firmly together. Wash hands after use.
- Baking (also called Curing):
Step 2
We’re going to start by creating a pair of antennas using black 0.38mm bead string wire. Make a small knot and use two pairs of pliers to pull it tight. Measure about 1.5 inches from the knot and cut - you can trim these later if they are too long.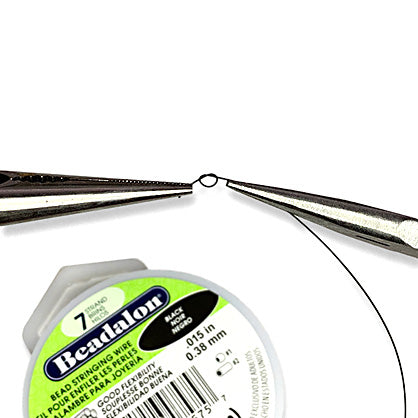
Step 3
Cut any excess wire that is above the knot so you’re left with something that resembles a tiny ball at the end of the wire. The knot may unravel if you haven’t pulled the knot tight enough. That’s ok, this step might take a few tries!
Step 4
Create a tapered snake about 1in long and a little less than ¼ in wide at the thickest end using a small amount of black clay. Use a small tool to create four sections. I used light pressure with the side of a needle tool while gently rolling the snake. The grooves should go all the way around the piece.Carefully and slowly insert the antennas into your unbaked clay.
Avoid wiggling your antennas around too much while inserting. You want a tight hold. We are baking at low temperatures so they will not melt in the oven. Set aside until Step 16.

Step 5
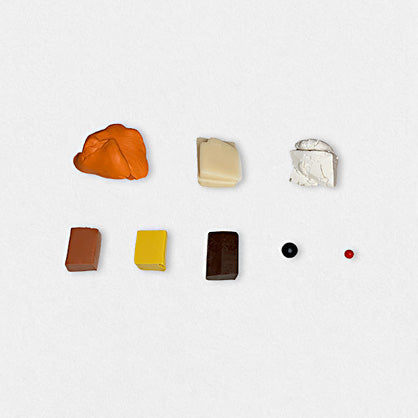
Let’s move onto the wings!I estimated the amounts of each color needed - but every piece of agate is unique so it’s ok to eyeball amounts here. It depends how thick or thin you want your rings of color to be.
You will be creating gradients of color so you can see I used a tiny amount of red clay to mix with some Koi for a darker orange.
Step 6
Marble together yellow ochre and translucent clay.I wanted an opaque center for my wings, so I used a 60% yellow to 40% translucent mix.
Create three shades of orange to form a gradient. I used Koi by itself, Koi mixed with a small amount of cadmium red, and Koi mixed with equal parts cadmium red.
You should also have some tools set aside to create the natural grooves and indents in agate (step 9). I used the rounded end of a tool and a flat chisel like tool.

Step 7
Form your yellow mixture into a small cylinder about 1/2 inch tall.Roll all three orange shades into thick snakes.
Run each snake through a pasta machine at setting 1 or 2.
Wrap the lightest orange around the yellow center, then the mid-tone, then the darkest orange mixture.

Step 8
Create three shades of brown. Use burnt umber and white for the lightest brown. Burnt umber and black for the mid-tone and burnt umber with more black for the darkest brown.
Step 9
Using some tools of your choosing create a natural shape - large, indented areas will work best for this step because we’ll be adding more layers. Don’t get too detailed otherwise it will be hard to wrap further layers without creating gaps or air pockets.
Step 10
Add at least two more shades of an orange/yellow color (setting 2 or 3 through a pasta machine) and a thinner layer (setting 1) of your darkest brown.Then roll out a 5 inch long, 1/4 inch thick snake and run that through your pasta machine on setting 1.
Also roll out a small snake of Koi. We’ll be creating the orange spots that monarch butterflies have on their wings.

Step 11
Arrange your orange snakes in a small grouping (use step 12 if you need a reference) - this will be the top of your wings.Cover your orange snake with your dark brown, flattened snake. I made a cluster of five orange dots.

Step 12
Make a small, short snake using your darkest orange to create another dot that matches the size of the Koi-colored dots. You only need one. Cover that dot with your darkest brown.Now make 12 white snakes of varying sizes.
Roll out a few black snakes to fill in the gaps between the white dots.
Place snakes and thin strips of black anywhere you don’t want the colors touching. You don’t need all sides to be uniform. You can build up as much black as you want in different areas. After the last layer of black, add more divots and rough details around your shape. You are creating the final wing shape.
Place a sheet of copy paper over your piece.
Use an acrylic roller and light pressure, 1-2 passes. This will expand your shape a little bit. We will be trimming and cutting this in half, so don’t go too thin. Your piece should be a little under ½ inch tall.
Place your unbaked piece in the freezer, on parchment paper, to let it harden for 5 minutes.

Step 13
Freezing your clay allows you to make paper-thin slices without the layers smearing and bleeding together. Using a tissue blade to trim paper-thin slices from the front and back of the piece until you have clean lines on both the front and back.
Step 14
Carefully cut your piece into two halves using your tissue blade. You should have two identical wings about 1/4 inch thick.
Texture the front and back of both centers with any tool you like. Use medium pressure - you don’t want to push through to the other side.

Step 15
Using a needle tool, drag the orange layer toward the yellow center.
Step 16
Using your finger, gently press glitter into the center of unbaked clay - on both sides. The clay should hold the glitter without any bonding agents - we’ll seal it later.Bake the wings and body at 275 °F for 45 mins on a ceramic tile lined with copy paper (30 mins if baking on an index card or baking mat).

Step 17
Using a brush, apply two coats of gloss glaze to all baked pieces (wings and body). Let air dry, and wait 30 mins between coats.I used a plier stacked on a few jewelry boxes to hold the antenna. This allowed me to apply gloss all around the body.
Artist tip: You can use UV resin instead of gloss glaze if you prefer a thicker glassier shine.

Step 18
Cut two pieces of 20-gauge black wire about 5 inches long.Hand drill two holes near the inside edge of each wing using a 1/16-inch drill bit. Make sure all the holes align because you need to feed two wires through all the pieces.
Drill two holes into the side of the body. Use the next step to check that you’re drilling the holes in the right places.

Step 19
Feed the wires through each piece to form a butterfly sandwich. Wing, body, wing.
Step 20
Flip your piece over so the antennas are facing toward you. Carefully fold the bottom two legs over and up and to the opposite side. They’ll form an X.Repeat this step with the other legs but over and down…creating another X that overlaps the first. Gently adjust the wings to a more open position.

Step 21
Using a plier, fold each leg to about a 100-110 degree angle - this doesn’t need to be exact. You just want the legs to splay out a little bit to create a solid standing position. You can adjust these more if needed after trimming.
Step 22
Trim the front legs to about 1 inch.Trim the back legs slightly shorter for a more playful and stable stance.
Enjoy your bright and whimsical piece!
