
Liquid Sculpey® Personalized Lacy Holiday Stocking
Liquid Sculpey® Personalized Lacy Holiday Stocking
Designed by Amy Koranek
Read More
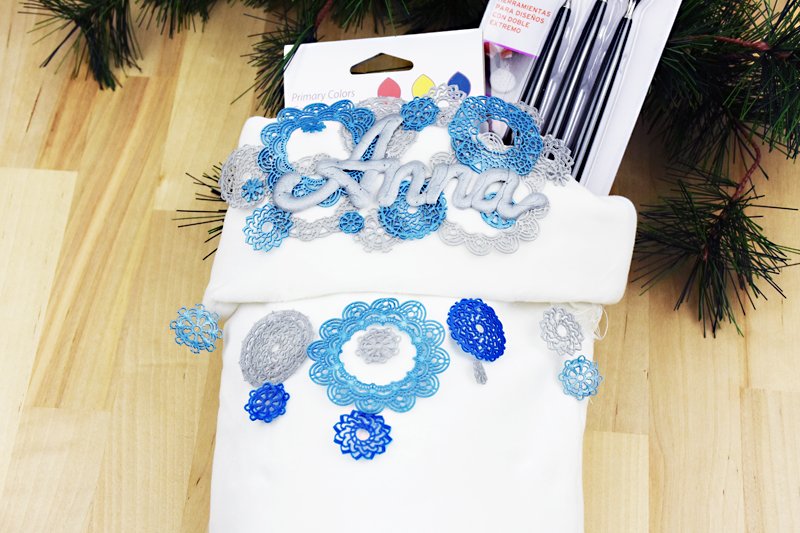
The Sculpey Lace Mandala mold and Liquid Sculpey team up to help create this unique personalized stocking for that special person on your list!
Read Less
ADDITIONAL SUPPLIES
- Paper or silicone cupcake liners for mixing Liquid Sculpey
- Scissors
- Name printed out on copier paper
- Sharp craft knife
- Ruler
- Pencil
- Scrap paper
- Clear smooth glass for tracing name with Liquid Sculpey
- Stocking
- Clear drying white craft glue
- Clear bead floss
- Needle
Project Instructions
- Getting Started:
- Baking:
Gently stir all of the Liquid Sculpey. Fill the Mandala mold with Silver Liquid Sculpey (LS). You will need all of the larger sized mandalas to complete your stocking design. Squeegee off excess LS and return it to the bottle. Bake the mold following the baking instructions for LS. When the mold is completely cool, gently peel the mandalas out by flexing the mold. Next, mix Silver LS and Blue LS 1:1 in a paper cupcake liner (supported by a cupcake pan) or in a silicone cupcake liner. Fill the mold and squeegee off excess. Bake the mold following the baking instructions for LS.

When the mold is completely cool, gently peel the mandalas out by flexing the mold.

To make more pieces, I used sharp scissors to cut my mandalas. I cut the largest ones as shown turning each large mandala into two.

I cut the medium mandalas as shown.

Print the name that you want to place on the stocking onto copier paper. I chose this font because the letters are fairly open and I knew I could easily hook them together to make them cursive. I prefer to work with cursive lettering when I make LS words because the letters are all hooked together giving me fewer individual pieces to handle.

Place a piece of glass over the name. The glass should be clean, clear, and flat. My glass is an old glass turntable from a microwave that I keep in my studio for just this purpose. It is textured slightly on the back, but the top is completely smooth. Those little odd triangles you see in the glass are just the turntable feet which are on the underside so they do not affect my writing. Carefully trace the letters onto the glass with Silver LS. Bake the name as quickly as possible so that the LS does not spread.

When the glass is completely cool, you can use a sharp craft knife to trim and sharpen the edges of the letters if you like. I trimmed the centers of the “A” and I also made the little notches at the tops of the “n’s” more prominent.

Carefully peel the name from the glass by lifting it with your fingernail. Next, lay out your mandalas and your name to see how it looks on the cuff of your stocking. My stocking is white so I had to really make sure my hands and even my molded pieces were really clean before auditioning them on the design.

Measure and cut a piece of paper so that it represents the area and shape that you want your finished design to take up on the stocking cuff. Lay this piece of paper under the glass. Lay out the mandalas on top of the glass but staying within the area represented by the paper.

Using the small Style ‘n Detail ball stylus, drip little dots of Clear LS into areas where the mandalas overlap each other. This will act as the glue that holds the design all together. Make sure that every mandala is connected to the one next to it so that the design becomes one piece.

Next, on the back side of the name, place very small amounts of Clear LS

Carefully flip the name over, positioning it on top of the mandalas

Bake the name and the mandalas again, to set the Clear LS that will hook everything together. When the piece is completely cool, carefully peel it off of the glass.

Place the piece on the stocking to see how it looks. I felt that my initial design didn’t fill up the cuff area the way that I wanted it too, so I added a few more little mandalas to the left and right edges. I placed the design back onto the glass, and used more Clear LS to add the new mandalas in place, then baked again. Glue the design permanently to the stocking cuff with little dots of clear drying craft glue applied to the back of the design. Allow the glue to dry completely before handling the stocking.

Next, add some dangling mandalas like snowflakes falling from the cuff. Mold more Silver LS mandalas and more Silver/Blue mandalas. Allow them to cool completely before peeling them from the mold. Then add even more Blue LS to the leftover tinted Silver/Blue so you have a deeper color still. Make a few small mandalas in the deep Blue and bake them too. Hang them from the cuff of the stocking by stringing them on clear bead floss. Then secure them by adding a dot of clear drying craft glue to the bottom mandala attaching it to the floss. Allow the glue to dry completely before handling.
