
Soufflé™ Faux Distressed Leather-Look Box
Soufflé™ Faux Distressed Leather-Look Box
Read More
Read Less
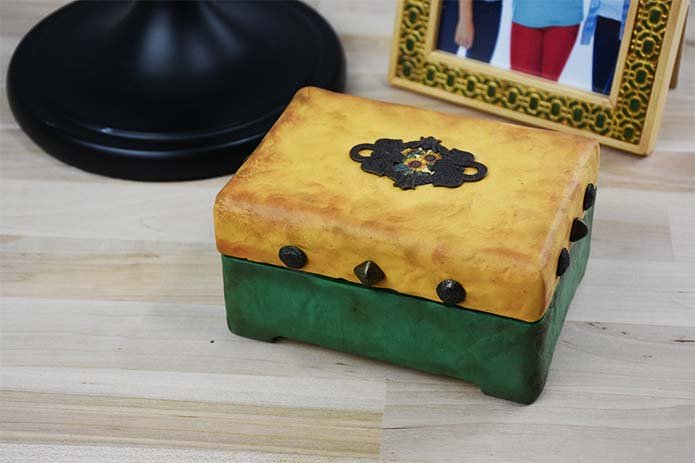
Who doesn’t love a “gadget box” for their smaller remotes or keys? This one features a clever faux leather look made easy with Sculpey Soufflé™.
ADDITIONAL SUPPLIES
- Wood or cardboard (also called chipboard) box that is about 4x5 inches on the lid
- Large texture stamp (2207J, or any one of your choice)
- Small deli sheets or thin paper
- Upholstery decorative tacks (9)
- Decorative metal piece for top
- Pan Pastel or pastels in a medium warm brown and a khaki green
- Soft brush for pastel application
- Baby wipes
- Metal coffee tamper (optional! You can use the acrylic roller for this as well)
- Pin vise or small drill
- Sturdy wire cutters to trim the brads
Project Instructions
- Getting Started:
- Start with clean hands, unwrap and knead clay until soft and smooth, or condition by running clay though a Pasta Machine. We recommend using a designated machine for clay purposes only. When working with multiple colors, clean hands with soap and water or baby wipes (we have found that baby wipes work best) before switching colors. Shape clay, pressing pieces firmly together. Wash hands after use.
- Baking:
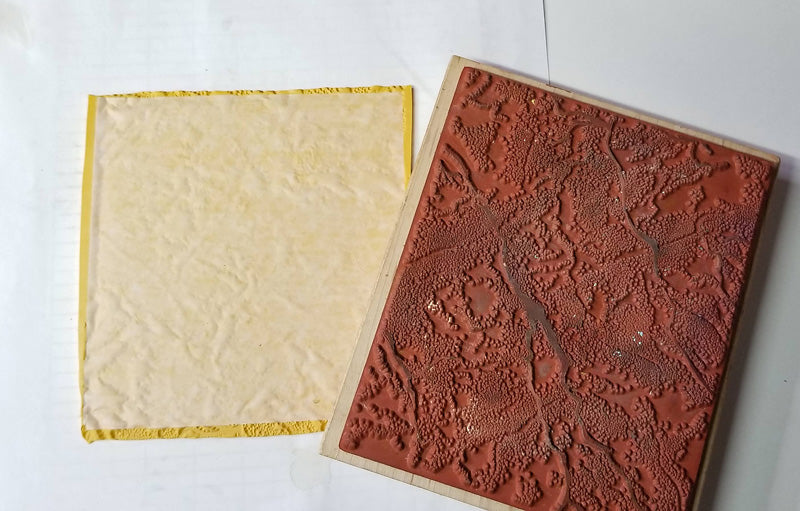
Mix the Canary 4 or 5 parts to 1 part of Cinnamon. (NOTE: You can add a very small amount of Pistachio to this mix to help keep the mix on the lighter side). Sheet this mixed clay out on the #2 or second from widest on the clay conditioning machine. Place a sheet of this clay on a sheet of clean paper. Put a sheet of deli paper or thin paper on top and put your selected stamp on top. (Note: there should be no clay showing on the edges of the deli paper). Place this stack on a firm floor and step on the stamp from all 4 sides – this will help give an even impression. The deli paper is there to soften the edges of the impression. Remove the stamp and peel the paper that was between the stamp and the clay from the clay. See how much softer this renders the stamp? (You can see the difference on the very left edge where the paper was not applied between the stamp and the clay). Repeat to make 3 sheets of stamped clay.
I prefer to remove any metal clasp on the front of the box and create my own. If there is a metal clasp, remove it or you will need to cut around it as you cover the box. I prefer to do the edges of the box top first, make a straight edge on one side of your texture clay and measure it against the side edges of the box and trim to fit. Apply a bead of Bake n’ Bond to one of the side edges of the box and spread it with your finger (use a baby wipe to clean your finger.) Apply the clay to the edges of the box. Repeat for the front edge, trimming the clay to cover the front edges of the clay on the sides. Repeat this for the back (cut around for the hinges and leave them room to open/close). Finally, apply some Bake n’ Bond to the top of the box and position it on another sheet of textured clay (check that the sheet of clay is big enough to fit the top before applying the Bake n’ Bond!). Flip the textured sheet over and place the box lid side down on the textured clay. Use the clay blade to cut the edges of the clay to cover the upper edges of the sides.

Now we need to blend the seams in. Place a sheet of the deli paper over the seam and use the coffee tamper or acrylic roller to LIGHTLY rub the seams together. Once you are satisfied with the seam, gently roll the stamp over the paper to texture it. BE PATIENT! Go lightly so that you don’t thin the clay too much on the seam.


I mixed a block of Jade with one of the 1/4 blocks of Cinnamon and added a small amount of the remaining mix from the lid (equivalent to 1/3 block). This gave me a rich, warm leather green. Stamp this mixed clay in the same method that we used for the lid clay.

Cover the bottom edges of the box as we did in Step 4. It’s easier if you keep the lid open the entire time! Cover the sides first and then the front and back so that they overlap the edges of the sides. Blend the edges as we did for the lid.

Apply a small amount of pastel to your soft brush and lightly brush the edges of the lid and the corners of the box. I randomly alternated using the warm brown and the greener color for more depth. Bake the clay covered box according to the directions in Step 1. I propped the lid open slightly while baking with my coffee tamper. (NOTE: if your wood box “leaks” any sap onto your clay, you can wipe it immediately after removing from the oven with baby wipes or a towel with hand sanitizer on it to help remove the sap. Be CAREFUL! The sap will still be hot!)


Soufflé™ is so easy to drill, I decided to wait until the box was baked and cooled to put my brads on. I trimmed the brads to about 3/8 inch length and drilled the clay and into the wood of the box slightly for each brad. NOTE: If you don’t wish to drill the box, you add the brads BEFORE baking, then just remove them and add glue before putting them back into place. You will need to trim the brads to about 1/4 inch so that they just enter the clay and not the wood. Add your metal piece or filigrees to the top of the box. Here, a small piece of scrapbook paper was also added in the middle. These were glued into place.

