
Sculpey Premo, Liquid Sculpey® and Resin Deep Space Pendant
Sculpey Premo, Liquid Sculpey® and Resin Deep Space Pendant
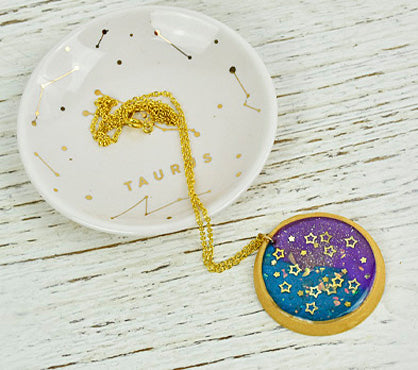
Designed by Amy Koranek
Read More
Read Less
Gold foil glitter stars float over a deep space background of blended Premo oven bake clay. The Liquid Sculpey Bezel provides the framework and poured resin gives the finished piece depth and shine.
TIME TO COMPLETE:2 Hours to make and bake
24 Hours curing time for resin
ADDITIONAL SUPPLIES
- Paper towel
- 6 mm Gold tone jump ring
- Flat nose jewelry pliers
- Gold foil confetti stars
- Alumilite Amazing Clear Cast
- Disposable or reusable measuring cups
- Disposable or reusable mixing cup
- Disposable paintbrush
- Optional - heat gun
- Optional - spritz bottle filled with 91% isopropyl alcohol
- Gold tone chain with clasp in the length of your choice
TIME TO COMPLETE:
2 Hours to make and bake
24 Hours curing time for resin
Project Instructions
- Getting Started:
Start with clean hands, unwrap and knead clay until soft and smooth, or condition by running clay though a Pasta Machine. We recommend using a designated machine for clay purposes only. When working with multiple colors, clean hands with soap and water or baby wipes (we have found that baby wipes work best) before switching colors. Shape clay, pressing pieces firmly together. Wash hands after use.
- Baking:
First, we will create the gold bezel for the framework of our pendant. Squirt a bead of Gold Liquid Sculpey® (LS) into the frame of the large round circle bezel. To get really crisp edges in the bezel edge, I use the tip of a Needle Tool (5-in-1 Needle) to trace both the inside and the outside edges of the shape. Insert the needle all the way down into the inner edge of the circle and drag it all the way around this inner edge several times. Remove the tip and wipe away excess LS on a paper towel. Insert the needle once again all the way down into the outer edge of the circle and drag it all the way around this outer edge several times. Remove the tip and wipe away excess LS on a paper towel.

Back fill the rest of the large circle shape with more Gold LS. Tap the mold several times on the work surface to release air bubbles. Bake the mold following the baking instructions for LS.

When the piece is completely cool, gently flex it to release the bezel. Poke a hole with the Needle Tool through the piece just inside the rim. You will probably have to poke through the same hole several times to make sure it is open enough to insert a jump ring.

Place the 6 mm jump ring through the hole and close it with flat nose pliers. Set the bezel aside for now.

Partially mix 1/16 bar of Opal with 1/16 bar of Peacock Pearl. Partially mix 1/16 bar of Purple Pearl with 1/16 bar of Yellow Gold Glitter. I like to only mix partially so that there is more interest in the color combinations. Use the Acrylic Clay Roller to flatten the clays into sheets that are very thin - about 1/16” thick. I allowed my edges to stay kind of rough because this will help the seam down the middle of the two colors be more mottled. Place the sheets very close together.

Cut out a 1.25” circle with the jagged seam going down the center. Remove the excess clay and save for other projects.

Place the pieces of clay sheet next to each other inside the bezel mold. Press the clay down so it is securely seated in the bezel.

Smear the two colors across the seam with your fingertip going from left to right and right to left partially mixing the two blends together. Pinch some of the Opal off of the bar adding more of the glittery pieces to the surface with your fingertip.

Use the Rubber Blending Tool to make sure the edges of the Premo are seated nicely all the way around the inner bezel frame.

Add a random sprinkle of gold foil glitter stars to the surface of the Premo. Make sure they are stuck down really well. Bake the bezel again following the baking instructions for Premo. If the jump ring keeps the piece from laying flat, you can position your piece so that the jump ring just barely hangs off of a tile or other slightly raised surface.

Read all the instructions for the Alumilite and make sure you understand how to use the resin if you’ve never used it before. Mix 1/2 ounce each of parts A and B thoroughly. This is a lot of extra resin for this project, however the Alumilite instructions state that 1 total ounce is the minimum volume that should be mixed. With this in mind, it is good to have other projects or molds ready to receive the excess resin if at all possible.

Use a disposable paint brush to cover all the textured surfaces with a thin coating of the resin. This will help relieve air bubbles that might form between the clay and the resin.
You can also use a low temperature heat gun to release air bubbles. Blow air back and forth across the surface of the resin on low heat. You will see the little bubbles twinkle and pop. Once they stop popping you can go to the next step.
A second way to release air bubbles from the surface is to spritz the surface of the resin with a fine mist of alcohol. The bubbles will pop immediately and the alcohol will dry quickly.

Once you have painted the thin layer across the clay areas and released air bubbles, you can go ahead and flood the entire area with resin. Be careful to only fill to the level edge of the bezel. If you notice air bubbles, use one of the bubble releasing techniques described in Step 13 again.
Allow the resin to cure completely, 24-48 hours, before touching. When the resin is set add the gold chain to the jump ring.
Allow the resin to cure completely, 24-48 hours, before touching. When the resin is set add the gold chain to the jump ring.
