
Sculpey III Halloween Card
Sculpey III Halloween Card
Read More
Invite your very best friends to a Halloween party they'll never forget!
Read Less
ADDITIONAL SUPPLIES
- Patterned cardstock: 3 coordinating patterns
- Ruler
- Glue stick White glue
- Toothpick
Project Instructions
Preheat oven to 275 °F. Test temperature with oven thermometer for perfectly cured clay. Condition all clay by kneading until it’s soft and smooth or by running it through the Clay Conditioning Machine for several passes on the widest setting. Fold the clay in half after each pass and insert the fold side into the rollers first.
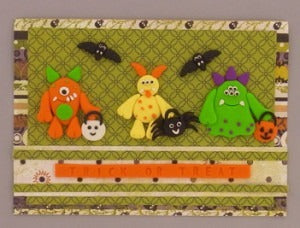
Make Sweet Potato 1-1/4" x 3/4" flat teardrop for head and body. Press on 3 tiny Granny Smith balls. Make two 1/4" x 1/2" Granny Smith teardrops and press on top of teardrop for ears. Make 1/4" White flat circle and press on 1/8" Black flat circle for eye. Press on head. With needle tool, press in mouth. Make tiny White teardrops and press on mouth for teeth. Make two Sweet Potato 3/8" x 1/2" flat teardrops and press on body for legs. Make two Sweet Potato 3/8" x 7/8" flat teardrops and press on body with arms. Make Granny Smith 3/8" flat circle and press on body for tummy. Use blade tool to press in lines on feet and hands. Make White 5/8" flat circle and cut off part of edge for treat basket. Press treat basket on hand. With Black, make and press on skinny logs and circles to make face and handle.

Make Lemonade 3/4" flat circle for body, and press on tiny Sweet Potato balls. Make Lemonade 3/8" flat circle and press on body for head. Make two 1/4" x 1/2" Sweet Potato teardrops and press on head for horns. Make three 1/8" White balls and press on tiny Black balls for eyes. Press eyes on head. With needle tool, press in mouth. Make Sweet Potato 1/4" flat circle and press on mouth for tongue. Make two White tiny teardrops and press on mouth for fangs. Make two Lemonade 1/4" x 7/8" teardrops and press on body for arms. Make two Lemonade 3/8" x 1/2" flat teardrops and press on body for legs. Use blade tool to press lines in hands, feet and tongue. Make Black 5/8" flat circle and cut off part of edge for treat basket. Press treat basket on hand. Make two White 1/8" flat circles and press on tiny black circles for eyes. Press eyes on treat basket. Make tiny White log and press on for mouth. With Black, make and press on skinny logs and circles to make legs and handle.

Make Granny Smith 1-1/2" x 1-1/2" bell shape with wavy bottom to make head and body. Press tiny Violet dots on wavy edge. Make three Violet 1/4" x 3/8" flat teardrops and press on head for horns. Make five White 1/8" flat circles and press on tiny Black balls for eyes. Press eyes on head. With needle tool, press on mouth. Make two tiny White teardrops and press on mouth for fangs. Make Granny Smith 3/8" x 1" flat teardrops and press on body for arms. Use blade tool to press lines on hands. Make Sweet Potato 5/8" flat circle and cut off part of edge for treat basket. Use blade tool to press on pumpkin lines. Press treat basket on hand. Make tiny Black logs and teardrops and press on for pumpkin face and handle.

Make Black 1/4" x 1/2" teardrop for body. Make two tiny White balls and press on tinier Black balls for eyes. Press eyes on head. Press on two tiny White teardrops for fangs. Make two Black 1/4" x 5/8" teardrops for wings. Use blade tool to press in lines on wing edges. Press wings on body. Repeat two make or more bats.

Make Sweet Potato 1"x 7" flat strip. Press in "TRICK OR TREAT" with Sculpey® Alphabet Stamper. Trim strip close to letters, and cut ends to 5" long. Bake all pieces as directed above. Allow to cool completely before handling.

Cut two 7" wide x 10" high pieces from patterned paper and glue pattern side out with glue stick. Fold in half to make 7" x 5" card. Cut 5-1/4" x 4-1/2" contrasting paper and glue onto card front. Glue clay banner on 1" x 7" patterned paper with white glue. When dry, trim with thin strips of other papers and glue on card front. With white glue, adhere monsters on card front.
Assemble the monsters right on your baking sheet so it's easy for you to bake them without deforming the characters.If you don't have scrapbooking papers and supplies, use store-bought cards and glue on monsters and banner with white glue.