
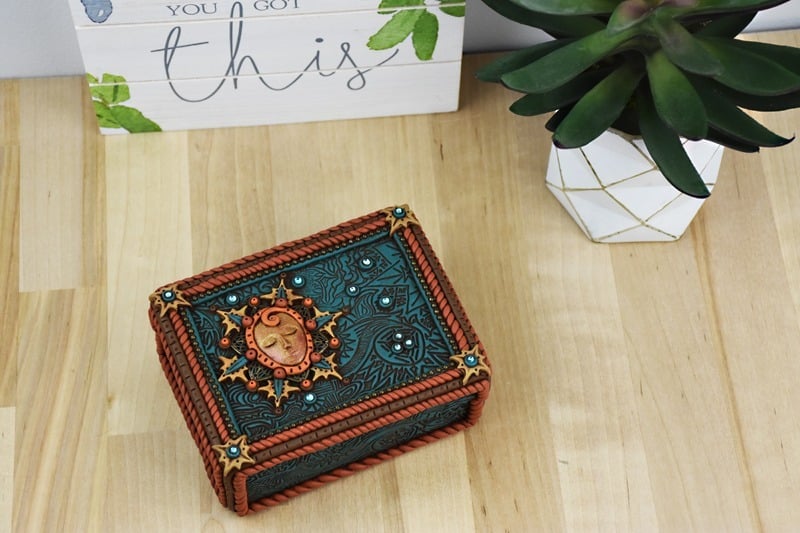
Sculpey Soufflé and Liquid Sculpey Mother Nature Mixed Media Trinket Box
Sculpey Soufflé and Liquid Sculpey Mother Nature Mixed Media Trinket Box
Designed by Syndee Holt
Read More
Read Less
This beautiful mother nature inspired mixed media box is perfect for your desk, dresser or anywhere you want a pretty box to hold your special things.
ADDITIONAL SUPPLIES
- Small box - the box in this instruction measures 4.25” X 3.5” X 2” and has a completely removable lid
- Heat set crystals
- Ball Chain
- Metal flower
- Texture sheet
- Mica Podwer
- Acrylic Paint - Brown
- Paper Towels
Project Instructions
- Getting Started:
Start with clean hands, unwrap and knead clay until soft and smooth, or condition by running clay though a Pasta Machine. We recommend using a designated machine for clay purposes only. When working with multiple colors, clean hands with soap and water or baby wipes (we have found that baby wipes work best) before switching colors. Shape clay, pressing pieces firmly together. Wash hands after use.
- Baking:
Trace around the bottom edge of the lid with a pencil onto the side of the box bottom. This will mark the boundary of where clay should be placed on the box bottom.

Cover the lid top and sides with a thin layer of Translucent Liquid Sculpey (TLS). Cover the box bottom and sides up to the pencil line with a thin layer of TLS. Set the box top and bottom aside while you prepare the clay to cover the lid.

Sheet Sea Glass Souffle through the clay conditioning machine on the thickest setting. Once the clay is fully conditioned, press through one more time on the second thickest setting. Spritz the surface of the clay lightly with water. A thin layer of water will keep the clay from sticking to the texture sheet. Impress the texture into the sheet of clay with heavy fingertip pressure in several areas so that the texture bites into the clay. Carefully roll over the texture sheet with the Acrylic Clay Roller to get the texture as deep and even as possible. Carefully peel away the texture sheet. Blot excess water from the textured clay surface with paper towel. The water can act as a barrier between the clay surface and other clays so the water should be removed before going to the next steps.

Gently place the textured sheet on the box lid top and drape it over both ends as well. Use fingertip pressure to make sure the clay is sitting well in the TLS. Make sure air bubbles are pressed out between the layers. Make sure the corners and sides are contacting well with the TLS layer

Trim the edges along the top and ends as needed with the clay blade. Cut pieces of the textured clay to cover the long sides as well. Place these on the box and trim as needed.

Twist lengths of Cinnamon Souffle into a double rope.

Place a rope of Cowboy Souffle all along the edges of the box top and down the four corners. Add the Cinnamon rope inside the Cowboy trim. Miter the corners to fit.

Add Cinnamon ropes to the sides of the box as well always lining it up to the Cowboy. Place a flower shaped metal filigree piece off-centered on the box lid top. Gently press the filigree into the clay so that the clay comes up through the openings in the metal.

Press Latte into the Whimsy mold to make six star shapes. Place these around the outside of the filigree piece.

Make little petal shapes from Sea Glass and place these on top of the Latte stars. Score lines down the middle with the tip of an Etch 'n Pearl. Add a pancake of Pumpkin to the center of the filigree and press it into place. Add a drop of TLS to the center. Pour Bronze Liquid Sculpey (LS) into the woman's face of the Whimsy Mold. Bake following the baking instructions for LS. When the mold is completely cool, flex it gently to release the face.

Place the face in the little puddle of TLS. Roll Pumpkin into a rope and cover the edge between the face and the filigree. Press Pumpkin rope gently into the filigree. Add little dots of Cowboy around the outside of the filigree points. Press them into place with the 6mm ball tool.

Highlight her cheeks, lips, and nose with pink mica powder. Add medium Cinnamon pearls around her face on top of the Sea Glass petals. Poke little holes in the pearls. Add small Pumpkin pearls to the Cowboy dots. Add dot details to the Latte stars. Add little score lines around her face. Add a rope of Sea Glass all the way around the inside of the Cinnamon twisted rope.

Trim ball chain with the wire cutters to fit the lengths of Sea Glass. Embed the ball chain in the Sea Glass rope with finger pressure

Use the Whimsy Mold to make four stars for the corners of the box top. Score lines in each star.


Add large pearls to the center of each corner star. Embed a 4mm heat set crystal in each large pearl. Embed a 3mm heat set crystal in each medium pearl. Add medium and large pearls randomly to the box top.

Add small pearls to the tips of the Latte stars and poke a little hole in each one. Add score lines to the Cowboy ropes on the edges of the box top. Add tiny dots to the corner stars. Bake the box top following the baking instructions for Souffle. When the box is completely cool, paint a thin layer of Sculpey Glossy Glaze to the face to seal the mica powder.

Cover the bottom of the box with more of the textured Sea Glass. Apply ropes of Cowboy to the edges. It may help to place the baked lid on the box so that you can make sure the bottom clay meets up to the top clay. In this photo the box is shown upside-down with the lid on the bottom

Add Cinnamon ropes to the bottom to match the top. Add decorative textures to the ropes to match the top. Bake the box bottom following the baking instructions for Souffle. Thin brown acrylic paint slightly with water so that it has a nice flow. Spread the paint in one area of the baked clay making sure the paint gets into all the details.

Immediately remove the excess paint with paper towels before moving on to another area.

Working in small areas at a time, continue applying the paint and wiping excess away.

The Glossy Glaze on the face will keep the paint from sticking to the face but it will look nice if some of the paint sticks around the edges of the face and under the eyes.

Allow the paint to dry completely.
