
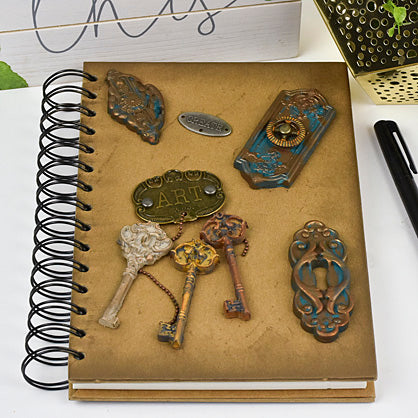
Sculpey Soufflé™ Molded Prima Art Daily Journal
Sculpey Soufflé™ Molded Prima Art Daily Journal
Designed by syndee holt
Read More
Read Less
Sculpey Soufflé™ teams up with the Prima products to create this amazing art journal!
TIME TO COMPLETION:90 minutes
NOTE: Optional: I also used Sculpey Soufflé™ Greige Granite
ADDITIONAL SUPPLIES
- Prima Art Daily Journal
- Prima Redesign Décor Moulds® -Grandeur Keyholes
- Prima Silicone Mould Keys
- Prima Art Alchemy- Metallique Wax-Bronze Age and Firebird
- Prima Mechanicals – Plated Labels and Steampunk Gears
- Instant glue or glue of choice
- 1 or 2 small plastic cups or small silicone bowls
- Small metal brads
- Disposable cosmetic sponge
- Small pieces of ball chain (optional)
- Toothpicks
- Dark grey acrylic paint and brush
- Small spray bottle of water
Project Instructions
Clay
Start with clean hands, unwrap and knead clay until soft and smooth, or condition by running clay though a Pasta Machine. We recommend using a designated machine for clay purposes only. When working with multiple colors, clean hands with soap and water or baby wipes (we have found that baby wipes work best) before switching colors. Shape clay, pressing pieces firmly together. Wash hands after use.
- Getting Started:
Start with clean hands, unwrap and knead clay until soft and smooth, or condition by running clay though a Pasta Machine. We recommend using a designated machine for clay purposes only. When working with multiple colors, clean hands with soap and water or baby wipes (we have found that baby wipes work best) before switching colors. Shape clay, pressing pieces firmly together. Wash hands after use.
- Baking:
- Getting Started:
- Baking:
Loosely chop about 1/2 block each of the Soufflé Sea Glass and Cowboy. Mix the two sets of color chunks together.

Roll the chunks together with the acrylic roller.

Lightly spray the selected keyhole mold firmly press the piece of mixed clay into the mold. Use the clay roller to help press it in.

Use the blade supplied in the Sculpey Essential Tool set to gently trim the excess clay by slicing along the top of the mold from the middle of the design to each edge. NOTE: You can add thin pieces you sliced off to any part of the clay still in the mold that may have got sliced a little too much or use the blade to slice a little more clay if needed.

Remove the clay from the mold and admire your handiwork!

Repeat the steps above to create the second keyhole. Make three of the keyholes. Bake them according to the directions above. NOTE: if you want to add a steampunk gear to the key hole pictured here, you can make the slit for the brad to go through before baking.

Fill the key molds with your selected Liquid Sculpey (LS) colors. NOTE: I mixed the Black and Gold to create a Bronze-ish color. You can mix the colors together in a small plastic cup or a small silicone cup and then pour into the mold. I added a little more gold to the mix while it was in the mold. Make several color keys and bake the molds according to the package directions.

While the keys are baking, begin the (fun!) surface work on the baked key holes. I started with the Bronze Metallique Wax and highlighted with the Firebird. I used a cosmetic sponge and just gradually built up the detail that I wanted highlighted. Set the finished pieces aside to dry.

Repeat this process for the keys. (NOTE: I elected to use the Sculpey Liquid Griege Granite as well because I LOVE that color)

I also added some Dark grey acrylic paint to some of the keys to “dirty them up” a little more.

Add the steampunk gears to the pieces you want to using the small metal brads.

Use a clean cosmetic sponge to lightly brush the Bronze Metallique Wax along the edges of the journal, building depth of color with repeated strokes. I focused on the edges, but added a few edge strokes of the sponge throughout the center of the cover.


Layout your pieces I elected to add a small bit of chain through the bottom of the ART metal label and place it behind a couple of the keys.


Glue your pieces in place and enjoy the journal!