
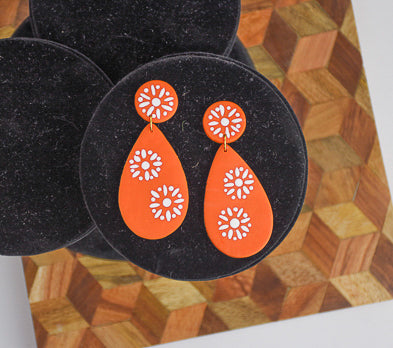
Sculpey Premo™ Faux Ceramic Earrings
Sculpey Premo™ Faux Ceramic Earrings
Designed by syndee holt
Read More
Read Less
Sculpey Premo™ Burnt Orange can recreate the look of hand painted ceramic earrings without the weight and brittleness of real ceramic.
TIME TO COMPLETION: 60 minutes
ADDITIONAL SUPPLIES
- White Acrylic paint
- Baby Wipes and a couple cotton swabs
- Gold-toned 7mm jump rings (2) or (4) if adding ear wires instead of posts
- Earring posts (2)
- Clear instant glue
Project Instructions
- Getting Started:
Start with clean hands, unwrap and knead clay until soft and smooth, or condition by running clay though a Pasta Machine. We recommend using a designated machine for clay purposes only. When working with multiple colors, clean hands with soap and water or baby wipes (we have found that baby wipes work best) before switching colors. Shape clay, pressing pieces firmly together. Wash hands after use.
- Baking:
Sheet out about 1/2 package of the conditioned Burnt Umber clay on the medium setting on the clay conditioning machine.
Use the largest of the tear drop cutters (2” cutter) to cut out at least two teardrops. (I made an extra to practice on!)
Use the smallest (.75) of the Sculpey Circle Cutter set to cut out two circles for the top of the earring.
NOTE: If you normally put your holes in the pieces before baking, do so now. (Polymer clay is so easy to drill after baking, I wait and do it after baking.) You will need a hole near the top of each tear drop and a hole in the bottom of each circle for post earrings. For ear wire mounted earrings, you will need to add a hole at the opposite side of the first hole.
Bake according to the directions above.

Once the clay is cooled, you can practice using the medium Dual End Detail tool to make your pattern. Put a small amount of the white paint onto non-porous surface, such as a tile or I like to use an empty clay wrapper. You want a puddle of the paint that isn’t really too thick (see my photo).
Tap the head of the Detail Tool into the puddle and gently tap the baked surface of the clay while holding the tool straight up and down. Once you are familiar with the dip/tap, you can add the center of the first flower to one of the baked earrings.
If you don’t like the effect or the placement isn’t quite right, just quickly wipe the paint off with a baby wipe!
Tap the head of the Detail Tool into the puddle and gently tap the baked surface of the clay while holding the tool straight up and down.
If you don’t like the effect or the placement isn’t quite right, just quickly wipe the paint off with a baby wipe!

Reverse the tool and dip the rubber end into the paint and practice applying the paint for the petals, paying attention to keeping the tool straight up and down and how much pressure you use to tap the tool to the clay.

Now add 3 more petals at right angles as shown in this photo.

Now add another petal between each of the first four petals, keeping the spacing as even as you can. Remember- you can wipe off and start again if needed! I even used a cotton swab to wipe off only one petal that I didn’t like!

Use the smaller ball stylus on the Dual Detail tool to add smaller dots between the petals as shown.
Repeat steps 3-7 to create another flower towards top of the teardrop.
Repeat steps 3-7 to create another flower towards top of the teardrop.

Now the tricky part! Making matching earrings. I started by placing my two teardrops next to each other and adding the flower centers. (Yes, the top one got wiped off and moved down!) Then just repeat the Steps 3-7 again.
You can also add a flower to the small circles for the top of the earring.
You can also add a flower to the small circles for the top of the earring.

After I have drilled the holes in the clay for assembling, I added the jump rings as shown. If you put your holes in before baking, you can just add the jump ring and then glue the post to the back of the circle or add the ear wire with a jump ring through the hole you put in the top of the circle. Ready to wear!

- Choosing a selection results in a full page refresh.
- Opens in a new window.