
Sculpey Premo™ Botanical Trinket Dish
Sculpey Premo™ Botanical Trinket Dish
Designed by Amy Koranek
Read More
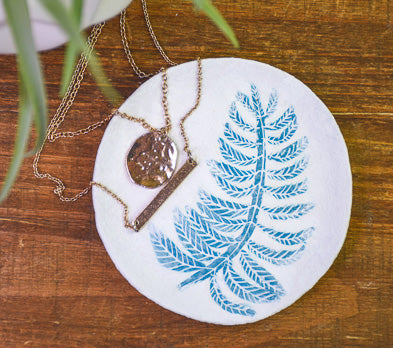
This super cool dish can grace any tabletop or dresser. We team up two classic colors -Sculpey Premo™ Teal and White with a simple whitewash for that farmhouse touch.
Read Less
ADDITIONAL SUPPLIES
- Small piece of paper
- Baking soda, 1 tsp.
- White acrylic paint
- Small plastic cup for mixing paint
- Paintbrush
Project Instructions
- Getting Started:
Start with clean hands, unwrap and knead clay until soft and smooth, or condition by running clay though a Pasta Machine. We recommend using a designated machine for clay purposes only. When working with multiple colors, clean hands with soap and water or baby wipes (we have found that baby wipes work best) before switching colors. Shape clay, pressing pieces firmly together. Wash hands after use.
- Baking:
Condition and shape a 2-ounce bar of White Premo™ into a smooth ball.

Use the Acrylic Roller to flatten the ball into a round pancake 3/16” thick.

Place the pancake on top of a piece of paper so that it will not stick to your work surface. Flatten the edge of the pancake with your fingertips to bevel the rim down toward your work surface. This will create a flat area in the middle and a thinner area around the rim.

Lift the clay from the piece of paper by peeling the paper away. Flip the clay over so that the pinched rim is now facing upward and the flat area becomes the foot of the dish.

Use your fingers to push the rim slightly upward all the way around creating a little dish.

Shape a super skinny Premo™ Teal frond for the center of your fern and place it off center in the dish.

Roll super thin sheets of Teal and cut them into long triangles. The small end of the triangles should be the same width as your smallest leaves. The wide end of the triangles should be the same width as your widest leaves.

Cut across the thin triangles with the Flexible Clay Blade making little curved leaves.

Arrange the leaves with the largest leaves at one end and the smallest leaves at the other end.

Use the Ball Tool to flatten the center frond.

Use the Ball Tool to flatten the leaves too.

Score lines in the center of each leaf with the Needle Tool.

Score lines in all the little leaves with the Needle Tool. Bend the edges of the dish upward to form a rim.
Bake the dish following the baking instructions in Step 1 above. Allow to cool completely before handling.
Bake the dish following the baking instructions in Step 1 above. Allow to cool completely before handling.

Place approximately 1 teaspoon of white paint in the bottom of a plastic cup. Add 1 teaspoon of baking soda to the paint.

Mix the paint and baking soda completely.

Spread the paint over the design liberally covering the entire dish.

Make sure all the little cracks and crevices are filled with paint.

Immediately wipe away excess paint with a damp towel. Allow to dry completely then paint the back side of the dish as well.

- Choosing a selection results in a full page refresh.
- Opens in a new window.