Sculpey Soufflé™ Jeweled Hoop Earrings
Sculpey Soufflé™ Jeweled Hoop Earrings
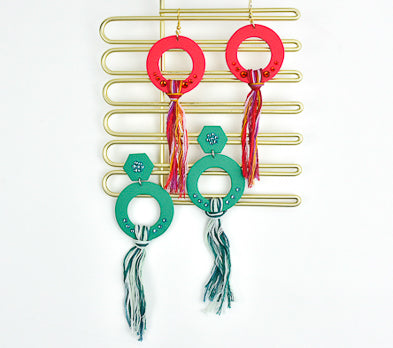
Designed by syndee holt
Read More
Read Less
The matte surface of Sculpey Soufflé™ is perfect to show off the sparkle in small colored rhinestones. Finish the earrings with some easy fringe and your earrings will dazzle with colors and textures.
TIME TO COMPLETION: 45 minutes
ADDITIONAL SUPPLIES
- Beacon Gem-Tec glue
- 3 mm flat back rhinestones in coordinating color (about 26 total)
- Embroidery thread in coordinating color
- 6 mm silver-toned jump rings (2)
- Silver-toned ear posts (2)
- A couple toothpicks
- Gel type instant glue
- Bent nose jewelry pliers or tweezers for rhinestones
- A form for making your tassels – I’ve used a wire bending rig, but you can put nails in a small piece of wood or cut a piece of stiff cardboard. My two nails are spaced 4 inches apart.

Project Instructions
- Getting Started:
Start with clean hands, unwrap and knead clay until soft and smooth, or condition by running clay though a Pasta Machine. We recommend using a designated machine for clay purposes only. When working with multiple colors, clean hands with soap and water or baby wipes (we have found that baby wipes work best) before switching colors. Shape clay, pressing pieces firmly together. Wash hands after use.
- Baking:
Sheet 1/2 of the conditioned Sculpey Soufflé™ out on the middle setting on the clay conditioning machine (pasta machine). Align the 1.75-inch cutter and the 1-inch cutter so that the smaller cutter is centered in the larger cutter. I find it easier to stand over the sheet of clay and close one eye to center perfectly every time. Once you have the cutters centered, press down firmly. NOTE: I like to put something solid, like a small block of wood, on top of the cutters and press down on the block of wood to get a better cut and save my hands!

arefully remove the clay ring that was created and the circle of clay in the smaller cutter. Position the smaller hexagon cutter over this circle and cut out a matching hexagon. Repeat steps 2 and 3 to make a pair of earrings.

Use the needle tool to put holes in the clay for assembling after baking. Make sure that the holes are positioned to match the jump ring you plan to use. Repeat for the other earring. Bake both earrings according to the directions in Step 1 above.

While the clay is baking, you can create the tassels. I use an old wire jig exclusively now to create my tassels. The posts are set 4 inches apart. You can use nails in a small board or cut a piece of stiff cardboard. Wrap the thread 6 times around the post. Start and stop the wraps on the same post (left one in this photo). Remove the thread from the posts and cut the thread at the side where you started/stopped the wraps. Trim the start/stop threads to the length of the other threads. Repeat to make two tassels.

Put the loop through the back side of the earring and pull the threads through the loop as shown. Hand tighten the loops (they can be secured with Gem Tac when you have finished the design).

Put a small amount of the Gem Tac glue on a scrap piece of plastic and put a small dot on your toothpick to apply the glue to the rhinestone while you hold the rhinestone in your pliers. I started with the center here and added the rhinestones around the center stone. .

Add three more rhinestones on either side of the tassel on the large circle. Repeat steps 7 and 8 for both earrings.

Use the needle tool to “shred” the embroidery thread by pulling the needle down through each piece. This will loosen the multiple threads in each piece of floss.

Attach the pieces together with the jump rings and glue your post finding to the back of the hexagons with the gel instant glue. Allow the glues to dry thoroughly. NOTE: you will probably want to position the post finding slightly towards the top of the hexagon and not dead center.
