
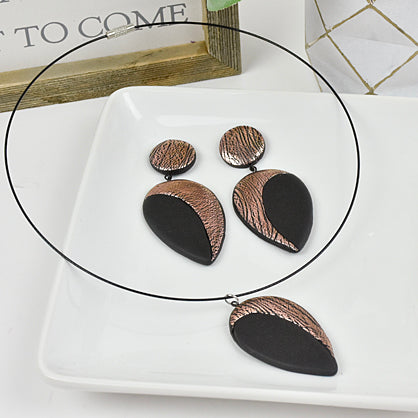
Sculpey Soufflé™ Art Deco Earrings
Sculpey Soufflé™ Art Deco Earrings
Designed by syndee holt
Read More
Read Less
Sculpey Soufflé™ teams up with ThermoWeb foils to create these amazing post earrings.
TIME TO COMPLETE: 90 minutes including baking and assembling
NOTE: If you don’t have a Clay Conditioning Machine (pasta machine), you can use the Sculpey® Acrylic Roller.
ADDITIONAL SUPPLIES
- Thermoweb Mixed Media New Penny Transfer Foil
- Black eyepins (4)
- Instant glue
- Post backs (2) or ear wires (2)
- Several sheets of plain white paper
- Jewelers drill (called a pin vise) and small drill bit
Project Instructions
- Getting Started:
Start with clean hands, unwrap and knead clay until soft and smooth, or condition by running clay though a Pasta Machine. We recommend using a designated machine for clay purposes only. When working with multiple colors, clean hands with soap and water or baby wipes (we have found that baby wipes work best) before switching colors. Shape clay, pressing pieces firmly together. Wash hands after use.
- Baking:
Sheet about half of the conditioned clay out on a medium setting on the Clay Conditioning Machine. Cut out a piece of foil that is large enough to comfortably make your earrings – my sheet is about 4 inches by 3-1/2 inches. Use the acrylic roller to burnish the sheet down to the clay. NOTE: you may want to put a sheet of paper over the foil for this process to help prevent scratching that you can see on mine. I didn’t mind the scratches.

You should be able to kind of see when the foil has left the transfer sheet, so when you are reasonably sure that it has transferred, quickly rip up the baking to expose your beautiful clay! (See the scratches came through? Buffer with a sheet of paper on top to prevent them if you want a perfectly smooth surface.)

I put my fingers under my sheet and gently stretched it to cause tiny cracks and ripples in the foil. My sheet became a little too think, so I backed it with a thin sheet of the Poppy Seed to bring it make to the medium thickness. Yes, you can run this through the clay conditioning machine!

Sheet out another small piece of the Poppy Seed on the medium thickness and use the largest teardrop cutter to cut out two plain clay teardrops and two foiled teardrops. Determine how much of the black you want to show. Cut the pieces out on a sheet of plain white paper.

I preferred to cut my foiled pieces first, cutting to the amount of area that I wanted on my earrings.

Place the cut piece of foiled clay around the plain clay teardrop and snug it to fit. Then use the same cutter to recut the teardrop, removing the excess plain clay. Repeat for the other earring.

Transfer the reshaped earring carefully to another thin sheet of Poppy Seed and recut the shape. If you like, you can combine this step with the step above so that you are only re-cutting once.

Place the completed teardrop on a clean sheet of paper and put a piece of thin paper or patty paper on top and gently rub the edges of the teardrop to round them. Carefully set these pieces aside for now.

Use the large piece that was cut away from the foiled teardrop to stack on the backing sheet again and use the smallest circle cutter to cut out a foiled circle for the top of the earring. Repeat with the other foiled piece.

Gently round the edges of the circles like we did in Step 9 above.
At this point, you can elect to put the holes in your pieces while your oven pre-heats. Souffle is so easy to drill after baking, that I choose to drill after baking.
At this point, you can elect to put the holes in your pieces while your oven pre-heats. Souffle is so easy to drill after baking, that I choose to drill after baking.

Once the clay is baked and cooled, you can add a thin layer of Sculpey® Gloss Glaze to the foiled areas ONLY. Allow to dry completely. While the glaze is drying, assemble your eye pins and either the post backs or ear wires.

If you haven’t pre-drilled the earrings, use a small jeweler drill (called a pin vise) to drill the holes and insert your eye pins with a small drop of instant glue on the pin. NOTE: the eye pin in the upper circle is positioned with the “eye” at 90 degrees from the circle and the eye pin in the tear drop is positioned with the “eye” facing you.

When the glue has dried, you can open the eye pin in the circle slightly and connect the tear drop to it before closing the pin. Glue the post back to the back of the circle or drill/insert another eye pin to attach the ear wires.
