Sculpey Premo™ Galaxy Box
Sculpey Premo™ Galaxy Box
Designed by Amy Koranek
Read More
We will recycle a cardboard cylinder-shaped canister into a handy and chic box for this project. The recycled cylinder will be covered in gorgeous Sculpey Premo™ blue/purple colors to represent deep a space galaxy. COMPLETION TIME:
2 Hours to paint, assemble, make, and bake
Read Less
ADDITIONAL SUPPLIES
- Ruler
- Pencil
- Scissors or Xacto knife
- Acrylic paint in a coordinating box color
- Paintbrush
- Cardboard cylinder box with a metal rim like an oats or hot cocoa powder container
- Acrylic paints in white, copper, and gold
- Old toothbrush for crafting
- Large circle cookie cutters in the same diameter as the inside of cardboard container and one larger than the outside diameter - these will be used to make a lid for the box

Project Instructions
- Getting Started:
Start with clean hands, unwrap and knead clay until soft and smooth, or condition by running clay though a Pasta Machine. We recommend using a designated machine for clay purposes only. When working with multiple colors, clean hands with soap and water or baby wipes (we have found that baby wipes work best) before switching colors. Shape clay, pressing pieces firmly together. Wash hands after use.
- Baking (also called Curing):
First, we need to prep our recycled can. Make sure it’s as clean as possible on the inside. The can I’m using was a small cardboard can that held oats. It had a metal rim on each end and a plastic lid. I recycled the plastic lid.

Use a ruler and pencil to draw a line all the way around the bottom of the cardboard. My line is about 2.5” from the metal edge on the bottom of the can. This is how tall my finished piece will be.

Carefully cut away the top of the can with scissors or a sharp knife. Recycle the cut away piece. Now you should have a cardboard cylinder with a metal bottom.

Paint the inside of the can with acrylic paint in a coordinated color. Paint the rim and outside edge as well to make sure no cardboard will be exposed on the final project. Allow the paint to dry.

Squeeze some Sculpey Oven Bake Clay Adhesive (OBCA) onto the outside of the can where clay will be applied. OBCA is the perfect medium for attaching raw oven bake clays to porous surfaces like cardboard.

Smear the OBCA all over the outside of the can as evenly as possible to make a thin coating. Set the prepped can aside for now to allow the OBCA to leach into the cardboard while we prep the clay.

Now we will start with a quick color mix. Blend 1/4 bar Navy with 1/4 bar Pearl to make Navy Pearl.
Sheet the entire bar of Lavender through the pasta machine on the thickest setting. You will need a piece that is not more than half as wide as your machine rollers. In the photo my Lavender sheet is about double the width of the Navy Pearl and the Mauve.
Sheet the Navy Pearl that you mixed and 1/2 bar Mauve to make sheets 1/2 as wide as the Lavender.

Slice the Navy Pearl and the Mauve so they are 1/2 as wide and lay the sheets sides touching as shown.

Sheet the colors holding them in their correct positions through the pasta machine on the thickest setting. It may be easiest to fold the striped sheet in half across the stripes, and matching like colors to like colors, putting the folded edge through the machine first. We are going for a loose blend of colors that will mimic a dusk sky.
Repeat folding across the stripes, matching like colors to like colors and pressing through the machine on the thickest setting a few times to produce a partial blending of the colors.
Repeat folding across the stripes, matching like colors to like colors and pressing through the machine on the thickest setting a few times to produce a partial blending of the colors.

To make my blends more random and less structured I like to fold the sheet across the stripes stopping about an inch down from the top edge.

Press the fold through first again and notice how much more random the blending becomes. That’s what I like!

Fold and press again through the pasta machine.

Doing partial folds will keep making the blend more random.

Now I want to show you a little blending trick that I use to soften the edges between stripes. Fold a paper towel into a soft pad at least 4 layers thick. Douse one edge of the pad with rubbing alcohol.

Use the soft pad to swipe over the clay sheet softening lines as shown.

You can also swirl the pad in a circular motion to really mix things up. Allow the alcohol on the surface of the clay to dry before moving forward.

Select a circle cutter that is a little larger than the circumference of the cardboard box. In this photo I have the box nested inside the cutter to see if I like the lip this cutter will provide as the size of the lid.

Use the circle cutter that you’ve chosen to cut your favorite section out of the blended sheet to be used as the lid.
Set the lid part aside for now.
Set the lid part aside for now.

Fold the remainder of the sheet in half right over the circle cut out as shown.

Press the folded sheet through the pasta machine lengthwise so that it gets longer. Compare the width of this new long sheet to the height of your box. If it looks wide enough to cover the height of the box you can proceed with the next step.
If it’s not wide enough use the Acrylic Clay Roller to flatten it and make it wider.
If it’s not wide enough use the Acrylic Clay Roller to flatten it and make it wider.

Next test to see if the sheet of clay is long enough to wrap the outside of the box. If not, press the clay sheet through the pasta machine lengthwise again on the second thickest setting to make it longer. You may also go down to the third thickest setting if necessary.

When the sheet is long enough, cut a straight edge across one of the short ends.

Bring the prepped box back. The OBCA will probably look foggy now as it has leached into the cardboard.
Line the edge of the long sheet of clay up with the metal bottom rim. Wrap the cardboard with the sheet being as careful as possible to not trap air bubbles between the clay and the cardboard. I’m leaving the metal rim exposed because I like the finished design.
Line the edge of the long sheet of clay up with the metal bottom rim. Wrap the cardboard with the sheet being as careful as possible to not trap air bubbles between the clay and the cardboard. I’m leaving the metal rim exposed because I like the finished design.

This is a photo of my seam where the clay met itself. I used some rubbing alcohol on another paper towel pad to smooth the seam. Once again, allow the alcohol to dry before handling the clay further.

Set the box down level on the work surface. Use the blade to slice off excess clay around the top rim.

Here’s a look at the side of my clay box.

Collect up all the scraps and trimmings we’ve made. We will use these to make the top for the box.

Sheet the clay scraps through the pasta machine on the thickest setting. You can fold the piece and press it through, fold first, as many times as you like to create a dusky sky blend.

Cut out a circle, using a circle that can fit inside the rim of the box.

Mount the smaller circle to the back center of the larger circle, from Step 19, using the Roller to press them together without distorting the shapes.

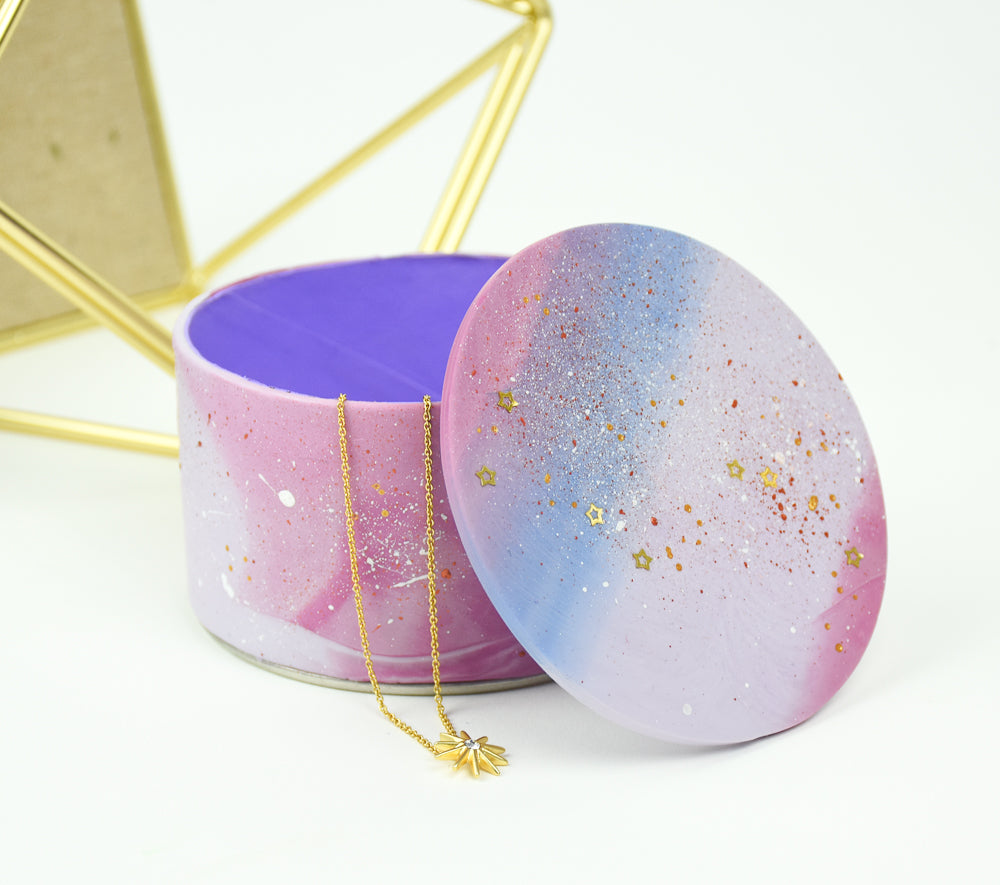
Splatter coordinating paints on the lid and sides of the box using an old paintbrush. While the paint is wet, press on a few little star shaped glitters.

Bake the box and lid following the baking instructions for Sculpey Premo™ in Step 1 above. Allow to cool completely before handling.

Here’s how the box looks from a different angle.
