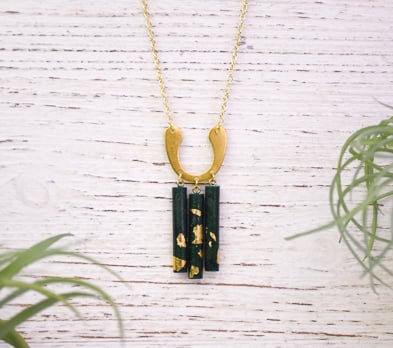
Liquid Sculpey® Emerald Sticks Necklace
Liquid Sculpey® Emerald Sticks Necklace
Designed by Amy Koranek
Read More
This glittering pendant will add a lux look to your favorite outfit! The deep green color will go with so many things already in your closet, but it is sooo pretty, you *may* need a whole new outfit to really show it off!
TIME TO COMPLETE:
90 Minutes to make, bake (twice), and assemble
Read Less
ADDITIONAL SUPPLIES
- Paper towel
- Flat nose pliers
- 2” Gold tone eye pins (3)
- 6 mm Gold tone jump rings (5)
- 18” Gold tone necklace with clasp
- Gold tone metal decorative connector
- Composite gold leaf
- Tweezers
- Paintbrush
- Flat nose pliers
- Wire cutters

Project Instructions
- Getting Started with Liquid Sculpey®:
- Baking:
- It is important to use oven thermometer when you bake the liquids so that you can ensure your oven is at the correct temperature.
- Do not microwave the liquids. They must be baked in a Preheated oven at 275 ºF (130 ºC) for liquid colors and 300 ºF (149 ºC) for Clear – Do not exceed baking temperatures.
- If your piece is less than 1/4” bake for 15 minutes. For thicker pieces that are 1/4” or above bake for 30 minutes.
- If your liquid project has become yellowed or discolored in the oven, when you remake it, tent it by placing either – folding an index card in half and placing your project under it by using aluminum foil over your project.
Here’s a tip for baking perfectly in silicone molds. Dampen a dish towel with water and wring out as much of the water as you can. Fold the damp towel so that the molds can sit level on top of it. The damp towel will slow down the curing process so that the LS will cure evenly throughout and avoid warping.
Fill the stick shapes in the 3D Jewelry Mold with Emerald Metallic Liquid Sculpey® (LS). Tap the mold vigorously on the work surface to release air bubbles.

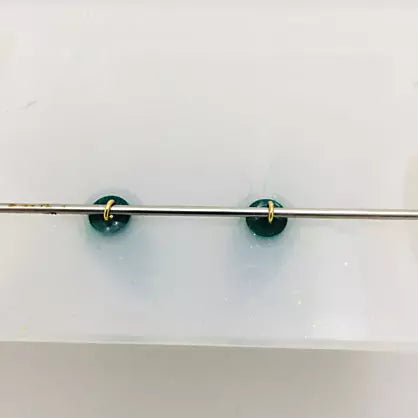
Bend each tail end of the eye pins into little loops. This little bend will help the eye pins to embed permanently into the clay pieces without being easily pulled out.

Hang two of the eye pins on one of the metal rods included in the 3D Mold package.

Dip the bent ends of the eye pins into the LS in the mold. Then settle the pins all the way in the liquid balancing the rod on the little stabilizing brackets that are built into the mold.
Bake the mold following the baking instructions for Liquid Sculpey®.
Allow the mold to cool completely.
Here’s a quick tip for releasing the baked pieces from the mold: squirt one drop of Sculpey® Clay Softener & Thinner between the baked piece and the sidewall of the mold. Use the tip of the Needle Tool to carefully drag the drop of LS around the baked shape. Be careful not to scratch or puncture the mold with the Needle Tool

Then just squeeze the bottom of the mold and the piece should easily release.
Release both sticks from the mold and then fill one of the stick shapes again following Step 2 through Step 7 making a total of three sticks.

Here’s a look at how the pendant will be laid out with the metal decorative connector.

Add little bits of gold composite leaf randomly to the sides of the baked Emerald sticks. Tweezers are very helpful when handling gold leaf. Seal the leaf into place with Sculpey® Glossy Glaze and a paintbrush. Allow the glaze to dry completely.
Connect the sticks to the decorative metal connector with jump rings using flat nose pliers to open and close them.
Cut the necklace chain in half directly opposite the clasp. Connect the necklace chain to the decorative connector with jump rings using flat nose pliers to open and close them.
Connect the sticks to the decorative metal connector with jump rings using flat nose pliers to open and close them.
Cut the necklace chain in half directly opposite the clasp. Connect the necklace chain to the decorative connector with jump rings using flat nose pliers to open and close them.

- Choosing a selection results in a full page refresh.
- Opens in a new window.