
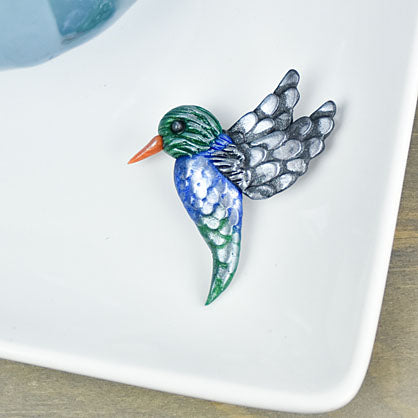
Sculpey Premo™ Hummingbird Pin
Sculpey Premo™ Hummingbird Pin
Designed by Amy Koranek
Read More
Read Less
This clever project uses the Sculpey Whimsy mold to help turn this into an easy projects for all skill levels!
ADDITIONAL SUPPLIES
- Pearl mica powder
- Silicone glue
- 1” Pin bar
Project Instructions
- Getting Started:
Start with clean hands, unwrap and knead clay until soft and smooth, or condition by running clay though a Pasta Machine. We recommend using a designated machine for clay purposes only. When working with multiple colors, clean hands with soap and water or baby wipes (we have found that baby wipes work best) before switching colors. Shape clay, pressing pieces firmly together. Wash hands after use.
- Baking:
From Rich Green make a small cone shape about .75” in length. From Azure Blue make a teardrop about 1.5” in length.

Use the large Etch ‘n Pearl to poke a hole in the fat end of the Rich Green cone. Ream the hole a bit so that it can accommodate the insertion of the Blue teardrop.

Roll both of these pieces together on the work surface maintaining the teardrop shape. Allow the teardrop to grow in length to about the same length as the Mermaid Tail cavity in the Whimsy Mold.

Press the Blue/Green teardrop into the Mermaid Tail. Pile the excess clay up above the level of the mold shape.

Use the Super Slicer to shave away the excess above the level of the cavity.

Gently flex the mold to release the hummingbird’s body. Trim the Green part down to a point to make it look like the tail is all closed up. Position the tail as you like.

Use Pewter Premo to make two hummingbird wings in the Whimsy Mold. You will need two wings going in the same direction. Press the clay into the mold, shave away excess clay, and gently flex to release the wing. Then repeat for a second matching wing.

Lay one of the wings down on the work surface and place the top of the body over the wing as shown.

Trim away some of the thicker area of the second wing and place it on top of the body. Position the wings as you like to make the hummingbird look like it is hovering.
Add a ball of Rich Green to the top of the body for the head.
Add a ball of Rich Green to the top of the body for the head.

Use the pointed end of the medium Etch ‘n Pearl to score little lines across the head and down the shoulder into the wings. The rest of the bird is pretty textured from the molded areas but I just thought these parts needed to look more blended.

Form a little nose from Vintage Copper and press it to the front of the head. Make a little eyeball from Pewter and set it in place with the small Etch ‘n Pearl.

Very carefully spread pearl mica powder just over all the raised surfaces with your fingertip. Bake the hummingbird following the baking instructions for Premo. When it is completely cool glue a pin bar to the back with silicone glue. Now be proud of your little hummingbird and you don’t have to tell anyone you made it from a mermaid tail.... unless you want to!
