
Souffle Mixed Media Bubble Pendant
Souffle Mixed Media Bubble Pendant
Designed by Syndee Holt
Read More
Read Less
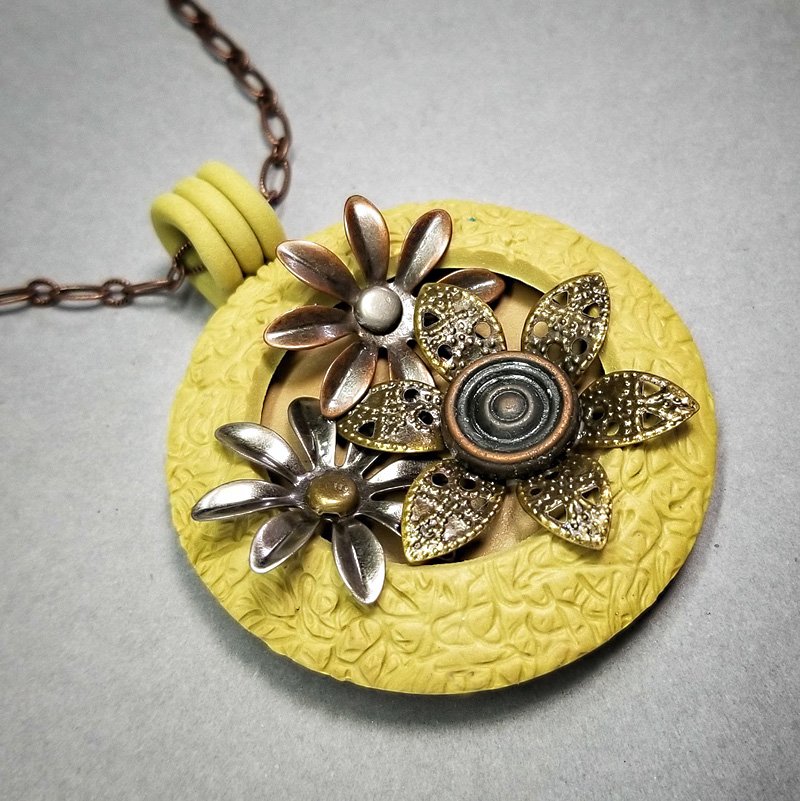
We all have at least box/drawer/container of cool metal bits and baubles, right? Sometimes it’s fun to focus on a clay color and shape and then dig through the “bits and baubles” to create a unique treasure!
ADDITIONAL SUPPLIES
- Texture material (mine is called a “soap saver”)
- Instant glue
- Assorted metal flowers and rivets (most of my are from Tim Holtz collection)
- Matching chain
- Jewelry findings
- Small spray bottle of water
Project Instructions
- Getting Started:
Start with clean hands, unwrap and knead clay until soft and smooth, or condition by running clay though a Pasta Machine. We recommend using a designated machine for clay purposes only. When working with multiple colors, clean hands with soap and water or baby wipes (we have found that baby wipes work best) before switching colors. Shape clay, pressing pieces firmly together. Wash hands after use.
- Baking:
Sheet out your selected color on the second from widest setting. NOTE: My color is Souffle Latte and Pistachio mixed 1:1). Lightly spray your texture with water and press firmly into the clay – the water will help to keep the clay from sticking in the texture.

Use the largest of the circle cutters to cut out the exterior of the clay bubble bezel and the 1.5 inch cutter to cut out the center. (TIP: I like to stand up to position that second cutter in the center!)

Settle the bubble bezel onto the largest “bump” on the Hollow Bead Maker and bake according to the directions in Step 1. (TIP: I keep my Hollow Bead Makers on top of my preheating oven so that they are warm when I put the clay on. This helps the clay to politely lay down!)

Once the bubble bezel has baked and cooled, sheet out a small amount of the remaining Latte clay on the #3 setting and use the second from largest cutter to cut out a circle of clay. Put a thin bead of the Clear LS around the edge and press the cured bubble bezel onto the circle of clay to create the back of the pendant. (NOTE: you can also texture this circle of clay, I, surprisingly, decided not to)

Begin adding your “bits and baubles” to the pendant. I added Clear LS to the backs of these flowers where they were going to touch the clay. I find that I don’t like to be “confined” to the bubble space and I bring my elements out to the top of the bubble.

Once your larger bits are in place, use small brads and decorative brads for the centers of the larger pieces. Clip the brad stems on the back to about 1/8 inch, add Clear LS and press into place. For my larger brad in the big flower, I added a small ball of clay coated in Clear LS and pressed firmly into place.

Create the pendant bail by extruding clay using the 7 round hole dye or by just rolling a small snake of clay. Lay 3 pieces side-by-side and stroke with your fingers to gently press them together. Trim to about 2 inches and gently roll one end up as shown.

Bake the filled bubble pendant and the bail- do NOT attach the bail to the pendant before baking! Bake the bail so that it is standing up as shown in Step 8, otherwise the tail will curve in the oven.
Once the clay has baked and cooled, add a small amount of instant glue the length of the bail tail and press into place on the pendant. Add your chain and findings and your new multimedia bubble pendant is done!

