
Sculpey Soufflé™ SynsPin Graduated Pendant
Sculpey Soufflé™ SynsPin Graduated Pendant
Designed by syndee holt
Read More
Read Less
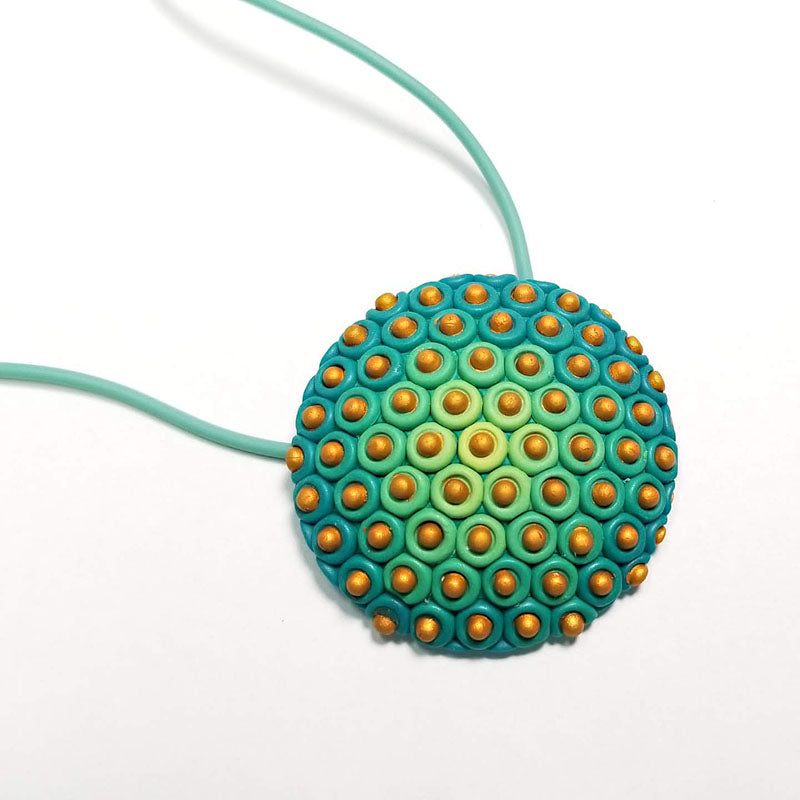
Once I figured out the secret to using the Etch n’ Pearls, I couldn’t stop using them! (the secret is a damp sponge!) I’ve shown you how to make a two color Synspin, this one features a blend of colors to add a 3D effect to the pendant. This pendant is so meditative for me to create, I hope it is for you as well!
ADDITIONAL SUPPLIES
- Small damp sponge;
- Small sheet of paper to work on
- Pendant cording (my cord is from Fire Mountain) or chain and fixtures
Project Instructions
- Getting Started:
Start with clean hands, unwrap and knead clay until soft and smooth, or condition by running clay though a Pasta Machine. We recommend using a designated machine for clay purposes only. When working with multiple colors, clean hands with soap and water or baby wipes (we have found that baby wipes work best) before switching colors. Shape clay, pressing pieces firmly together. Wash hands after use.
- Baking:
Making the Blended Sheet of clay:
This is a modified version of a Skinner blend, so sheet out about ½ block of the conditioned Sea Glass on the widest setting on your clay conditioning machine. Trim it to about a 3 inch square. Sheet out some of the conditioned Pistachio clay and trim to about 1-1/2 inches wide. Cut the Sea Glass square in half and lay the Pistachio down the center, overlapping the edges of the Sea Glass as shown. Press the clay into position and fold this sheet of clay in half. Sheet the clay through the clay conditioning machine, always keeping that Pistachio stripe perpendicular with the rollers of the machine. Repeat until you see the blend appear. It does NOT have to be perfect smooth! Sheet this blend out (still with the stripe perpendicular) on the thin setting (about #4 on my machine. You want it thin, but not paper thin).
This is a modified version of a Skinner blend, so sheet out about ½ block of the conditioned Sea Glass on the widest setting on your clay conditioning machine. Trim it to about a 3 inch square. Sheet out some of the conditioned Pistachio clay and trim to about 1-1/2 inches wide. Cut the Sea Glass square in half and lay the Pistachio down the center, overlapping the edges of the Sea Glass as shown. Press the clay into position and fold this sheet of clay in half. Sheet the clay through the clay conditioning machine, always keeping that Pistachio stripe perpendicular with the rollers of the machine. Repeat until you see the blend appear. It does NOT have to be perfect smooth! Sheet this blend out (still with the stripe perpendicular) on the thin setting (about #4 on my machine. You want it thin, but not paper thin).


Sheet about 1/2 package of the conditioned Jade clay out on the middle setting (Or second from largest if your middle is thin). This will be the base of the pendant. Use the largest Etch n’ Pearl. Always press it into the damp sponge before pressing it into the clay. The sponge provides just the right amount of moisture to help the clay release from the tool. Press the tool into the very center of the blend, which should be just the plain Pistachio. Add this dot of clay to the center of the Jade sheet. Now add a row of dots around this center dot and are from side of the original dot, so that there is a slightly darker color.


Continue adding the dots around the outside edge, placing a dot in the notch of two dots in the row next to it. Each row of dots should be progressively darker than the previous row as you move out through the blend. Before you get too far, use your largest circle cutter to gently mark the area of the pendant so you know how far you are working out. (NOTE: it’s 4 rows of dots from the center dot, but you may need some extra dots to help round the design to fit the cutter marks. If you are working on a small piece of paper, you can turn the paper to help you add the dots.

Once you have filled out the dots to cover the area that the cutter marked, sheet out a small piece of the Gold clay on the wide-open setting. Now use the sponge and the smallest Etch n’ Pearl to add “pearls” to the center of each dot of color. These pearls can be added a random, you don’t need to follow the pattern this time!

Once all the dots are in place, use the circle cutter to cut out the completed circle. Use the palm of your hand to gently press it into place on the largest bump on the Hollow Bead Maker. (NOTE: I keep my Hollow Bead Makers on top of my oven, so that they warm when I preheat the oven. The warmed metal makes the clay wants to bend and stick easier!)

Making the Montarse Easy Back: Use the 1 inch circle cutter to cut a circle of clay from a medium thickness piece of the Jade clay. I use the teardrop cutter from the Sculpey Mini Cutters-Basic Shapes to cut the notches in the top of the circle for the cord to go through. If you don’t have this cutter in your stash you can also just cut notches with an Exacto knife. Place this circle on the second from smallest bump on the Hollow Bead Maker. Bake both pieces as directed in step 1.

Once the clay is baked and cooled, glue the Montarse Easy Back to the back center/top of the pendant. Allow the glue to dry before adding the cord. (NOTE: you can actually add the cord first and then CAREFULLY glue the back to the pendant, making sure that the cord is not touching any of the glue. That way if you are using cording with the closures in place, you don’t have to worry about fitting the closures through the holes!)
