
Sculpey Soufflé™ Geometric “Printed” Earrings and Pendant
Sculpey Soufflé™ Geometric “Printed” Earrings and Pendant
Design by syndee holt
Read More
Read Less
Sculpey Soufflé™ teams up with Gelli Arts Gelli plate and Geometric Stencil to create this great pendant earring set.
ADDITIONAL SUPPLIES
- 3x5 Gelli plate
- Gelli Arts Roundabout stencil (small pattern)
- Turquoise acrylic paint
- Copper/Bronze metallic acrylic paint (mine is Jacquard Lumiere) A heavy acrylic is best for texture
- Small stencil brush
- 9mm Antique copper jump rings (2 for earrings, 3 for pendant)
- Posts (2) or ear wires and 2 more 6mm jump rings
- Antique copper chain in preferred length.
- Small paint brush for gelli print
- Baby wipes

Project Instructions
- Getting Started:
Start with clean hands, unwrap and knead clay until soft and smooth, or condition by running clay though a Pasta Machine. We recommend using a designated machine for clay purposes only. When working with multiple colors, clean hands with soap and water or baby wipes (we have found that baby wipes work best) before switching colors. Shape clay, pressing pieces firmly together. Wash hands after use.
- Baking:
Make a sheet of the conditioned Cornflower clay that is about 3x3 on the second from widest setting on the clay conditioning machine (pasta machine).
Place a small amount of the turquoise paint on your brush and quickly swirl across the gelli plate.
IMMEDIATELY press the sheet of clay against the plate. NOTE: It often helps to put a sheet of paper across the top of the clay sheet so you can GENTLY stroke with your hand to make sure that there is full contact with the plate.
Remove the sheet of clay and clean the Gelli plate with a baby wipe or a water moistened towel. Set the clay aside.


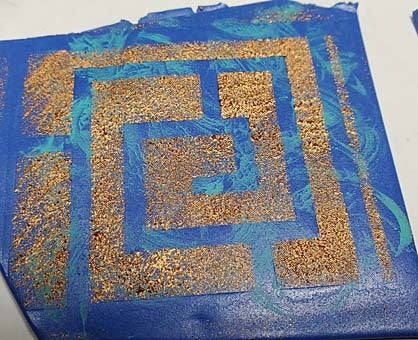
The printed clay will dry fairly quickly so you can move onto using the stencil. NOTE: I cut a line of the stencil off the original so that I could work with it without accidentally damaging the rest of the stencil.
Apply the copper/bronze paint to the small stencil sponge and sponge over the stencil. Remove the stencil and clean it with a baby wipe or towel and water.
Apply the copper/bronze paint to the small stencil sponge and sponge over the stencil. Remove the stencil and clean it with a baby wipe or towel and water.


I love the texture that this creates! Repeat to create a second sheet if you wish to make the pendant as well.
While I was waiting for this paint to dry, I decided to do another sheet of clay with the paint colors reversed, so I Gelli printed the bronzed paint and stenciled with the turquoise color.
While I was waiting for this paint to dry, I decided to do another sheet of clay with the paint colors reversed, so I Gelli printed the bronzed paint and stenciled with the turquoise color.
Take another small sheet of clay and just stencil the bronzed paint color on it. Set aside to dry.

Once the paints are dry, you can trim to the stenciled image, leaving a small line of selvage on each edge.

Use the circle cutters to cut out pieces to use for the top/bottom of the pendant and possibly for the earring.

I had an extra stencil (okay, I had one that wasn’t so great) so I cut out some circle from it for the tops of the earrings.
Use your needle tool from the Sculpey Clay Tool Starter Set to put the holes for assembling. I prefer to hand drill after baking because Souffle is so easy to drill – that way I can determine later if I want these as post earrings or add earwires.
Use your needle tool from the Sculpey Clay Tool Starter Set to put the holes for assembling. I prefer to hand drill after baking because Souffle is so easy to drill – that way I can determine later if I want these as post earrings or add earwires.

Here are all my pieces ready to be transferred to my baking sheet (I bake on cardboard box flaps). I’ve digitally added the holes for you to see where to position them before baking. (These holes are large so you can see them – your needle tool will make the perfect sized hole!).
Bake as directed in Step 1 above and allow the pieces to cool before you assemble them (I know – mine are barely cool when I start to work on assembling because I CAN’T WAIT!)
Bake as directed in Step 1 above and allow the pieces to cool before you assemble them (I know – mine are barely cool when I start to work on assembling because I CAN’T WAIT!)

- Choosing a selection results in a full page refresh.
- Opens in a new window.