
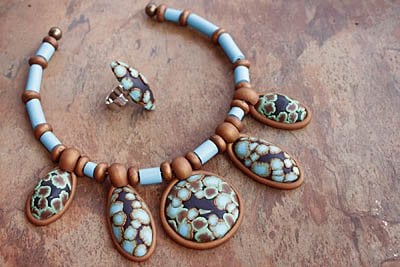
Sculpey Premo™ Speckled Faux Turquoise
Sculpey Premo™ Speckled Faux Turquoise
Making faux Turquoise is always a fun way to play with clay!
- Flexible cabachon mold
- Spray bottle of water for mold release
- Bead Wire
- Chain with clasp
- Metal ring finding
- Getting Started:
Start with clean hands, unwrap and knead clay until soft and smooth, or condition by running clay though a Pasta Machine. We recommend using a designated machine for clay purposes only. When working with multiple colors, clean hands with soap and water or baby wipes (we have found that baby wipes work best) before switching colors. Shape clay, pressing pieces firmly together. Wash hands after use.
- Baking:
These cabochons are created using a Skinner blend cane technique. There are several ways to create a Skinner Blend. I use the technique that Judith Skinner showed me to create this Skinner blend:
Create the green color of the blend by mixing 3 parts Leaf Green with 1 part Burnt Umber and 1 part White.

Roll this mixed color out on the #1 setting of the Sculpey Clay Conditioning Machine and trim to create the biggest rectangle you can out of your sheet of clay. Roll out the Turquoise clay on the #1 setting. Set the Green rectangle on top of the Turquoise and trim the Turquoise to the same size. Immediately separate the two rectangles. My triangles tend to be about 3 inches by 1-/12 inches. You can make smaller or larger.

Place the Turquoise rectangle on a sheet of paper and use the Super Slicer to cut the rectangle from the bottom right corner to the center top of the rectangle.

Grasp the small piece and rotate it counter-clockwise; place it on top of the larger piece to create a 90-degree triangle.

Repeat steps 3-4 with the green rectangle. Align the pieces as shown in the photo to create a large square.

Fold the top portion down at the center cut to create a double layered rectangle as shown.

Place this doubled rectangle into the Clay Conditioning machine, set on the #1 setting with the long edge down. Roll through the machine. Fold the sheet of clay from bottom to top, do NOT rotate the sheet of clay left or right. Continue to fold and roll the sheet of clay until the blend from one color to the next is smooth. It takes at least 6-10 times through the machine.

Retrim the blended sheet of clay to a rectangle and position the clay in the Clay Conditioning Machine, set on #5 so that the THIN edge (with the lighter color) is placed into the machine. Roll the sheet of clay through on the #5 setting to create a long thin sheet of clay. Take care to keep the sheet of clay from sticking to itself. NOTE: Save the trimmed piece of clay!

Place the long, thin sheet of clay on your work table and roll a small cylinder of Turquoise about 1/4 inch in diameter.

Place the cylinder at the Turquoise end of the sheet of Skinner blended clay. Carefully roll up the sheet of clay so that the roll has the Turquoise in the center and the Green mix on the outside.
NOTE: I keep that trimmed portion of the blend and bake it to help me recall exactly what colors the blend was created from.

Squeeze the rolled clay in the center with your fingers, turning the roll frequently to keep a rough round shape. Squeeze the roll down to each end in the same manner to reduce the diameter of the roll about 30 percent.

Place the reduced roll on your work surface and roll gently to smooth the surface and further reduce it to approximately ½ inch diameter. Cut the roll in half and admire your beautiful Skinner blended cane!

Set the Skinner Blend roll aside and mix the Gold and Burnt Umber at a 3:1 mix. This will create a very rich bronze color. Roll a sheet of this clay out on the #3 setting, cut a straight edge on this sheet and set the reduced roll at this edge. Trim the Gold/Burnt Umber to match the length of the Skinner Blend roll.

Carefully roll the Skinner Blend roll up in the sheet of Gold mix until the lead edge of the Gold mix just touches the other end.

Roll the Skinner Blend back and cut at the dent in the clay left by the lead edge of the clay. Trim the clay at this mark and the edges of the clay will just meet with no overlaps.

Roll the wrapped roll to smooth out any air bubbles and to help blend the edge. Now there will be an even line of the Gold mix around the Skinner Blend rolls. This is a basic millefiori cane. Cut this new cane in half.

Take an old credit card (finally a good use for these things!) and push it into the side of the cane. Rotate the cane and repeat this at uneven intervals around the entire cane.

Roll the other half of the cane about 30 percent smaller and use the credit card to make irregular dents around the edge of this smaller cane. Grasp one end of the cane and gently pull it to makes this end slightly smaller. You should have at least 3 different sizes of the cane now.
To create the cabochon:
Cut off about ¼ of a 2 oz bar of Black clay and roll and squeeze it in your hands to warm it up and make it pliable (this is called conditioning!). Roll it into a ball about ¾ of an inch in diameter.

Spray the mold lightly with water and press the ball of clay into the mold. Lay your Super Slicer on the mold and gently slice off the excess clay.

Cut very thin slices of your canes and place them around the edge of the cabochon.

Once you have placed all your cane slices, position the clay back into the mold and press gently. Use your Super Slicer to remove the excess clay again and your speckled turquoise is complete!

You can insert a pendant bail into your completed cabochon and bake as directed on the clay package for a simple pendant.

When the completed cabochon is trimmed but still in the mold, press the Sculpey Round Fashion Ring into the cabochon before you remove it from the mold. Support the ring in a small round metal cutter when baking.

Extrude some of the Gold/Burnt Umber mix using the teardrop dye. Wrap it carefully around the edge of the cabochon, and bring the ends together at the top of the cabochon.

Extrude a two inch piece of the Gold mix using the half circle dye and roll one end to create a bail, bringing this loop over seams of the teardrop clay. Attach the remainder to the back of the cabochon.

Bake as directed.
