
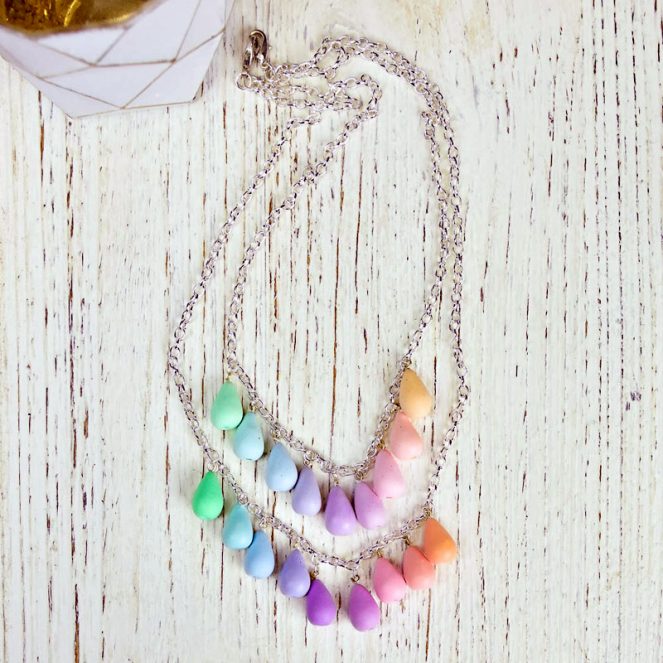
Sculpey Premo Pastel Color Spectrum Necklace
Sculpey Premo Pastel Color Spectrum Necklace
Designed by Amy Koranek
Read More
Read Less
This pastel color statement necklace that will be perfect with your Spring/Summer wardrobe.
TIME TO COMPLETE:60 minutes to make & bake
60 minutes to assemble
ADDITIONAL SUPPLIES
• 1” Silver tone head pins (18)
• 6mm Silver tone jump rings (20)
• 18” Silver tone chain
• 20” Silver tone chain
• Silver tone lobster clasps (2)
• Round nose jewelry pliers
• Flat nose jewelry pliers
Project Instructions
- Getting Started:
Start with clean hands, unwrap and knead clay until soft and smooth, or condition by running clay though a Pasta Machine. We recommend using a designated machine for clay purposes only. When working with multiple colors, clean hands with soap and water or baby wipes (we have found that baby wipes work best) before switching colors. Shape clay, pressing pieces firmly together. Wash hands after use.
- Baking:
This design is based on a teardrop shape. It’s really important that all of the teardrops are very similar in size. The best way to get them all the same size is to make sure the volume of clay for each teardrop is equal. Start by flattening each pastel color to the exact same thickness. Press them through the pasta machine on the thickest setting or roll conditioned clay to 1/8” with the Acrylic Clay Roller. Cut out two 1” circles from each color using the 1” circle cutter. Now each circle should be very similar in volume. Leave one of each color whole and cut one of each color in half. Lay the circles out from left to right as shown: Apricot 1/2 Apricot and 1/2 Rose Quartz Rose Quartz 1/2 Rose Quartz and 1/2 Pale Amethyst Pale Amethyst 1/2 Pale Amethyst and 1/2 Clearwater Blue Clearwater Blue 1/2 Clearwater Blue and 1/2 Mint Green Mint Green You will have 1/2 Apricot and 1/2 Mint Green leftover.

Completely mix the half and half colors together to form the intermediate colors. Roll each individual color into a ball. Shape each of the balls into teardrop shapes as shown. To make a teardrop it’s easiest if you start with a smooth ball. Then slightly pinch the ball between your thumb and forefinger to form the teardrop.

From the remaining flattened clay in Step 1 cut another 1” circle of each color. Sheet White Premo to the same thickness as the pastel colors. Cut out five 1” circles of White as well. For this series of teardrops, each one will be half White making the colors more muted. Lay out the circles from left to right as shown: 1/2 White and 1/2 Apricot 1/2 White and 1/4 Apricot and 1/4 Rose Quartz ` 1/2 White and 1/2 Rose Quartz 1/2 White and 1/4 Rose Quartz and 1/4 Pale Amethyst 1/2 White and 1/2 Pale Amethyst 1/2 White and 1/4 Pale Amethyst and 1/4 Clearwater Blue 1/2 White and 1/2 Clearwater Blue 1/2 White and 1/4 Clearwater Blue and 1/4 Mint Green 1/2 White and 1/2 Mint Green

Mix each of the color combinations and shape them into balls. Shape each mixture into a teardrop shape as shown

Here’s how the teardrops will look with the darker ones on the top and the lighter ones on the bottom.

Poke a 1” head pin through the bottom of each teardrop shape, seating the head slightly into the clay of each one. Pull the head pin into the clay so that you have at least 1/4” of the pin protruding from the top of the clay teardrop.

Bake all the teardrops following the baking instructions for Premo. When they are completely cool, use the round nose pliers to curl a little eye into each one.

Separate the lighter teardrops from the darker teardrops. Open and attach a jump ring to each eye with the flat nose pliers. Starting with the darker set of teardrops, position the Pale Amethyst teardrop in the center of the 20” chain and close the jump ring attaching it to the chain. Work from the center outward attaching the colors on either side of the central Pale Amethyst. Close the jump rings with the flat nose pliers.

Position the teardrops on the chains in order with the darker colors on the 20” chain and the lighter colors on the 18” chain as shown. Connect the ends of the chains together with a jump ring. Add a lobster clasp to each of the jump rings before closing. Using a lobster clasp on each end of the chain makes the chain easy to wear for both right-handed and left-handed wearers.
