
Liquid Sculpey® and Sculpey Premo™ Bohemian Rhapsody Pendant
Liquid Sculpey® and Sculpey Premo™ Bohemian Rhapsody Pendant
Designed by Amy Koranek
Read More
Read Less
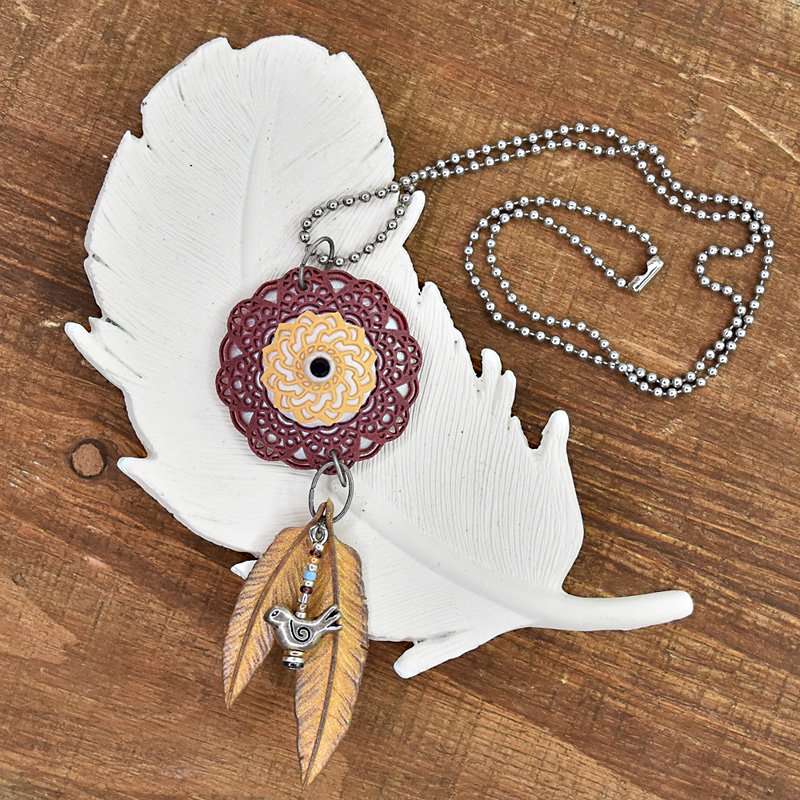
The Mandala and the Boho Chic molds make the perfect pairing with some Liquid Sculpey and Premo Sculpey to create your ultimate bohemian look pendant.
ADDITIONAL SUPPLIES
- Silicone baking liner
- Black mica powder
- Paintbrush
- Small oval shaped antique silver tone jump ring
- Medium oval shaped antique silver tone jump ring
- Large oval shaped antique silver tone jump rings (2)
- Silver tone bird bead
- 2” Silver tone head pin
- Assorted seed beads in coordinating colors
- Assorted metal flat spacer beads
- 3mm Dark red heat set crystal
- Flat nose jewelry pliers
- Wire cutters
- Round nose jewelry pliers
- 24” Antique silver tone ball chain with clasp
Project Instructions
- Getting Started:
Start with clean hands, unwrap and knead clay until soft and smooth, or condition by running clay though a Pasta Machine. We recommend using a designated machine for clay purposes only. When working with multiple colors, clean hands with soap and water or baby wipes (we have found that baby wipes work best) before switching colors. Shape clay, pressing pieces firmly together. Wash hands after use.
- Baking:
Fill the large and the small feather shapes in the Boho Chic mold with Gold Liquid Sculpey® (LS). In the photo I have filled all three feathers but you will only need the large and the small ones. Squeegee off excess Gold LS as needed so the feathers are not overfilled. Add a thin line of Pearl LS down the center of each one. I’m putting this little detail on the backs of the feathers so that when worn, they will look pretty from both sides if they flip over

Use the needle tool to drag the Pearl LS out through the Gold LS in streaks like a real feather.

Bake the feathers in the mold following the baking instructions for LS. When the mold is completely cool, gently flex it to release the feathers. Apply black mica powder to the edges and the raised vein of the feathers with your fingertip.

Apply a thin layer of Sculpey Satin Glaze to the feathers to seal the mica powder in place so that it will not rub off later. Allow the glaze to dry completely.

Use a needle tool to poke a hole in each of the quills.

Hook the quills together with a large oval shaped jump ring. On a head pin, place three metal spacers, a bird shaped bead, and an assortment of seed beads. Trim the head pin to within 3/4” of the top bead. Curl a loop in the tail of the pin with round nose pliers. Attach a small oval jump ring to the loop and to the large jump ring between the feathers. Set this element aside for now.

In a silicone baking cup, place a dime sized amount of Red LS, a dime sized amount of Silver LS, and two drops of Black LS.

Stir the mixture completely with a purple tool. We are going for a deep antique red color. You can adjust the color to your liking.

Fill the second largest mandala with the deep red liquid. Bake the mold following the baking instructions for LS.

While the mandala is baking, sheet Pearl Premo through the clay conditioning machine on the second thickest setting. Cut out a 1.5” circle. Press the circle onto the second largest dome of the Hollow Bead Maker.

When the mandala is completely cool, release it from the mold by gently flexing it. Press the baked mandala over the top of the Pearl Premo on the Hollow Bead Maker.

Cut another Pearl circle .75”. Place it on top of the mandala.

Fill the third largest mandala with Gold LS and bake if following the baking instructions for LS. When the mandala is completely cool, release it from the mold by gently flexing it. Press the baked mandala over the top of the Pearl Premo on the Hollow Bead Maker.

Press a divot in the center of the Pearl clay with the 6mm Ball Tool.

Set a large pearl in the center with the Large Etch ‘n Pearl tool. Set the red heat set crystal firmly in the center pearl. Bake the mandala on the Hollow Bead Maker following the baking instructions for Premo making sure your oven is reset to 275F

When the Bead Maker is completely cool, gently flex the mandala design off of it. Attach the feather elements to the bottom of the mandala and the chain to the top of the mandala as shown.

Designer’s Note - When I’m all finished with a project, I fill my mandala mold with any remaining tinted LS and bake the pieces to save for later projects. Then I bake the silicone cups with the residue of the LS in them. When they are completely cool, the residue can be peeled out of the cups and discarded. Wipe out the cups with paper towels and store to use again later. The silicone cups I use are from the baking department and designed for use as cupcake liners.