
Sculpey III Glitter Rainbow Earrings
Sculpey III Glitter Rainbow Earrings
Designed by Khyrstyne Dunaway
Read More
Read Less
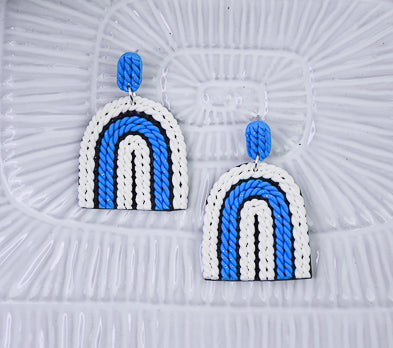
This design, created with Sculpey III, is a fun ‘twist’ on trendy rainbow earrings. They have a woven or knitted feel to them that makes them unique. These earrings are the perfect piece to add a statement to any outfit!
TIME TO COMPLETION: 60 minutes
ADDITIONAL SUPPLIES
- Toothpick
- Oval shaped clay cutter (1.1cm x 1.5cm)
- Clay extruder (optional)
- Silver-toned earring backs x 2
- Silver-toned jump rings x 2
- E6000 glue
Project Instructions
- Getting Started:
Start with clean hands, unwrap and knead clay until soft and smooth, or condition by running clay though a Pasta Machine. We recommend using a designated machine for clay purposes only. When working with multiple colors, clean hands with soap and water or baby wipes (we have found that baby wipes work best) before switching colors. Shape clay, pressing pieces firmly together. Wash hands after use.
- Baking:
Hand roll glitter white clay into very thin strands. A clay extruder may also be used for this step but is not necessary. You will make 16 white strands total.

Take 2 strands and seam them together gently. Repeat until all white strands are in pairs – 8 total

Take a paired strand and twist them continuously. Repeat this until all white pairs are twisted. You will need 4 white twisted pair strands for each earring.


Now, take 2 of the white twisted strands and shape them into a rainbow.

Take the black glitter clay and hand roll (or use a clay extruder) to make one very thin black strand. Shape this strand on the outside of the rainbow shaped white strands.

Roll out 8 long, thin strands from the blue glitter clay. Twist them and pair them as you did with the white strands, then shape 2 of them into the rainbow on top of the black strand.


Repeat step 6 by putting a small thin black strand on top of the blue strands. Then, repeat steps 4 and 5 to place 2 more white twisted strands on top of the black strand.
Repeat steps 2-8 to make the second earring. You are now ready to cut your rainbows!
IMPORTANT- when you cut your rainbows, make sure to save the cut blue twisted strands as they are. You will use them for the next step.
Repeat steps 2-8 to make the second earring. You are now ready to cut your rainbows!
IMPORTANT- when you cut your rainbows, make sure to save the cut blue twisted strands as they are. You will use them for the next step.


Once your rainbows are cut, you are ready to make the stud pieces. Take your blue glitter clay and press a small circle into your mat. Then, take your leftover twisted blue strands and line them up on top of the circular pressed clay.


You will now take a small oval cutter and cookie cut your blue clay. Repeat step 9 and 10 again to make the other side of the earring.

Take a toothpick or similar object and poke holes in the small blue studs.

Roll out a slab of black glitter clay so that it is flat and smooth. Place your rainbows on top of this and use a cutting tool to cut the shape of the rainbow out of the black clay. Then, take a toothpick and poke holes in the top of the rainbows.

Each of these pieces will bake at 275 F degrees for 15 minutes. Assemble as shown.
