
Liquid Sculpey® Terrestrial Triangles
Liquid Sculpey® Terrestrial Triangles
Designed by Amy Koranek
Read More
Read Less
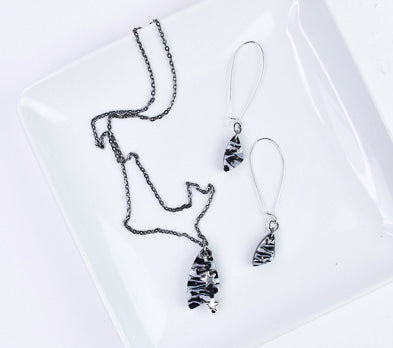
These super cool earrings are a breeze to make with Liquid Sculpey® and the Sculpey Tools™ Bakeable Jewelry Mold. In the photos you will see that other wells are filled with Liquid Sculpey® (LS) besides the ones we are currently working on. In this way we can completely fill the mold and all the pieces can be cured at the same time.
TIME TO COMPLETE:45 minutes
ADDITIONAL SUPPLIES
- Paper towel
- Table pepper
- Small sharp scissors
- 9mm Dark silver tone jump rings (3)
- 6mm Dark silver tone jump rings (3)
- Dark silver tone chain with clasp
- Dark silver tone ear wires (2)
- 2” Silver tone head pin
- Black seed beads (4)
- Small silver tone star beads
- Flat nose pliers
- Round nose pliers
- Wire cutters
Project Instructions
- Getting Started with Liquid Sculpey:
- Baking:
Fill the triangle shapes with Black Liquid Sculpey® (LS) to level. Tap the mold gently on the work surface to release air bubbles. Yes, I know, we have a lot of wells filled by now. You just have to tap really really gently and carefully.

Drip and drag a thin line of Silver LS back and forth across the triangle shapes. You may want to practice squirting a super thin line on paper before adding it directly to the mold. Drip and drag a thin line of Pearl LS back and forth across the Silver lines.

Put a tiny amount of pepper in the palm of your hand. Use thumb and finger to sprinkle tiny bits of pepper on top of the LS designs. When the entire mold is filled, bake the mold following the baking instructions for LS.

When the mold is completely cool, carefully remove the pieces by gently flexing it. When the pieces are removed from the mold, they will have an excess of random lines across the shapes.

You can remove the excess baked LS from the shapes by snipping it off with small sharp scissors.

For the pendant, connect the triangle shape to the chain with a jump ring. String stars and seed beads onto the head pin. Trim the head pin to 3/4” tail above the beads. Curl a loop into the tail of the head pin securing it just above the beads. Attach it to the pendant piece with a small jump ring.
For the earrings, connect a large jump ring through the hole of each small shape. Connect the large jump ring to the ear wire with a smaller jump ring using flat nose pliers.
For the earrings, connect a large jump ring through the hole of each small shape. Connect the large jump ring to the ear wire with a smaller jump ring using flat nose pliers.

- Choosing a selection results in a full page refresh.
- Opens in a new window.