
Liquid Sculpey® Sparkling Cylinder Earrings
Liquid Sculpey® Sparkling Cylinder Earrings
Read More
Read Less
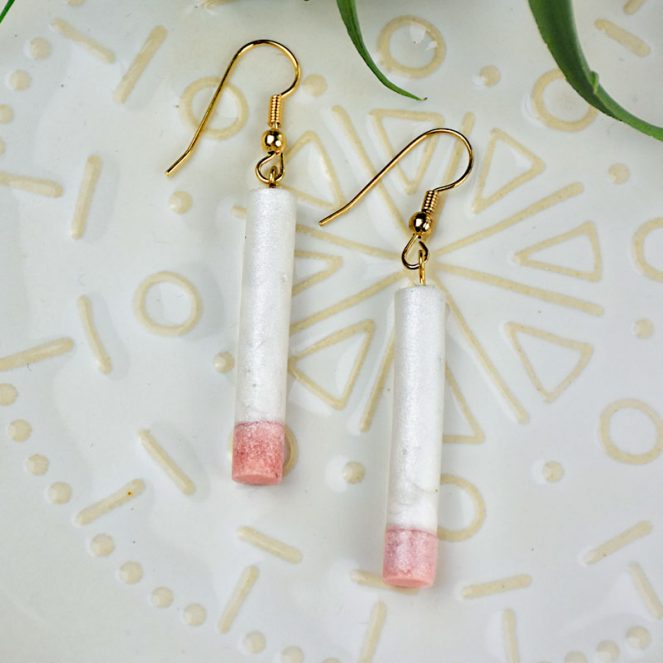
Liquid Sculpey teams with the Sculpey 3D Cylinder mold to create dramatic (and easy!) earrings that are swingy and fun!
COMPLETION TIME:75 minutes to make and bake
ADDITIONAL SUPPLIES
• Paper towel
• Sharp scissors or a craft knife
• Cotton swabs
• Rubbing alcohol
• 1” Gold tone eye pins (2)
• Gold tone ear wires (2)
• Flat nose jewelry pliers
Project Instructions
- Getting Started:
- Baking:
Remove the caps from the Liquid Sculpey (LS) bottles and stir the liquids completely with one of the Purple Clay Tools. Replace the caps. Place a small amount of Rose Gold LS - 1/4” deep in the bottom of each cylinder shape in the 3D Jewelry Mold. If you accidentally get a drip of the LS along the side of the cylinder shape, you can carefully wipe it out by using a cotton swab doused in rubbing alcohol. Bake the mold following the baking instructions for LS.

When the mold has completely cooled, fill both cylinders up with Pearl LS.

Locate the little raised brackets on the top of the 3D Jewelry Mold that hold the rods in place during baking. Place two eye pins on one of the rods that is included with the mold. Dip one eye pin into each of the two cylinders and prop the rod on the raised brackets on top of the mold. Make sure the eye pins are centered in each of the cylinder shapes. Bake the mold again following the baking instructions for Premo.

When the mold is completely cool, carefully release the shapes by pushing upward from the bottom of the mold. If there is any excess LS baked around the top of the cylinder shape, it can be carefully removed with sharp scissors or a craft knife. Open the little loop at the bottom of each ear wire with flat pliers and attach each one to a cylinder. Close the loops with pliers.
