
Liquid Sculpey® Pyramid Pendant
Liquid Sculpey® Pyramid Pendant
Designed by Amy Koranek
Read More
Read Less
Create a funky pyramid of pieced together triangles for a pendant. Make extra triangles to make matching earrings. Use the bezel mold to construct delicate frames that add structure and unique design elements.
This project requires several bakings in order to make all the component parts in the molds. If you have more than one mold, it’ll go a little faster.
ADDITIONAL SUPPLIES
- Paper towel
- Silver tone seed beads
- Gold tone seed beads
- Tiny spoon (baby spoon, measuring spoon, sorbet spoon)
- Sharp scissors
- Smooth plate glass
- Heat gun
- Dremel drill or pin drill
- 9 mm Gold tone jump rings (25)
- 8 mm Gold tone jump ring
- 6 mm Gold tone ball beads (2)
- 2” Gold tone head pin
- 5” Gold tone chain (6 pieces)
- 4mm Gold tone jump rings (2)
- Gold tone ear wires (2)
- Round nose pliers
- Flat nose pliers

Project Instructions
- Getting Started:
- Baking:
To make the center of each triangle, start by placing one of the 9 mm jump rings around the post in the small donut cabochon shape.

Fill the donut with Clear Liquid Sculpey (LS) but not quite full - just enough to start covering the jump ring.

In a shallow vessel, mix together gold and silver seed beads. You might want a small spoon to add the beads to the mold.

Drop enough seed beads into the donut shape as possible. Make sure the seed beads get as submerged into the LS as possible.

If there is any remaining room in the mold, fill it to level with more Clear LS.

In the Bezel mold, squirt a bead of Gold LS into the edge of the medium triangle bezel. To make sure there are no air bubbles trapped in the edge, poke the tip of the small Etch ‘n Pearl into the Gold LS all the way to the bottom of the mold. Drag the tip of the tool around the inner edge of the frame several times to release air bubbles.

Remove the tool and re-insert the tip of the tool. This time drag the tool several times around the outer edge of the frame. Remove the tool and wipe clean with a paper towel. Tap the mold on the work surface several times to make sure all air bubbles are released. Bake the cabochon and the bezel molds following the baking instructions for LS. To make the pendant we will need a total of four donuts, and two gold triangles, and two navy triangles. To make the earrings we will need an additional two donuts, and one each gold and navy triangles.

When the molds are cool, gently flex to release the pieces. Since I used the bezel mold to only make the frame shapes (not the full bezel), they are a little sloppy on the edges.

Use sharp scissors to trim the excess drips of LS from the inner and outer edges of each frame.
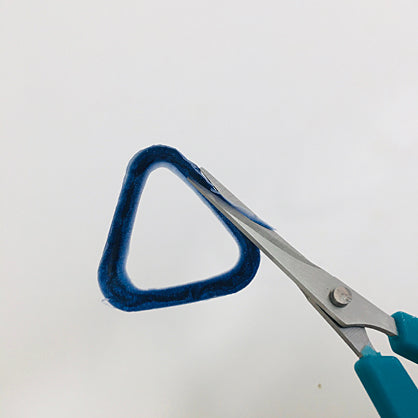
Here’s a look at how the frames look when they are trimmed neatly.

Lay the frames on a smooth piece of glass. Center a donut in the center of each triangle.

Carefully flood the areas between the donut and the triangle frames with Translucent Turquoise LS. Leave the center of the donuts open. Some of the Translucent Turquoise LS may leak out from underneath the frames but that’s okay.

Bake the pieces following the baking instructions for LS. While the pieces are still hot from the oven, you can very carefully add more heat with a heat gun to bring up the shine of the Translucent Turquoise. Place the baked pieces on a heat safe surface. Turn the heat gun on high and hold it about 4”-6” from the clay pieces. Move the heat constantly over the clay. When the Translucent Turquoise starts to shine, remove the heat.

Drill two holes in each straight edge of the triangles close to where the donuts touch the edge of the triangle frames. Here’s a look at how the triangles should be laid out. Hook the triangles to each other with 9mm jump rings.

Fold the triangles into a pyramid. Connect all sides of the pyramid to each other with additional jump rings.

To make the piece into a pendant, we need to add a hanger. Add a gold ball bead onto a 2” head pin and then an 8 mm jump ring.

Poke the head pin through whichever triangle you would like to be on the bottom of the pendant.

Pull the end of the head pin up through the opening opposite the hole in the bottom. Add seed beads onto the head pin until they are strung all the way to the top. This will keep the second ball bead from falling down inside the pyramid.

Add the second ball bead to the head pin on top of the seed beads. Curl an eye into the tail of the head pin to make a hanger just above the ball bead. Connect the pieces of 5” chain together with the remaining 9mm jump rings. Add the chain to the top of the pyramid with one of the jump rings.

For matching earrings drill holes in the top area of a gold triangle and a navy triangle. Attach ear wires to the remaining 9mm jump rings with 4 mm jump rings.
