
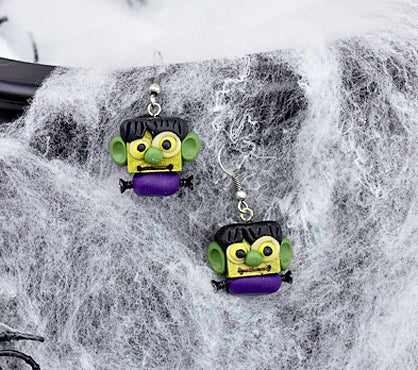
Liquid Sculpey® Frankenstein Earrings
Liquid Sculpey® Frankenstein Earrings
Designed by Amy Koranek
Read More
Read Less
The cube shapes in the 3D Jewelry Mold make it easy to create any of your favorite block head figures and transform them into earrings for the season. In this tutorial we will make some Frankenstein heads; but imagine using the same idea to make robots, clowns, or your favorite block heads!
ADDITIONAL SUPPLIES
- Paper towel
- Small silicone baking cup
- Green alcohol ink
- Tiny black or silver tone screws (4)
- 1” Silver tone eye pins
- Silver tone ear wires
- Round nose pliers
- Fine line black permanent marker
- Flat nose pliers
Project Instructions
Please make sure your work area is covered and you are not working on an unprotected surface. We recommend working on the Sculpey® Oven Safe Work Mat, wax paper, metal baking sheet, or disposable foil. Uncured Liquid Polymer Clay may damage unprotected furniture or finished surfaces. Be sure to cover your crafting area appropriately.
Getting Started with Premo Clay:
Start with clean hands, unwrap and knead clay until soft and smooth, or condition by running clay though a Pasta Machine. We recommend using a designated machine for clay purposes only. When working with multiple colors, clean hands with soap and water or baby wipes (we have found that baby wipes work best) before switching colors. Shape clay, pressing pieces firmly together. Wash hands after use.
Getting Started with Liquid Sculpey
Stir Liquid Sculpey® completely. Thin with Sculpey® Liquid Clay Softener as needed - Wash hands after use (we have found that baby wipes work best) .
Getting Started with Premo Clay:
Start with clean hands, unwrap and knead clay until soft and smooth, or condition by running clay though a Pasta Machine. We recommend using a designated machine for clay purposes only. When working with multiple colors, clean hands with soap and water or baby wipes (we have found that baby wipes work best) before switching colors. Shape clay, pressing pieces firmly together. Wash hands after use.
- Baking:
Getting Started with Liquid Sculpey
Stir Liquid Sculpey® completely. Thin with Sculpey® Liquid Clay Softener as needed - Wash hands after use (we have found that baby wipes work best) .
- Baking:
In a silicone baking cup, pour 1/4 ounce of Gold Liquid Sculpey® (LS). Add 3-4 drops of green alcohol ink. Mix the ink in completely using one of the tools from the Sculpey Tools Clay Tool Starter Set.

Add more drops of green alcohol ink as desired to achieve the color that you would like for the Frankenstein faces. I added four more drops.

Stir the ink in completely. Clean tools with paper towel.

Fill the cube shapes in the Sculpey ToolsTM Oven-Safe Mold: 3D Jewelry with the green/gold mixture. Only fill the cubes to 1/8” from the top. Tap the mold several times on the work surface to release air bubbles.

Use round nose pliers to bend loops in the ends of the 1” eye pins. The loops will be inserted into the LS to make sure the eye pins bake securely into the liquid.

Thread the original eye of an eye pin onto one of the metal rods included in the mold set. Dip the loop that you bent into the liquid. Position the metal rod in the little brackets on top of the mold so that the eye pin dangles in the center of the cube shape.
Repeat to dangle the second eye pin into the remaining filled cube. Bake the mold following the baking instructions for Liquid Sculpey®.
Repeat to dangle the second eye pin into the remaining filled cube. Bake the mold following the baking instructions for Liquid Sculpey®.

Allow the mold to cool completely. Carefully remove the metal rods from the eye pins. Top up each mold with Black Liquid Sculpey®. Bake again following the baking instructions for Liquid Sculpey®.

Allow the mold to cool completely. Carefully remove the pieces from the mold. If necessary, you can gently make a space between the molded piece and the mold. Then place one drop of Sculpey® Clay Softener & Thinner in the space between the baked LS and the wall of the mold. Drag the softener around the edges of the baked piece with the tip of the Needle Tool. Then push from the bottom of the mold to de-mold the cube. Repeat for the second cube. Wipe the cubes clean with paper towel.

Add thin strips of Black Sculpey Premo to the top edges of the heads. Cut a little triangle part in the hair.

Add oval shaped Spanish Olive ears to the sides of each head. Add uneven dots of Glow to the front of the face for eyes.

Add small pearls of Fluorescent Yellow to the center of each eye with the small Etch ‘n Pearl.

Add tiny Black pupils to the center of each eye. Add a Spanish Olive ball nose right in between the eyes.
Make a thick pancake of Purple and press onto the bottom of the head for a collar. Push tiny screws into the sides of the collar.
Draw on a straight line mouth with the fine line permanent marker.
Bake the Frankenstein heads again following the baking instructions for Sculpey Premo.
Make a thick pancake of Purple and press onto the bottom of the head for a collar. Push tiny screws into the sides of the collar.
Draw on a straight line mouth with the fine line permanent marker.
Bake the Frankenstein heads again following the baking instructions for Sculpey Premo.

When the heads are completely cool, add the ear wires to the eye pins with flat nose pliers.
