
Liquid Sculpey® Cubes of Granite Earrings
Liquid Sculpey® Cubes of Granite Earrings
Designed by Amy Koranek
Read More
Read Less
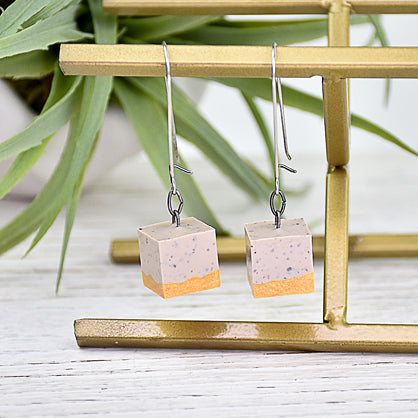
Little layered cubes of Liquid Sculpey® colors in the 3D Jewelry Mold are easy to make and fun to wear. Try making them in any color combination to complete your look.
TIME TO COMPLETE:75 Minutes to make and bake
ADDITIONAL SUPPLIES
- Paper towel
- Antique silver small oval jump rings (4)
- Antique silver ear wires
- Flat nose pliers
Project Instructions
- Getting Started:
- Baking:
Open the Gold Liquid Sculpey® (LS) completely by removing the cap and stir the liquid with the black knife tool. Clean the tool by wiping it with paper towel. Replace the cap and squirt a small amount into the bottom of both of the cube shapes in the 3D Jewelry Mold. I squirted the Gold right into the middle and allowed it to spread to the corners on it’s own.

Check to make sure that the entire bottom of both cubes has an even layer of Gold LS on the bottom.

Use the needle tool to poke each corner of the cube shapes. Poke right through the Gold LS into each corner to make sure there is no trapped air and that you will have nice neat corners. Bake the molds following the baking instructions for LS to set the Gold layer in the bottom. Allow the mold to cool completely before proceeding.

Place a small oval antique silver jump ring onto one of the rods that comes with the 3D Jewelry Mold.

Place the rod with the jump ring on it over the cube shape. Make sure the rod rests in the little raised brackets that are built into the top of the mold. This will keep the rods from moving during baking. Repeat for the second rod and another jump ring. Double check that the jump rings are directly over the center of each cube.

Open the Greige Granite LS by removing the cap. Stir the LS with the black knife tool. Clean the tool with a paper towel. Replace the cap. Carefully fill each cube to the top with Greige Granite LS. Make sure once again that the jump rings are positioned right in the middle of the Greige layer. Bake the cubes one more time following the baking instructions for LS.

Allow the cubes to cool completely. Remove the rods from the jump rings. Push up on the bottom of the mold to push the cubes out of the cavities. Finish the earrings by attaching an ear wire to each cube with another jump ring using flat pliers.
