
Liquid Sculpey® and Sculpey Premo™ Grapefruit Ice Earrings
Liquid Sculpey® and Sculpey Premo™ Grapefruit Ice Earrings
Designed by Amy Koranek
Read More
Read Less
Premo Sculpey cane slices of your favorite fruit - in this case grapefruit - frozen into “ice cubes” of Clear Liquid Sculpey are irresistible little treats.
ADDITIONAL SUPPLIES
• Paper towel
• Heat gun
• Bright silver tone ear wires (2)
• 1” Bright silver tone eye pins (2)
• 1” Bright silver tone head pins (2)
• Clear crystal cube shaped beads (2)
• Round nose jewelry pliers
• Flat nose jewelry pliers

Project Instructions
- Getting Started:
Begin by preheating oven to 300 degrees F (149 degrees C). Test temperature with oven thermometer for perfectly cured clay.
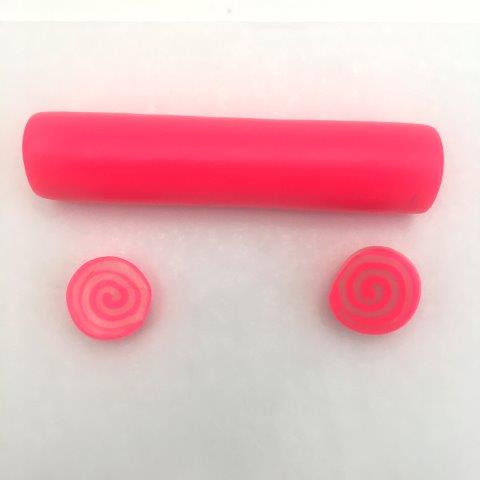
First, let’s make the grapefruit cane for our little grapefruit slices. Sheet Fluorescent Pink and Translucent through the pasta machine on the thickest setting to make a rectangular shaped sheet of each color.

Lay the Translucent sheet on top of the Fluorescent Pink sheet. Press them together through the pasta machine on the thickest setting to seal them together into one layered sheet.

Next we will make a simple jelly roll cane with the layered sheet. Fold the sheet in half sandwiching the Translucent layers in the middle and the Fluorescent Pink layers on the outside.

Starting at the folded end, roll the edge up on itself as shown.

Keep rolling the clay up until it is a jelly roll cane.

Roll the cane between your hand and the work surface to reduce it’s diameter to about 1/2”. Rolling the cane will also help seal the seam up and flatten it so it blends into the cane.

Slice off the ends with the Super Slicer.
Next we will take the cane which is circular in shape and change it to a cane that is triangular in shape. Pinch along the top of the cane to form a peak all the way down it’s length.

Roll the cane over so the peak you pinched is touching the work surface. Pinch another peak along the part of the cane that is now on top.

Roll the cane one more time so both peaks you pinched are laying on the work surface. Pinch a third peak along the part of the can that is now on top. Smooth the sides with your fingertips to make three nice flat sides with three nice pointed edges. You now have a triangle cane. Gently grasp the ends of the cane and pull gently to make the cane about 4.5”-5” long.

Sheet White Premo through the pasta machine on the third thickest setting. Make a sheet that is nice and flat and smooth without air bubbles. Border one side of the cane with the White sheet. Smooth it to make sure it is flat to the side of the triangle without trapping air bubbles.

Cut the cane into six equal sections approximately 1.5” long.

Next we are going to reassemble the triangle shaped pieces into a hexagon shaped cane. Organize the little logs from Step 13 into a pie shape making sure that the White side is always in the same orientation as shown.

Push the triangles together as shown to make a hexagon shaped cane.

Gently squeeze the cane in your grip to push all the triangles toward the middle. Use a gentle grasp to continue decreasing the diameter of your cane while the length of it grows. The White stripes make really good register marks on the outside of the cane. If they are twisted, you can gently turn the cane to undo the twist and watch the White lines straighten back out. Roll the cane gently on the work surface to smooth the outsides. At this point the cane will be between 3/4” and 1” in diameter. If it’s smaller that’s okay too.

Sheet both 1/4 block of Sunshine and 1/4 block of White through the pasta machine on the thickest setting. Lay one sheet on top of the other and press them together through the pasta machine on the thickest setting to seal them together into one layered sheet. Press through the pasta machine again on the second thickest setting. Make sure it will wrap around your grapefruit center that you’ve already created. If it’s a little short, you can lengthen the sheet by pressing it through the pasta machine again on the third thickest setting.

Cut a straight edge along one of the sides of the layered sheet with the Super Slicer. Roll the grapefruit center up in the layered sheet as shown.

Cut an edge in the layered sheet to create a seam that butts together. Smooth the seam with your fingertips and then roll the cane gently to make sure there is no air trapped between the peel and the fruit.

This cane will yield a lot more slices than you need for the earrings. So, if you like, you can slice a piece off from the grapefruit cane and preserve it in it’s large size for another project.

Roll and reduce the grapefruit cane until it is about 3/8” in diameter.

Slice the cane in half. Roll and reduce one half of the 3/8” cane until it is 1/4” in diameter. Now you should have two very small canes: one at 3/8” and one at 1/4” in diameter.

From the 1/4” diameter grapefruit slice off lots of little slices with the Super Slicer a little thinner than 1/8” thick each.

From the 3/8” diameter grapefruit cane slice off two slices that are a little thinner than 1/8” thick each. Poke one head pin up through the each slice as shown. The head of the head pins is on the under side of these slices.

Open Clear Liquid Sculpey® (LS) all the way up by removing the cap. Stir the Clear LS completely with one of the purple clay tools. Clear LS will regularly have a lump of sediment in the bottom of the bottle that should be stirred completely back into the liquid. Wipe the tool to clean it off with paper towel. Replace the cap on the bottle. Twist the cap open and squirt a small drop, about the size of the 3/8” grapefruit slices, in the center of each of the cube shapes in the 3D Jewelry Mold. Place the grapefruit slices with the head pins through them into the drops of the Clear LS - one in each cube.

Place more Clear LS in each cube shape up to half way full.

Drop the little grapefruit slices from Step 23 into the Clear LS. Make sure they fall in randomly and don’t just make a stack in the bottom of the cube.

Make sure to place a few slices on the very top facing upward.
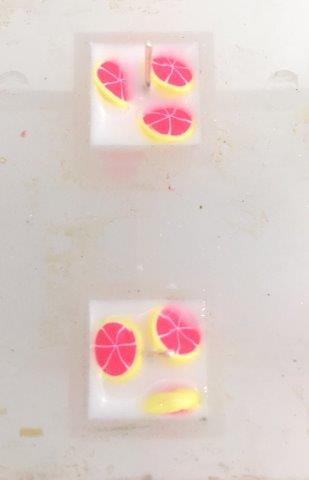
Add more Clear LS to make sure the cube shapes are filled up completely.

Bake the silicone mold at 300 for 20 minutes. This temperature is generally too high for baking Premo, but I’ve found that if the Premo is completely insulated by the Clear LS, that it will be okay.
When the mold is completely cool, remove the cubes by pushing up on them from the bottom of the mold.
Curl the tails on the head pins down into a little loop just above the cubes with the round nose pliers.
When the mold is completely cool, remove the cubes by pushing up on them from the bottom of the mold.
Curl the tails on the head pins down into a little loop just above the cubes with the round nose pliers.

If the Clear LS is still not completely clear, you can add more heat with a heat gun. Turn the heat gun on HI. Hold the heat 4”-6” away from the clay. Constantly move the heat over the pieces. When you see the pieces go very clear and the surface becomes shiny, turn the heat off and allow them to cool before handling.
String a crystal bead onto each eye pin. Curl a little loop in the tail of the eye pin with round nose pliers. Open the eye pin’s original loop and connect it to the loop in the top of one of the cubes. Close the loop with pliers. Open the ear wire loop and attach it to the loop you made in the crystal bead. Close with pliers. Repeat for the second earring.
String a crystal bead onto each eye pin. Curl a little loop in the tail of the eye pin with round nose pliers. Open the eye pin’s original loop and connect it to the loop in the top of one of the cubes. Close the loop with pliers. Open the ear wire loop and attach it to the loop you made in the crystal bead. Close with pliers. Repeat for the second earring.
