
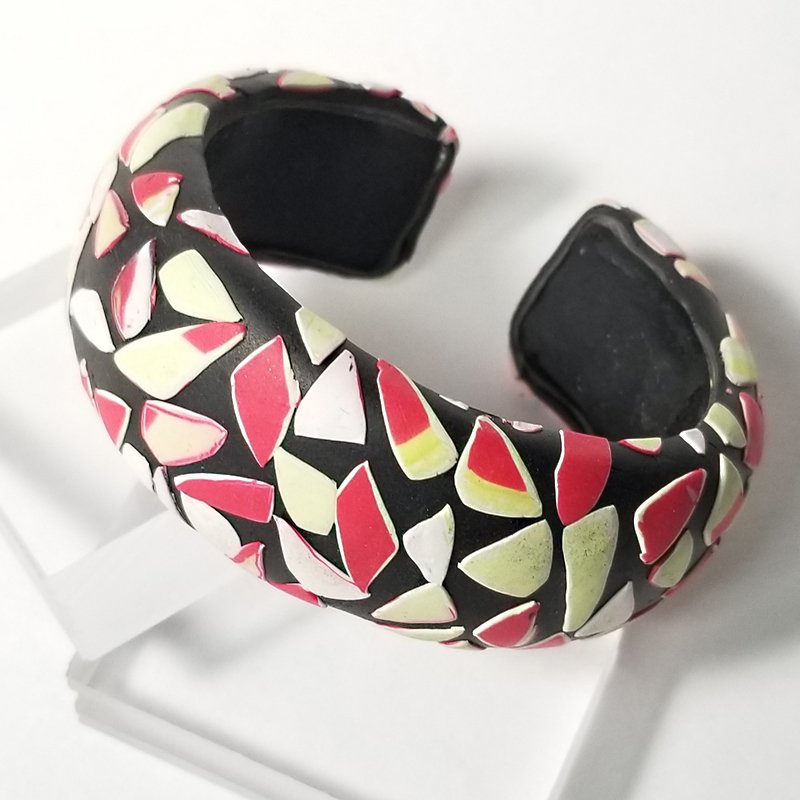
Sculpey Souffle™ Terrazzo-style Cuff Bracelet Created From Scraps
Sculpey Souffle™ Terrazzo-style Cuff Bracelet Created From Scraps
Designed by Syndee Holt
Read More
Read Less
Souffle clay scraps really come into play with this dramatic cuff bracelet. Don’t have “pretty” scraps? You can actually make the terrazzo pieces from “good” clay and use the other scrap clays for the inside build of the bracelet.
ADDITIONAL SUPPLIES
- Clean white paper
- Exacto blade
Project Instructions
- Getting Started:
Start with clean hands, unwrap and knead clay until soft and smooth, or condition by running clay though a Pasta Machine. We recommend using a designated machine for clay purposes only. When working with multiple colors, clean hands with soap and water or baby wipes (we have found that baby wipes work best) before switching colors. Shape clay, pressing pieces firmly together. Wash hands after use.
- Baking:
Place a sheet of clean paper on your work area. Sheet out the remaining Poppy Seed clay on the next thinner setting than the middle setting. Fold and roll the clay to create a sheet that is about 2-2-1/2 inches wide by 9 inches long and lay on the clean paper. Sheet out any of the remaining layered scraps of clay on the same setting and cut small triangles and piece to place on this black strip. If you don’t have any scraps, you can use small pieces (about 1 inch square) of the remaining color and layer them together in 2 or 3 layers and run through on the same setting as the background. The goal is to have layers that are visible on the cut edges.


Your sheet should look similar to this when it is filled. Make sure to leave some space between the pieces!

Lay a sheet of clean paper on TOP of the sheet and use the acrylic roller to slide back and forth across the paper to gently press the pieces into the background. Once the clay feels fairly smooth, slowly peel up the top paper to reveal your terrazzo effect. You can see that the layers in the clay now show as accent edges around each small piece! Gently peel the bottom sheet of paper away from the clay, trying to avoid stretching the clay. Set aside for now.

Now we are going to build the clay foundation on the bracelet blank. Sheet out any remaining Poppy Seed clay that you have (add other colors if you need to) on the second to widest setting on the clay conditioning machine. Fold the clay and roll to manipulate a long narrow sheet of clay. Place the bracelet blank on the clay and trim one end of the clay to the blank. Gently roll the remaining clay around the blank as shown.

Trim the second end to the bracelet blank. Slide your clay blade along each edge to trim off any excess clay. The outside of the blank should be entirely covered and NO clay on the inside of the blank.


Cut a small strip of the clay trimmed off that is the length of the original strip and about 1/2 inch wide. (reroll the clay to create this if you need to!) Lay this strip down the center of the covered bracelet and trim both ends to the blank.

Use your thumbs to gently press the edges of this top layer down to the lower later, forming a rounded strip. This strip does NOT have to be perfectly even and smooth! Retrim the ends and the side edges to the blank as needed.

Wrap the terrazzo sheet of clay around the bracelet blank. NOTE: You can also add a thin scrap layer to the bracelet BEFORE you put on the final layer in the same way as you mount the final layer- wrapping around the blank and trimming. This will yield a slightly wider bracelet and often makes applying the final layer easier.

Gently fold the edges of the wrap to the inside of the bracelet blank as shown. The goal is to have a smoothing wrapped top of the bracelet and no folds on the edges.

Use the craft knife to slide along the INSIDE edge of the blank to trim the terrazzo clay layer to cover the inside edges. I find that it is easier to start about 3/4 of an inch from and end, slice until I hit the blank and then turn the blade and slide along the blank until almost the other end. Repeat on the other side.

I find that it is easier to do the two ends by hand, just pulling the clay down and against the blank until it tears off. Then tug each corner the same way. Use the Super Slicer to clean up any clay on the inside of the bracelet blank.

Bake as directed and allow to cool before tugging at one end of the clay to remove the blank from the inside of the cuff. You can use the craft knife to help smooth any rough edges on the inside of the blank.

