Skip to product information
1 of 1

Sculpey Soufflé™ Quick Faux Leather Wrap Stackable Bracelets

Sculpey Soufflé™ Quick Faux Leather Wrap Stackable Bracelets

Designed by Syndee Holt
Read More

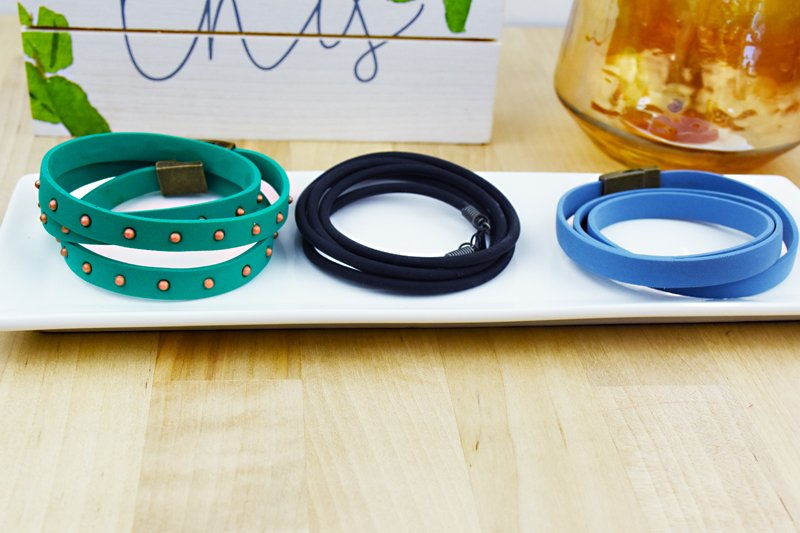
Sculpey Souffle™ clay is such a durable and flexible clay (in thinner layers) that I extrude it to create these quick and easy bracelets. I’ve worn one of these cool little guys for over a year and that means in the shower and the pool!   NOTE: I've used Souffle Bluestone and Jade for these bracelets, but you can use ANY Souffle color or mix you wish!  The cool thing about Souffle is that if you run it through the pasta machine, it looks like cured leather.  If you extrude it, the clay takes on a suede look and feel.  Either way in just a couple of wearings, the clay will start to take on a natural smoothness like leather (and or suede).  My friends still swore my bracelets were leather until I quickly showed them that they were waterproof!

Read Less
ADDITIONAL SUPPLIES
  • Magnetic clasps (Konmay on Amazon)
  • Instant glue
  • Round dye to fit your coiled wire finding (2), small clasp.
  • Empty soda can
View full details
Project Instructions
    Getting Started:
Please make sure your work area is covered and you are not working on an unprotected surface. We recommend working on the Sculpey® Oven-Safe Work Mat, wax paper, metal baking sheet, or disposable foil. Uncured clay may damage unprotected furniture or finished surfaces. Be sure to cover your crafting area appropriately.

Start with clean hands, unwrap and knead clay until soft and smooth, or condition by running clay though a Pasta Machine. We recommend using a designated machine for clay purposes only. When working with multiple colors, clean hands with soap and water or baby wipes (we have found that baby wipes work best) before switching colors. Shape clay, pressing pieces firmly together. Wash hands after use.

    Baking:
Begin by preheating oven to 275 °F (130 °C). After you are done creating; for best results bake clay on an oven-proof surface such metal, aluminum foil, an index card or the Sculpey® Clay Mat at 275°F (130 °C) for 30 minutes per 1/4" (6 mm) thickness according to package directions. Oven safe glass or ceramic surfaces are also acceptable for baking; however please note that the baking times may take longer as the glass or ceramic surfaces take longer to heat up. For best baking results, use an oven thermometer. DO NOT USE MICROWAVE OVEN. DO NOT EXCEED THE ABOVE TEMPERATURE OR RECOMMENDED BAKING TIME.
Roll your conditioned clay into a log that will fit in the barrel of your extruder. Place the smaller of the rectangle dies in the extruder. Extrude the entire barrel of clay onto a sheet of clean paper. Make sure to hold the extruder about 5 inches from the paper so that the clay doesn’t stretch (if it’s warm in your workroom).
Wrap the clay gently around the soda can, trying to keep the strips fairly straight and not touching. Try not to stretch the clay! Bake as directed in Step 1.
Once the clay has baked and cooled, remove the clay from the can. Place the end of the clay flat on the table and cut a straight angle in the end of the clay and push it into one side of the magnetic clasp. Wrap the clay loosely around your wrist 2-3 times and mark with your finger where to trim. Cut this piece at a straight angle and push into the clasp. (It’s my experience that one side of the clasp has a slightly thinner area for the clay than the other side, this is what the angle is for!) Remove one of the pieces, add a small amount of glue to the end of the clay and push back into the clasp. Repeat for the other side. DONE!
Adding “studs” to the bracelet. Once you extrude the clay and wrap it onto the soda can, use the smallest Etch n’ Pearl tool to create “pearls” from a small piece of Premo Accents Copper (or Gold), sheeted on the widest setting on the clay conditioning machine. Gently press the pearls onto the bracelet.  NOTE: A small piece of a small damp sponge acts as a great mold release for the pearls. Just press the toll into the sponge and then into the clay to create the pearl. Then press into place on the bracelet. Bake as directed in Step 1. Follow the directions above in Step 4 to add the clasp.
For the round bracelet:Use the round die that most closely matches your round cord findings. I extruded mine and trimmed to a length I knew I wanted for my bracelet (remember to leave room for the clasp in the measurement!). Then I SLIGHTLY rolled each end a little smaller to fit my cord finding. I errored on the side of a little more length because I knew that I could “whittle down” the baked end of the cord to fit the finding that was just slightly smaller than my baked cording. I glue the finding in place on one end, add the clasp assembly and then make the final measure before cutting the other end.