
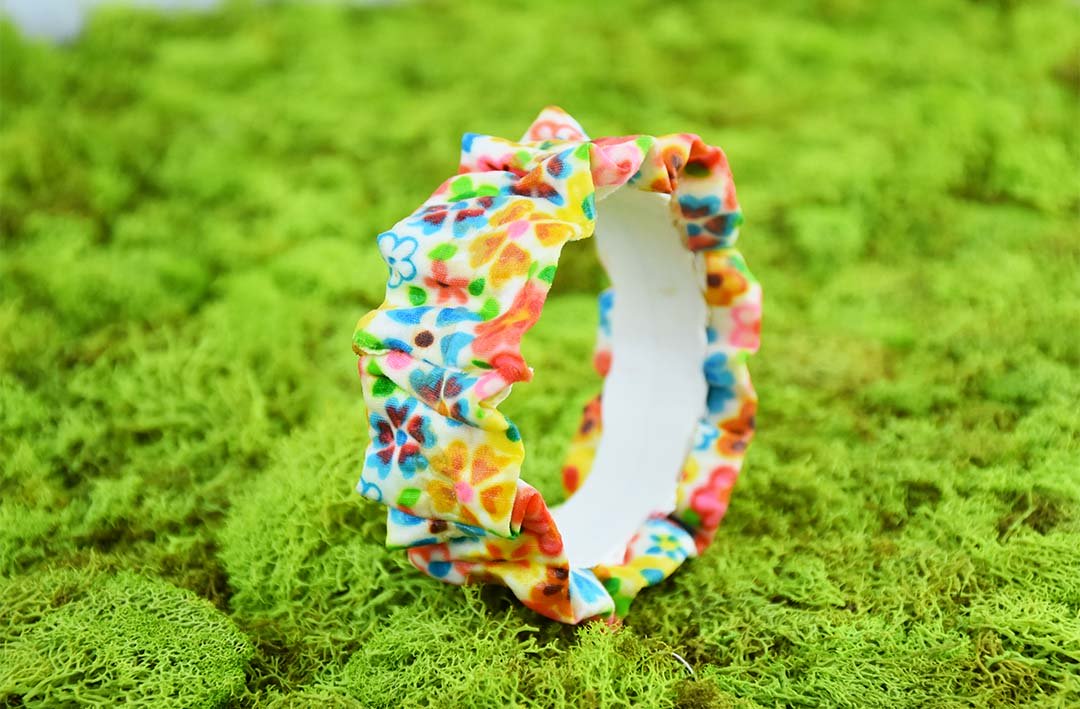
Liquid Sculpey® & Soufflé™ Fabric Bracelet
Liquid Sculpey® & Soufflé™ Fabric Bracelet
Designed by Amy Koranek
Read More
Read Less
Choose any fabric pattern you like to pull off this fabric and Sculpey summer fun bracelet. This idea was adapted from a doll-making class with Maureen Carlson. She uses Liquid Sculpey® to laminate fabric to oven-bake clay to achieve the realistic look of clothing for her doll sculptures.
ADDITIONAL SUPPLIES
- Cotton fabric of your choice 2” x 22” for a 7” bracelet. If you would like to make a larger bracelet, the fabric should be at least three times longer than the finished size of the bracelet. If you want your bracelet to be more ruffly, make the fabric up to four times longer than the finished size.
- Scissors
- Deli wrap or wax paper or other barrier paper
- Circle cookie cutter that fits easily over your hand
- Paper towels
- Rubber band - this must be made of real rubber so that it does not melt in the oven. It’s a good idea to test the rubber band by baking it on a piece of cardstock before hand
- Heat gun
Project Instructions
- Getting Started:
Start with clean hands, unwrap and knead clay until soft and smooth, or condition by running clay though a Pasta Machine. We recommend using a designated machine for clay purposes only. When working with multiple colors, clean hands with soap and water or baby wipes (we have found that baby wipes work best) before switching colors. Shape clay, pressing pieces firmly together. Wash hands after use.
- Baking:
Designer's Note: Clear Liquid Sculpey® should be stirred completely before use. There is lots of awesome goop that has most likely settled into the bottom of the bottle that needs to be stirred back in so that the Clear LS will go completely clear when cured. My method for mixing up the Clear LS is to
1.) cut the bottle open at the shoulder shape of the bottle;
2.) poor all the Clear LS into a silicone baking cup
3.) scrape all the residual sediment from the bottom of the bottle and put it in the silicone cup too, then discard the bottle
4.) Stir and stir and stir until that sediment is stirred completely back into the liquid and is totally smooth
5.) from this point on, I leave my Clear LS in the silicone cup and cover lightly with a lid. I stir it each and every time I use it in a project. This advice only pertains to CLEAR LS, and is not necessary for the other colored Liquid Sculpey®.
Start by cutting the fabric to 2" wide and at least three times longer than the size of your finished bracelet. For example, if you need a 7" bracelet, then cut your fabric 22" long (3X7 + 1 for the ends). If you would like your bracelet to be more ruffled, then cut the fabric four times longer than your finished size. Lay the fabric right side down on barrier paper to keep the mess contained to this small area. Make sure your Clear LS is stirred well. Cover the back of the fabric with a thin layer of Clear Liquid Sculpey® (LS). You can use your finger or any tool. The layer of Clear LS should be very thin and just enough to soak into the fabric. Fingertips and work areas can be wiped clean with paper towels.

Sheet clay through the clay conditioning machine to the 6th thickest setting. Cut the clay to a piece that is 1" wide and 1/2" shorter than your fabric piece. Carefully place the clay down the center of the fabric piece leaving 1/4" of fabric sticking out on each end.

Fold the ends of the fabric over the ends of the clay.

Carefully fold the sides of the fabric over the sides of the clay. Spread another thin layer of Clear LS on the fabric that has been folded over the clay. Lay more barrier paper over the top of the fabric so that you can flip the entire piece of fabric and clay over. Coat the top side of the fabric with a very thin layer of Clear LS. Set the fabric and clay aside for now.

Prepare a thin rope of clay that can wrap around the cookie cutter form. Once the clay is on the form, flatten it with your fingertips to the sides of the cutter.

Attach the fabric/clay piece to the clay on the form with finger pressure.

Loosely lay the fabric/clay around the outside of the cutter and attach the other end next to the end that is already attached.

With the fabric/clay loosely arranged around the metal cutter, find the middle opposite where the ends are attached. Press the middle point of the fabric clay to the form with an Etch 'n Pearl

Attach the fabric/clay to the form in two more points so that it is now attached to the form in four places.

Continue pressing the fabric using the smooth side of an Etch 'n Pearl to the form allowing the excess fabric to ruffle out between attachment points. Use your fingertips to neaten up the ruffles around the form.

Use a real rubber band around the center of the bracelet to keep all the ruffles in place while it cures. The rubber band that you use must be real rubber so that it does not melt to the bracelet. You can check this by baking a rubber band on a piece of card stock in your oven at 275 °F for 20 minutes. Bake the bracelet with the rubber band in place following the baking instructions above in Step 1.

When the bracelet is completely cool, carefully remove the rubber band. Carefully flex the metal cutter to help the bracelet release from it. If you want the bracelet to be shiny, you can clear the Clear LS with a heat gun at this point. Turn the heat gun on high and hold it 3" - 4" away from the piece. Constantly move the heat over the bracelet so that you do not burn one area. When the piece turns shiny, the Clear LS has gone completely clear and your bracelet is complete!
