
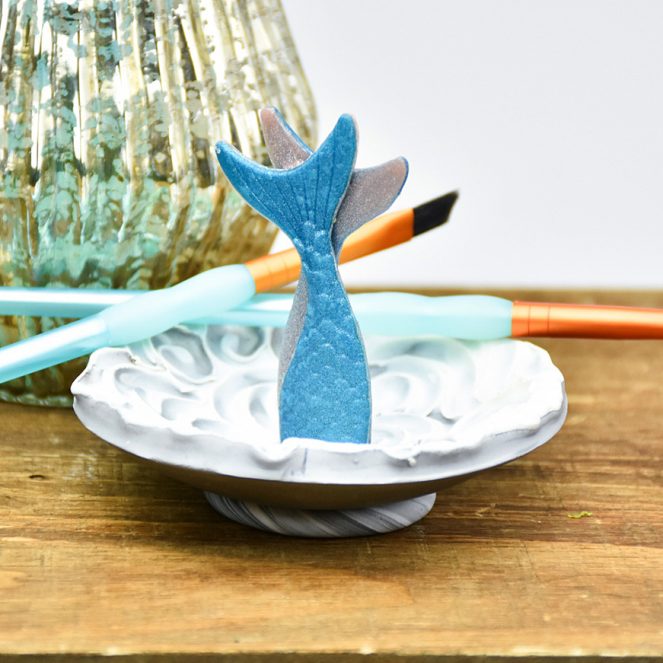
Premo Sculpey™ and Liquid Sculpey® Ocean Waves Ring Dish
Premo Sculpey™ and Liquid Sculpey® Ocean Waves Ring Dish
Designed by Amy Koranek
Read More
Read Less
This beautiful project features a swirling technique that I learned from Christi Friesen. Christi uses the ball tools to swirl layers of clays together to make ocean swirls and waves. It’s a lovely technique that’s perfect for a project like this.
TIME TO COMPLETE:
60 minutes including baking
ADDITIONAL SUPPLIES
• Small sharp scissors
• Clean piece of glass or glass baking dish
• 3-1/4” or 3-1/2” Circle cookie cutter
• 4” Diameter metal or glass bowl for shaping the dish
• Super glue gel
Project Instructions
- Clay Getting Started:
Start with clean hands, unwrap and knead clay until soft and smooth, or condition by running clay though a Pasta Machine. We recommend using a designated machine for clay purposes only. When working with multiple colors, clean hands with soap and water or baby wipes (we have found that baby wipes work best) before switching colors. Shape clay, pressing pieces firmly together. Wash hands after use.
- Liquid Getting Started:
- Baking:
- Liquid Baking:
First we will make the mermaid tails so that they are all baked and ready for when we need them later. Fill your Sea Life Silicone Mold with Peacock Pearl Liquid Sculpey® (LS). Tap the mold gently on the work surface to release air bubbles. Try to fill the tail shape as level as possible. Bake the mold following the baking instructions for LS. When the mold is completely cool, carefully remove the tail. Repeat to create a second tail. If there is any residual LS on the edges of the tails it can be carefully trimmed away with sharp scissors. Spread a thin layer of Rose Gold LS on the glass plate. Place each mermaid tail flat side down in the Rose Gold. This will make a pretty color on the back of the tails so that the dish looks nice all the way around. Bake the tails on the glass following the baking instructions for LS.

When the tails are completely cool, carefully peel them and the Rose Gold away from the glass. Trim the Rose Gold away from the edges of the tails. Lay one of the tails back in the mermaid tail shape in the mold. Smear a very thin layer of Rose Gold LS on the back of the tail in the mold. Lay the other tail on top so the flat sides are touching. Make sure the straight bottom edges are lined up. The tails will not quite line up, but instead they will look like they are crossing slightly. Bake the tails one more time in the mold to support them following the baking instructions for LS. When the mold is completely cool, carefully remove the double-crossed tail and set it aside for later.

Sheet each Silver and White Premo through the pasta machine on the thickest setting. Make the sheets roughly the same square shape.

Lay one color on top of the other and press them together through the pasta machine on the thickest setting.

Cut the layered sheet in half and stack again.

Press the sheets together through the pasta machine on the thickest setting.

Cut the sheet in half one more time.

Stack the sheets on top of each other. You should have a total of 8 White stripes and 8 Silver stripes. Roll over the stack with the Acrylic Clay Roller to seal the layers together.

Cut the circle shape using the circle cookie cutter.

Lay the clay disc with the White side up. Start in the center of the circle with the 6mm ball tool. Press the ball down into the clay and drag it in swirling motions. As you drag, the ball will pull up the Silver as well so that it shows through the White.

Continue dragging the ball in various directions making different size swirls and waves. Lift the ball tool up out of the clay between each different swirl.

Smooth the edges of the dish with your fingertips. Carefully place the clay dish in the bottom of the metal bowl or glass bowl that you are using to shape the clay. Gently push the clay down into the bottom of the bowl so air is not trapped between the clay and the bowl.

Gently push the mermaid tails into the center of clay dish making a little divot where they will be placed later.

Remove the tail from the dish. You should be able to see a little mark in the center of the clay dish that was made with the tails. Bake the dish without the tails following the baking instructions for Premo Sculpey®. Remember to turn the oven down to 275 °F for the Premo.

Take some of the White/Silver striped scraps and roll and twist it into a striped rope.

Form a ring about 1.5” in diameter, trim the ends and smooth the seam.

When the dish is completely baked and cooled, carefully remove it from the bowl. Turn the bowl over. Position the ring on the bottom of the bowl for a foot.

Smash the ring slightly flat. Turn the bowl right side up and press it down gently to the work surface to evenly flatten the ring. Turn the bowl upside down again and bake one more time following the baking instructions for Premo.

After the bowl is completely cool, glue the mermaid tail permanently in place positioning it right in the little divot previously made.

When the glue has dried you can use the dish to organize rings and small jewelry items.
