Liquid Sculpey® Winter Celebration Ornaments
Liquid Sculpey® Winter Celebration Ornaments
Designed by syndee holt
Read More
Liquid Sculpey® in frost Winter colors team up with a couple of resin molds to create these gorgeous ornaments that even have a hint of translucency to them that will shine with all the holiday lights.
TIME TO COMPLETION: 30 minutes to fill each mold / 30 minutes to bake
Read Less
ADDITIONAL SUPPLIES
- Resin molds for ornaments
- Couple of toothpicks
- Couple of cotton swabs
- Small piece of flexible plastic for a scraper

Project Instructions
- Getting Started with Liquid Sculpey®:
- Baking:
- It is important to use oven thermometer when you bake the liquids so that you can ensure your oven is at the correct temperature.
- Do not microwave the liquids. They must be baked in a Preheated oven at 275 ºF (130 ºC) for liquid colors and 300 ºF (149 ºC) for Clear – Do not exceed baking temperatures.
- If your piece is less than 1/4” bake for 15 minutes. For thicker pieces that are 1/4” or above bake for 30 minutes.
- If your liquid project has become yellowed or discolored in the oven, when you remake it, tent it by placing either – folding an index card in half and placing your project under it by using aluminum foil over your project.
Here’s a tip for baking perfectly in silicone molds. Dampen a dish towel with water and wring out as much of the water as you can. Fold the damp towel so that the molds can sit level on top of it. The damp towel will slow down the curing process so that the LS will cure evenly throughout and avoid warping.
For the Marbled Ornament:
Start at the top of the ornament with the Navy Metallic LS. Use the needle tool to drag around the post for the hole several times to help remove any bubbles that like to lurk in this area.
Start at the top of the ornament with the Navy Metallic LS. Use the needle tool to drag around the post for the hole several times to help remove any bubbles that like to lurk in this area.

Continue to add lines of the LS colors in a gentle curve as shown. I tend to keep the White LS areas smaller than the other colored areas. NOTE THAT I AM ONLY FILLING ABOUT HALFWAY UP IN THE MOLD!

Continue to add lines of color to fill the mold. I added a couple of swirls of White LS as well.

Once you have added lines of the colors to fill the bottom of the mold, go back and fill each color area to the top of the mold.

Use the blunt pointed tool in the Sculpey Clay Tool Starter Set to drag from top to bottom to top vertically across the striped areas to marble the colors. Make sure that the tool is dragging across the bottom of the mold.

The marbling process can introduce bubbles in the LS, so gently pick up the mold and drop it on your work surface a couple of times to help the bubbles to move to the surface and pop. Careful to keep the mold level at all times!
Bake according to the directions in Step 1 above and allow to cool completely before removing from the mold.
Bake according to the directions in Step 1 above and allow to cool completely before removing from the mold.

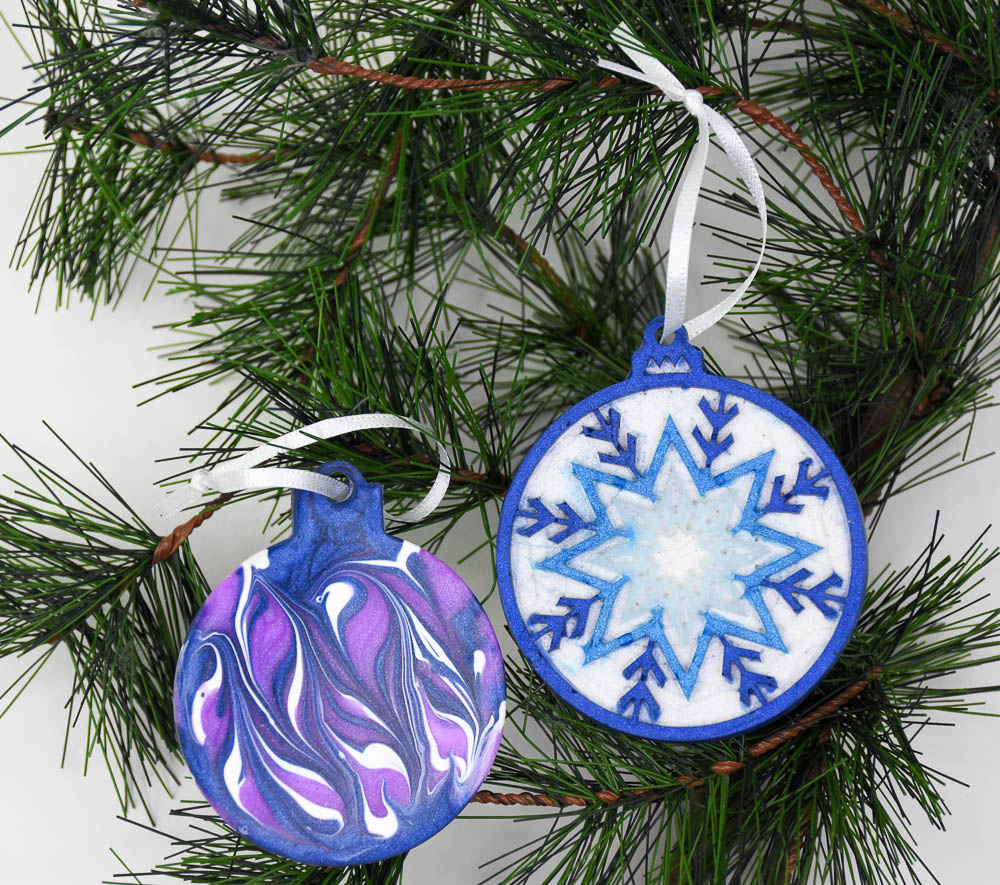
Here is a look at my baked ornament with the left on the right and the back on the right. I like both the patterns and was so surprised to see that the ornament patterns glow gently when backlit!

For the Snowflake (or other Patterned) Ornament:
Carefully fill the center circle of the pattern with the Translucent Turquoise Liquid Sculpey (LS). Use the needle tool from the Sculpey Clay Tool Starter set to help spread the LS throughout the pattern without spilling over the pattern.
Carefully fill the center circle of the pattern with the Translucent Turquoise Liquid Sculpey (LS). Use the needle tool from the Sculpey Clay Tool Starter set to help spread the LS throughout the pattern without spilling over the pattern.

Once the pattern is filled, use a small piece of flexible plastic to act as a squeegee to remove any excess LS from the top of the mold.

Fill the next portion of the pattern with the Peacock Pearl in the same fashion.

Use a toothpick and a cotton swab to help clean off any excess LS from this pattern so not to disturb the other poured pattern.

Begin filling the final pattern before the rim with the Navy Metallic LS, starting at the outside edge and gently nudging the LS into the pattern and up to the Peacock Pearl pattern with a needle tool and toothpick.

Continue to fill the outside rim and hanger portion with the Navy Metallic LS. Be sure to run your needle tool around these areas once you are filling them to remove any bubbles – especially around the loop for hanging.

Once the mold is filled to the edges of the patterns, fill in the rest of the mold with the Pearl LS by flooding the mold. Do NOT try to spread, but just fill the mold to the rim slowly.
Bake the filled mold in a preheated oven following the instructions in Step 1 above. Allow to cool COMPLETELY before slowly removing from the mold.
Bake the filled mold in a preheated oven following the instructions in Step 1 above. Allow to cool COMPLETELY before slowly removing from the mold.

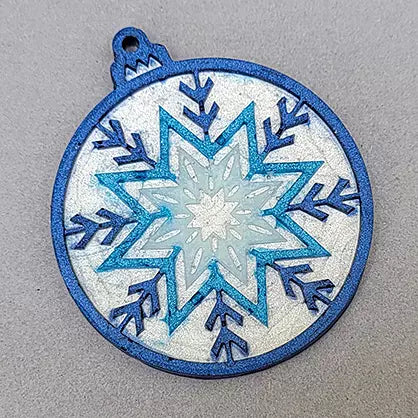
Here is a look at my final ornament!
OPTIONAL:
I used my little piece of flexible plastic to help spread a thin layer of the Navy Metallic LS on the outside edge of the ornament so that it was all that one color. Rebake according to the directions above for about 15-20 minutes
OPTIONAL:
I used my little piece of flexible plastic to help spread a thin layer of the Navy Metallic LS on the outside edge of the ornament so that it was all that one color. Rebake according to the directions above for about 15-20 minutes
- Choosing a selection results in a full page refresh.
- Opens in a new window.