
Liquid Sculpey® Shifting Agate Coasters
Liquid Sculpey® Shifting Agate Coasters
Designed by Amy Koranek
Read More
Agate shaped coaster molds are very popular and fun to fill with Liquid Sculpey®. Make a set of coasters for your personal decor, to gift to a friend, or to hang from monofilament to shimmer in a window.
TIME TO COMPLETE:
90 Minutes to make and bake each coaster
Read Less
ADDITIONAL SUPPLIES
- Paper towel
- 1 Ounce silicone mixing cup
- Iridescent foil glitter
- Agate shaped silicone molds
- Gold metallic acrylic paint
- Paintbrush
- Small sharp scissors

Project Instructions
- Getting Started with Liquid Sculpey®:
- Baking:
- -It is important to use oven thermometer when you bake the liquids so that you can ensure your oven is at the correct temperature.
- -Do not microwave the liquids. They must be baked in a Preheated oven at 275 ºF (130 ºC) for liquid colors and 300 ºF (149 ºC) for Clear – Do not exceed baking temperatures.
- -If your piece is less than 1/4” bake for 15 minutes. For thicker pieces that are 1/4” or above bake for 30 minutes.
- -If your liquid project has become yellowed or discolored in the oven, when you remake it, tent it by placing either – folding an index card in half and placing your project under it or by using aluminum foil over your project.
Here’s a tip for baking perfectly in silicone molds. Dampen a dish towel with water and wring out as much of the water as you can. Fold the damp towel so that the molds can sit level on top of it. The damp towel will slow down the curing process so that the LS will cure evenly throughout and avoid warping.
In filling the agate shaped coaster molds, we will start in the center and work outward. Start by squirting a bead of Navy Metallic Liquid Sculpey® (LS) around the center edge.

Then add beads of Color-Shifting Purple and Peacock Pearl. The next area is Translucent Turquoise with iridescent foil glitters mixed into it as described in Step 4.
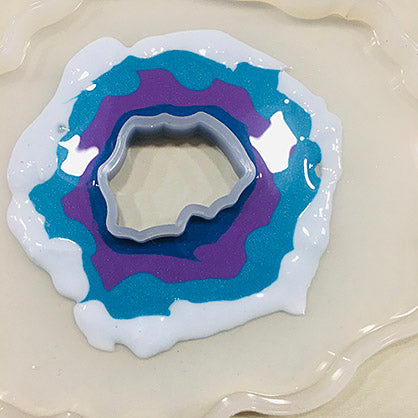
Fill a one-ounce silicone baking cup half way with Translucent Turquoise LS. Add a teaspoon full of iridescent glitter and stir in completely. This is the band of color that was added lastly in Step 3.

Continue adding rings of color around the agate shape. Varying the width of the bands will help the piece to look more organic when completed.

Add more of the Translucent Turquoise/foil mixture right on top of the same color band that you applied earlier to thicken that area and to also help it mix with the areas on either side of it. It’s okay to kinds of overlap colors because they will tint each other and look more natural.

Add streaks of White LS through some of the wider areas.

Add more of the Navy Metallic in thin lines over the other colors. Adding the White and the Navy over wider areas can help the wide areas to look narrower since these are such high contrast colors. Keep adding more color on top of matching color until the mold is almost filled to level.

Use the Needle Tool to pull through the color bands to create areas that are more jagged and angular like cut rock. Tap the mold vigorously on the work surface to help all the colors level out and to release trapped air bubbles.

Bake the silicone mold following the baking instructions for Liquid Sculpey®. Look at how deep and rich the colors become during baking! The iridescent flakes really show through beautifully.
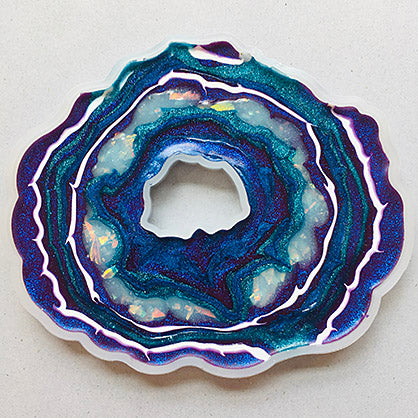
After the first baking, coat the entire top of the mold to level with Clear LS and bake again. This will give your piece the look of polished stone.
If your baked pieces have any little slivers of baked LS along the edges, these can easily be trimmed away with small sharp scissors.
If your baked pieces have any little slivers of baked LS along the edges, these can easily be trimmed away with small sharp scissors.

For fun I made a second coaster using a slightly different shaped agate mold to create a set.
When the molds are completely cool, paint the edges of the coasters with bright gold metallic paint and allow to dry completely before handling.
When the molds are completely cool, paint the edges of the coasters with bright gold metallic paint and allow to dry completely before handling.
