
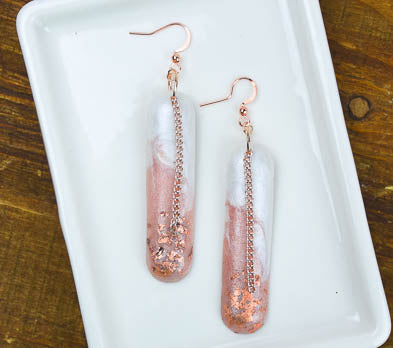
Liquid Sculpey® Rose Gold Pill Dangles
Liquid Sculpey® Rose Gold Pill Dangles
Designed by Amy Koranek
Read More
“What these earrings? I just whipped them yesterday evening to wear today!” How fun would it be to say that to your friends or co-workers? You CAN with this quick and easy earring project that creates earrings that will surely garner you attention.TIME TO COMPLETE:
90 Minutes to make, bake, and assemble
Read Less
ADDITIONAL SUPPLIES
- Paper towel
- Rose gold composite leaf
- Tweezers
- Paintbrush
- Dremel drill, or pin drill, or spring drill
- 2” Rose gold fine chain (2)
- 8 mm Rose gold jump rings (2)
- 4 mm Rose gold jump rings (2)
- Rose gold ear wires (2)
- Wire cutters
- Flat nose pliers


Project Instructions
- Getting Started with Liquid Sculpey®:
- Baking:
- -It is important to use oven thermometer when you bake the liquids so that you can ensure your oven is at the correct temperature.
- -Do not microwave the liquids. They must be baked in a Preheated oven at 275 ºF (130 ºC) for liquid colors and 300 ºF (149 ºC) for Clear – Do not exceed baking temperatures.
- -If your piece is less than 1/4” bake for 15 minutes. For thicker pieces that are 1/4” or above bake for 30 minutes.
- -If your liquid project has become yellowed or discolored in the oven, when you remake it, tent it by placing either – folding an index card in half and placing your project under it by using aluminum foil over your project.
Here’s a tip for baking perfectly in silicone molds. Dampen a dish towel with water and wring out as much of the water as you can. Fold the damp towel so that the molds can sit level on top of it. The damp towel will slow down the curing process so that the LS will cure evenly throughout and avoid warping.
Drip Rose Gold Liquid Sculpey (LS) in the bottom portion of the pill shaped cavity and allow it to flow in a dribble toward the top.

Add a bead of Pearl LS to the top of the pill shape but do not fill the shape to level yet.

Use the Blunt Point Tool to swirl the colors into each other. Be sure the tip of the Blunt Point Tool touches all the way to the surface of the mold and don’t lift it out until you are done swirling. If the tip of the tool doesn’t contact the mold, the swirls will remain suspended inside the shape and not appear on the front surface.

Back fill the top with Pearl LS and the bottom with Rose Gold LS to level.
Tap the mold vigorously on the work surface to release air bubbles.
Bake the mold following the baking instructions for Liquid Sculpey® and allow to cool completely before gently flexing the baked piece out.
Tap the mold vigorously on the work surface to release air bubbles.
Bake the mold following the baking instructions for Liquid Sculpey® and allow to cool completely before gently flexing the baked piece out.

Repeat Steps 2-5 to make a second pill shape.
Add bits of rose gold colored composite leaf to the bottom area of the pills. Burnish them into place with your fingertip.
Seal them with Sculpey® Glossy Glaze to permanently adhere them. Allow the glaze to dry completely before handling.
Add bits of rose gold colored composite leaf to the bottom area of the pills. Burnish them into place with your fingertip.
Seal them with Sculpey® Glossy Glaze to permanently adhere them. Allow the glaze to dry completely before handling.

Drill a 1/16” diameter hole through the top portion of each pill.
Use an 8 mm jump ring to connect the pill to a 2” piece of rose gold chain and to the 4 mm jump ring.
Close the jump ring with the flat nose pliers.
Trim the chain to your liking with wire cutters. Open the loop on the ear wire with flat nose pliers and attach it to the 4 mm jump ring. Use pliers to close the ear wire.
Repeat assembly instructions for the second earring.

- Choosing a selection results in a full page refresh.
- Opens in a new window.