
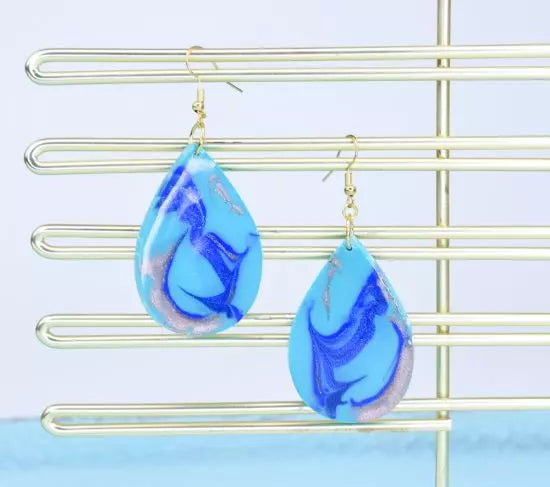
Liquid Sculpey® Marbled Turquoise Teardrop Earrings
Liquid Sculpey® Marbled Turquoise Teardrop Earrings
Designed by Amy Koranek
Read More
Read Less
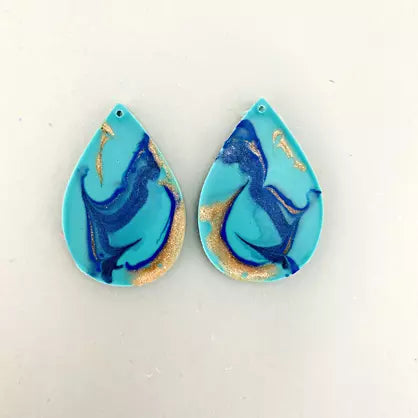
Liquid Sculpey® “family” of blue tones is perfect for creating these wonderfully marbled earrings with a dash of sparkle from the Rose Gold. TIME TO COMPLETE: 45 Minutes to make, bake, and assemble; some drying time for Sculpey® Gloss Glaze
ADDITIONAL SUPPLIES
- Paper towel
- Oven safe silicone teardrop earrings mold
- Paintbrush
- 6mm Silvertone jump rings (2)
- 4mm Silvertone jump rings (2)
- Silvertone ear wires (2)
- Flat nose pliers
Project Instructions
Step 1
- Getting Started with Liquid Sculpey®:
- Baking:
- It is important to use oven thermometer when you bake the liquids so that you can ensure your oven is at the correct temperature.
- Do not microwave the liquids. They must be baked in a Preheated oven at 275 ºF (130 ºC) for liquid colors and 300 ºF (149 ºC) for Clear – Do not exceed baking temperatures.
- If your piece is less than 1/4” bake for 15 minutes. For thicker pieces that are 1/4” or above bake for 30 minutes.
- if your liquid project has become yellowed or discolored in the oven, when you remake it, tent it by placing either – folding an index card in half and placing your project under it by using aluminum foil over your project.
Here’s a tip for baking perfectly in silicone molds. Dampen a dish towel with water and wring out as much of the water as you can. Fold the damp towel so that the molds can sit level on top of it. The damp towel will slow down the curing process so that the LS will cure evenly throughout and avoid warping.
Step 2
Fill molds almost to level with Turquoise Liquid Sculpey® (LS).Tap the mold on the work surface to release air bubbles,

Step 3
Add more colors to the mold. Add Blue LS in a thick band to both shapes. Then add Rose Gold right on top of the Blue.
Step 4
Keep adding more bands of colors.I’m doing the best I can to make my designs mirror image each other.

Step 5
Add some color to the thick part of the teardrop.
Step 6
Tilt the mold slightly to help the lines between colors soften.Return the mold to flat on the work surface.

Step 7
Use the Needle Tool to move colors around and create interesting shapes. Dip the tip of the Needle Tool into the liquid and drag it through the color bands. Remove the tool and wipe clean with paper towel.
Step 8
Tap the mold on the work surface to release air bubbles.Make any adjustments that you would like to with the Needle Tool.

Step 9
Designer’s Note - Here’s a great tip for baking molds. Molds tend to flex and warp during baking because the bottom side of the mold where it touches the baking surface heats faster than the top side of the mold. In order to make the mold bake more evenly, place a damp cloth under the mold on top of the baking surface. Just wet a cloth and wring out as much water as you can. Then fold the cloth neatly and place it on the baking surface. Then place the mold on top of the damp cloth. Bake as you normally would. Make sure the mold is level on top of your damp barrier. The steam from the cloth will help the mold bake more slowly and evenly and the mold will remain flat without warping.Bake the mold following the baking instructions for Liquid Sculpey®.
Allow to cool completely before flexing the mold to release the pieces.
Step 10
I wanted my pieces to shine so I painted them with Sculpey® Glossy Glaze.Allow glaze to dry completely before handling.

Step 11
Here’s the layout for the earring assembly.
Step 12
Use flat nose pliers to open and close jump rings to assemble earrings.