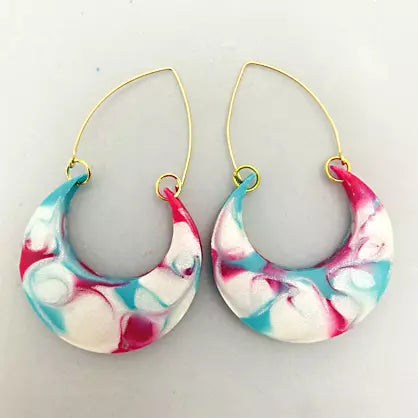
Liquid Sculpey® Crescent Earrings
Liquid Sculpey® Crescent Earrings
Designed by Amy Koranek
Read More
Read Less
Liquid Sculpey® teams up with a silicone mold to create these wonderful, swirled color earrings in less than an hour!TIME TO COMPLETE: 45 Minutes to make, bake, and assemble
ADDITIONAL SUPPLIES
- Paper towel
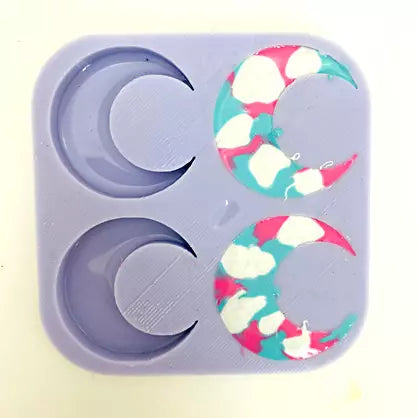
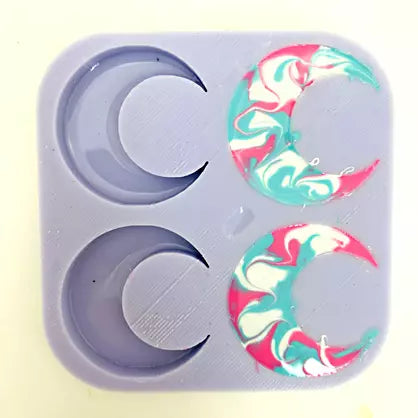
- Crescent moon mold (Etsy)
- Small scissors
- 4 mm Gold tone jump rings (4)
- Arch shapes ear wires (2)
- Flat nose pliers

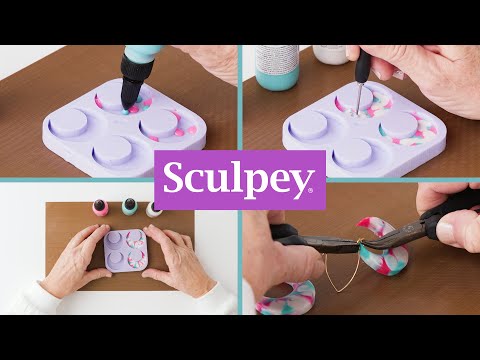
Project Instructions
Step 1
- Getting Started with Liquid Sculpey®:
- Baking:
- It is important to use oven thermometer when you bake the liquids so that you can ensure your oven is at the correct temperature.
- Do not microwave the liquids. They must be baked in a Preheated oven at 275 ºF (130 ºC) for liquid colors and 300 ºF (149 ºC) for Clear – Do not exceed baking temperatures.
- If your piece is less than 1/4” bake for 15 minutes. For thicker pieces that are 1/4” or above bake for 30 minutes.
- If your liquid project has become yellowed or discolored in the oven, when you remake it, tent it by placing either – folding an index card in half and placing your project under it by using aluminum foil over your project.
Here’s a tip for baking perfectly in silicone molds. Dampen a dish towel with water and wring out as much of the water as you can. Fold the damp towel so that the molds can sit level on top of it. The damp towel will slow down the curing process so that the LS will cure evenly throughout and avoid warping.
Step 2
We wanted these earrings to have a cloudy chic feeling, so it was important to make the pearl color be the most dominant.Start by filling two of the crescent shapes with large puddles of Pearl Liquid Sculpey® (LS). But don’t cover the bottom completely.

Step 3
Add smaller dots of Fuchsia LS next randomly between the larger Pearl areas. Leave blank spaces for the Turquoise.
Step 4
Add smaller dots of Turquoise LS in the empty spaces. At this point the shapes should only be about 1/2 full in depth with liquid.
Step 5
In order to make the crescents have swirls on the fronts and the backs, it’s important to swirl the liquids now. These will be the swirls that are seen from the front of the earrings.Dip the tip of the Needle Tool into the LS starting at one of the moon tips. Let the tip touch the surface of the mold through the LS, but don’t press so hard that you might scratch the silicone mold. Without lifting the tip, pull the Needle through all the spots of colors, creating cool swirls. When you have reached the other end of the moon, lift the tip out of the liquid and wipe clean with paper towel.
The top moon has been swirled, but the bottom one hasn’t. You can see the difference that the swirling makes.

Step 6
Swirl both moons with the Needle Tool as in Step 5. Clean the tool with paper towel.
Step 7
Now back-fill the molds to level with the same colors. Place more Pearl LS directly on top of the previous Pearl.Place Fuchsia on top of Fuchsia and place Turquoise on top of Turquoise.
Adding more LS will not disturb the swirls that we have already made because the LS has a tendency to “stick” to the silicone mold.
Step 8
Repeat the swirling process with the Needle Tool; however, this time, don’t dip the tool all the way to the bottom of the well. Just hold the tip of the tool through the last layer of LS. In this way we won’t disturb the swirling we already did in Step 5.Bake the mold following the baking instructions for Liquid Sculpey®.
Allow to cool in the mold before gently flexing the mold to release the molded pieces.
Step 9
If there is a little ridge on the edges of the shapes, you can easily trim it away with scissors.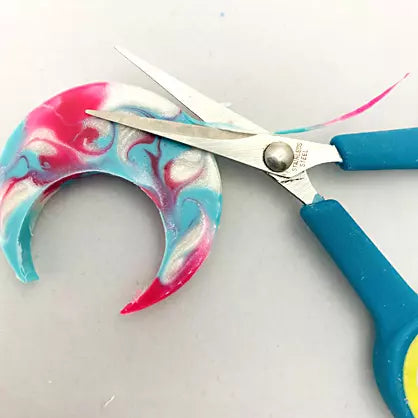
Step 10
Here’s a look at our beautiful crescents.
Step 11
Use the tip of the Needle Tool to poke a hole in both tips of each crescent perpendicular to the molded piece.The 5-in-1 Needle Tool is good for this process because it is a little thicker and more sturdy than thinner needle tools.

Step 12
Use flat nose pliers to string a jump ring through one of the holes.Add the eye of the arch shape ear wire to the jump ring.
Bend a 90-degree angle in the tail end of the ear wire with the pliers.
It may look odd to have an angle bent in the part of the ear wire that goes through the ear, but they are rather easy to insert through a piercing.

Step 13
Place a jump ring on the opposite tip of the crescent shape to hook the bent tail through when wearing.Repeat for the second earring.