Getting Started with Liquid Sculpey:
Please make sure your work area is covered and you are not working on an unprotected surface. We recommend working on the Sculpey® Oven Safe Work Mat, wax paper, metal baking sheet, or disposable foil. Uncured Liquid Polymer Clay may damage unprotected furniture or finished surfaces. Be sure to cover your crafting area appropriately. -
Stir Liquid Sculpey® completely. Thin with Sculpey® Liquid Clay Softener as needed - Wash hands after use (we have found that baby wipes work best)
• It is important to use oven thermometer when you bake the liquids so that you can ensure your oven is at the correct temperature.
• Do not microwave the liquids. They must be baked in a Preheated oven at 275 ºF (130 ºC) for liquid colors and 300 ºF (149 ºC) for Clear – Do not exceed baking temperatures.
• If your piece is less than 1/4” bake for 15 minutes. For thicker pieces that are 1/4” or above bake for 30 minutes.
• If your liquid project has become yellowed or discolored in the oven, when you remake it, tent it by placing either – folding an index card in half and placing your project under it or by using aluminum foil over your project.
We will layer the colors in the bottom of a silicone cup. I like to use inexpensive silicone cups from the baking department. They are super flexible so you can bend them to create a spout for pouring. The cup I’m showing here is very small - 1.5” high and 2” tall. Also, since they are silicone, you can bake them to harden any residual LS in the bottom of the cup. Then you can remove the residue by peeling it out of the cup after baking.
The first layer in the bottom of the cup will be two spots of Navy Metallic, two spots of White, and two spots of Rose Gold. Allow the colors to spread into each other filling the bottom of the cup.
Next, add a layer of each color but shift the colors so that each color is layered on top of a different color.
Keep shifting the colors so that you are always adding drops of colors onto different colors. Keep adding layers like this until you reach the amount of LS that is needed to fill the mold according to the volume test in the Designer’s Note above.
Carefully pick up the mixing cup and squeeze it slightly to create a pour spout along the edge. Pour the layered LS into the rectangle shape. This technique works best if you just pour all the LS right down the center of the rectangle shape, allowing the LS to fill and layer itself in the mold.
Here’s how the mold looks from the side. You can see how the LS looks very uniquely layered from the side.
Next add a jump ring to either the little rod that is included with the 3D Jewelry Mold or you can add a jump ring to a knitting needle which will make the jump ring sit up higher above the mold. I’m using a knitting needle because I want my jump ring to sit up high enough to reach up into the top of my connector shapes shown in the finished photo. Slide the jump ring onto the rod or needle.
Position the rod or the needle across the raised brackets in the mold and allowing the jump ring to dip down into the LS. Use a Needle Tool to adjust the jump ring so that it is centered in the shape if necessary.
Bake the mold following the baking instructions for Liquid Sculpey®.
Allow the mold to cool completely. To easily remove the baked piece from the mold, squirt one drop of Clay Softener & Thinner in between the baked LS shape and the wall of the mold. Then carefully run the Needle Tool around the edge between the baked LS shape and the wall of the mold. Be very careful that you do not puncture or scratch the mold with the Needle Tool.
Carefully squeeze the closed end of the mold applying pressure upward to push the baked piece out. It should come our very easily with the Clay Softener & Thinner used as a release.
Clean the mold by swabbing out the inside with a cotton swab to remove any extra Clay Softener & Thinner.
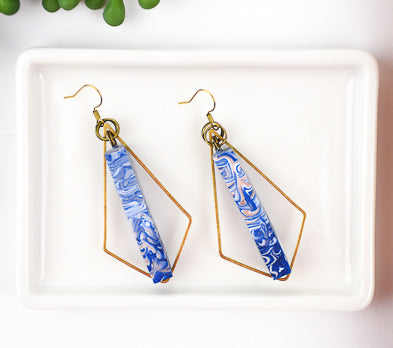
Here’s a look at our molded piece. The random layers look so pretty.
Follow Steps 2-11 to make a second piece for two earrings. Here they are turned on edge which is how they will be positioned inside the connectors.
The rectangle 3D shapes will fit perfectly inside the kite shaped connectors.
With the rectangle shape wedged inside the kite shape, place one jump ring on the front side of the kite and one jump ring on the back side of the kite. Then open the loop in the ear wire with flat nose pliers and hook both jump rings onto it. Then close the loop in the ear wire with the flat nose pliers again.
Here’s a look at the finished earrings.