
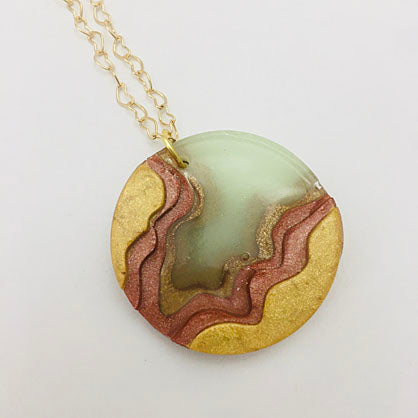
Liquid Sculpey® Island Pendant
Liquid Sculpey® Island Pendant
Designed by Amy Koranek
Read More
Read Less
Silicone molds are everywhere. They are easy to find and easy to use. Heat resistant silicone molds are available as ice cube trays, candy molds, and fondant tools in myriads of shapes, sizes, and themes. The availability of silicone molding opens up whole new avenues of creative exploration with Liquid Sculpey®. Just make sure that when you purchase silicone molds that they are rated for at least an oven temperature of 350F or higher. This tutorial features our Liquid Sculpey® metallic colors poured into an island mold that was found online.
TIME TO COMPLETE:90 Minutes to make, bake twice, and assemble
ADDITIONAL SUPPLIES
- Paper towel
- Cotton swab
- 91% Isopropyl alcohol
- 1 Ounce volume silicone baking cup for mixing
- Green alcohol ink
- Silicone 2 piece island mold
- Dremel drill, pin drill, or spring drill
- Heat gun
- 8 mm Gold tone jump ring
- 18” Gold tone chain with clasp
- Flat nose pliers

Project Instructions
- Getting Started with Liquid Sculpey:
- Baking:
The silicone mold that I am using has two parts. There is a detailed part that has steps that look like little land masses. The second part, featured in Step 7, is an open round part that allows you to insert the land mass and then back fill with “water” as deeply as you like.
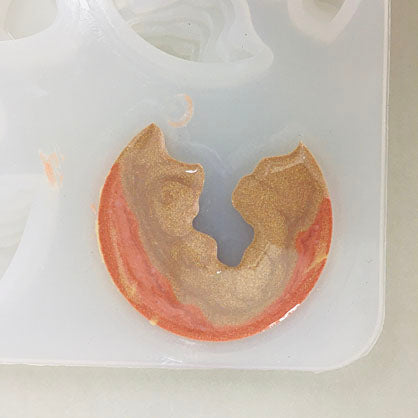
We will start with the “land mass” mold first. Please note that the deepest part of the mold will be the top most part of the finished design. This part of the mold has five distinct layers. Fill the deepest layer with Gold Liquid Sculpey® (LS). It might be easiest to underfill it and then move the Gold LS around with the tip of the Needle Tool. Wipe tools clean with paper towel between colors.
Designer’s Note: If you accidentally get LS in an area of the mold where you do not want it, it can be easily removed without dumping out the mold. Dip a cotton swab into 91% isopropyl alcohol and swab the mistakes away. Then just wait the few seconds it takes for the alcohol to evaporate before continuing.

Fill the next two layers with Copper Metallic LS.

Finally, fill the last two layers with Bronze LS . In this photo, my Copper Metallic floated up around the Bronze. This is not a problem as long as the detail edge is showing the Bronze color.
Bake this part of the mold following the baking instructions for LS.
Bake this part of the mold following the baking instructions for LS.
While the land mass mold is baking we can mix up the color we would like for our water area.
Please make sure you have stirred the Clear LS really, really, really well. Clear LS is very different from the other liquids because it goes completely clear when treated properly. It has special ingredients in it that cause the “clearing”. Those special ingredients like to dwell in the bottom of the bottle. So it’s really important to mix those back in each and every time you use the Clear LS. In a small silicone cup, place a quarter sized amount of Clear LS. Next, add a drop or two of green alcohol ink to the Clear LS. My advice is to add only one drop at a time, stir it in completely, then add more if you like.
Please make sure you have stirred the Clear LS really, really, really well. Clear LS is very different from the other liquids because it goes completely clear when treated properly. It has special ingredients in it that cause the “clearing”. Those special ingredients like to dwell in the bottom of the bottle. So it’s really important to mix those back in each and every time you use the Clear LS. In a small silicone cup, place a quarter sized amount of Clear LS. Next, add a drop or two of green alcohol ink to the Clear LS. My advice is to add only one drop at a time, stir it in completely, then add more if you like.

We are going for a very light tint of green.

When the land mass mold is completely cool, remove the baked piece by gently flexing the mold. Push the baked land mass down into the matching shape mold. In this case, I’m using the round island so I push the land mass that I baked into the round water shape. Make sure your land mass is now face up as we are working from the right side from now on.
Fill in as much of the water area as you like with the tinted Clear LS. I fill the open area plus one of the steps of the Bronze area. Bake the mold again following the baking instructions for LS.
Fill in as much of the water area as you like with the tinted Clear LS. I fill the open area plus one of the steps of the Bronze area. Bake the mold again following the baking instructions for LS.

The Clear LS will only go clear when it is brought to a temperature of at least 300F. We can do this step with a heat gun, or if you don’t have a heat gun, you can increase the oven temperature to 300F and bake til it becomes clear. While the mold is still warm from the oven, use hand protection to move it to an area where you can hit it with a heat gun. Leave the piece in the mold and turn the heat gun on the hi setting. Move the heat back and forth across the molded piece at a distance of about 3”-4”. Watch closely to see the Clear LS turn crystal clear and shiny. Once this is achieved, turn off the heat from the heat gun. If you like you can wait til the piece is cool, then use heat on the back side as well to bring up the clarity and shine.
I like to use a heat gun any time I am “clearing” Clear LS because I enjoy watching the process and I can control the extra heat to the other areas of my finished piece.
I like to use a heat gun any time I am “clearing” Clear LS because I enjoy watching the process and I can control the extra heat to the other areas of my finished piece.

Once the piece is completely cool, use the Needle Tool, Dremel drill, pin drill, or spring drill to make a hole in the top of the pendant. Add a jump ring and chain.
- Choosing a selection results in a full page refresh.
- Opens in a new window.