
Liquid Sculpey Inclusions Pendants
Liquid Sculpey Inclusions Pendants
Read More
Inclusions: It’s what’s on the inside that counts
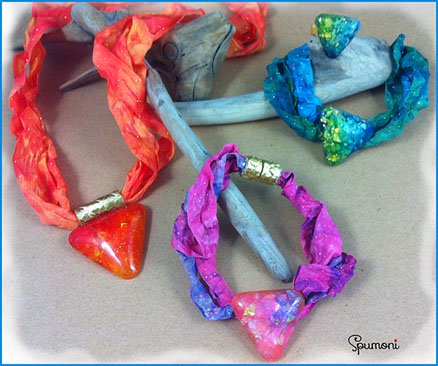
I was thrilled when I obtained my first bottle of Sculpey CLEAR Liquid Bakeable Clay. It really is different from any product I’ve used and I really enjoy experimenting with it. These are jewelry pieces created with chalk tinted Sculpey Clear poured into molds, inclusions were added, pieces were baked and glazed.
Design by Shirley Rufener
Read Less
ADDITIONAL SUPPLIES
Iridescent glitter flakes in clear white
Project Instructions
DO NOT USE on unprotected surfaces. We recommend working on the Sculpey clay mat, wax paper, metal baking sheet, or disposable foil. Start with clean hands and work surface area. Bake on oven-proof glass or metal surface at 300 °F (150 °C) for 20 minutes For best baking results, use an oven thermometer. DO NOT USE MICROWAVE OVEN. DO NOT EXCEED THE ABOVE TEMPERATURE OR RECOMMENDED BAKING TIME. Wash hands after use. Baking should be completed by an adult. Begin by preheating oven to 300 °F (150 °C). Test temperature with oven thermometer for perfectly cured clay.
Squeeze out 3 quarter size puddles of Liquid Clear onto your work mat. Scrape pastel chalk colors over puddles with an X-Acto knife then mix each color with a toothpick. Choose colors that blend together such as blue, green, yellow. You know they will blend as blue and yellow make green. I used red, orange and yellow on the necklace and for the second bracelet I used deep pink, white and purple.
Scoop up the tinted Sculpey Clear using the rubber tip chisel end of the Sculpey ball tool and add the tints as shown for a variegated look. Try not to overfill the mold. The colors will blend together a little and that is fine.

Place your mold on a tile and bake as directed on the bottle of liquid clay you are using. When you take the mold out of the oven, immediately submerge it under ice water in a shallow pan or bowl. This creates the clearest results. Remove when cool.
Sand the surface just enough to make it smooth using 800 grit sand paper, rinse under water and allow to dry. Apply 2 to 3 coats of a polymer clay friendly glaze for a high shine.
To make the iridescent pendant:Make sure mold is clean and dry, then squeeze a small puddle of Liquid Clear Sculpey into your mold cavity. Coat the cavity by moving the liquid to all areas with your finger or clay dedicated paintbrush. Do not wait for the liquid to settle. Immediately sprinkle an even layer of iridescent glitter flakes into the cavity to cover the clear liquid. *Use less flakes than shown. I wanted to make sure you could see them.

There are so many ways to use these beautiful stones for your projects. I added a clay tube bead bail to the top of the backside of the red-orange stone with a large enough hole for three strands of ribbon cord for the necklace. The bracelets were made almost the same although I added a clay tube bead on the back of the stones to hide them. The clasps are just a tube bead with a tiny disk super strong magnet inserted into one end of each bead. The cords were then glued into the opposite end of the bead. Variations of these stones are included in my upcoming Craft E Tutorial titled “Polymer & Pastels” to be released at the end of June. The date will be announced on my website: www.ShirleyRufener.com