
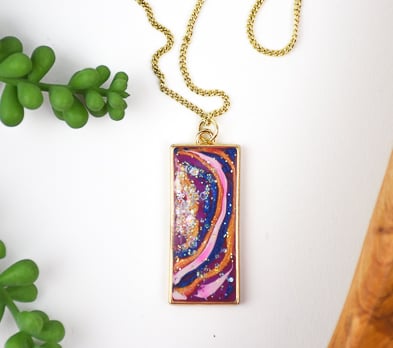
Liquid Sculpey® Floating Agate Pendant
Liquid Sculpey® Floating Agate Pendant
Designed by Amy Koranek
Read More
Read Less
This tutorial presents just one way that the look of agate can be achieved. Try this one or explore your own technique to create a natural looking piece inside of a floating bezel.
TIME TO COMPLETE:90 Minutes to make and bake
ADDITIONAL SUPPLIES
- Paper towel
- Piece of smooth clean glass
- Bright gold tone bezel frame
- Small silicone baking cup
- Very small measuring spoon or baby spoon
- Heat gun
- X-acto style knife
- Glitter - I used Mr. Nola’s Glitter in the color Ellen #452 - it’s a glitter with mixed sizes in it
- 6 mm Bright gold tone jump ring
- Flat nose pliers
- Bright gold tone necklace chain with clasp
Project Instructions
- Getting Started with Liquid Sculpey:
- Baking:
First, it’s important to seal the edges of the bezel so that the colors of Liquid Sculpey® that we apply later won’t leak out from underneath the bezel frame. Lay the bezel frame on a piece of glass and squirt a thick bead of Translucent Liquid Sculpey® (TLS) around the outside edges of the bezel.

Bake the bezel on the glass to cure the TLS. We will continue to work out the design with the bezel attached to the glass for the rest of the project.

After thoroughly stirring the Clear Liquid Sculpey (LS), pour some into the bottom of a small silicone cup.

Add one drop of purple alcohol ink.

Stir completely. Most alcohol inks will deepen in color during baking, so if necessary, you might want to test your colors first.

Fill the bezel frame with the Clear purple LS so that it is only halfway filled to level. This will leave plenty of room for the other colors to be added.

Squirt very thin lines of White LS and Gold LS leaving spaces between them for the Clear purple to show through.

Use the tip of the Needle Tool to help move the colors as necessary. You can use the tip of the Needle Tool dipped into the Clear purple to add tiny amount of the Clear purple to some of the thicker lines of White and Gold.

Add a very small amount of glitter to one area using a very small spoon.

Bake the bezel on the glass following the baking instructions for LS. While the glass is still hot, add heat to the piece using a heat gun to make the colors even deeper and shinier. Using the heat gun while the piece is hot from the oven, makes the process much faster since the piece is already hot. Be sure to use hand protection while handling hot items. Leave the piece on the glass. Hold the heat gun about 4 inches away. Place the heat setting on HI and move the heat constantly in a circular motion over it. You will see the surface of the baked piece take on a shine. When you see the shine, remove the heat.
Allow the glass to cool completely. Peel the TLS border away from the outside of the bezel. If your TLS border is really stuck, you can use an X-acto style craft knife to help trim it away.
Allow the glass to cool completely. Peel the TLS border away from the outside of the bezel. If your TLS border is really stuck, you can use an X-acto style craft knife to help trim it away.

Your finished piece is ready for a jump ring to be added so that you can wear it on a coordinating chain.

- Choosing a selection results in a full page refresh.
- Opens in a new window.